Genesis began as "'horn removal' or: deconstructing an A5/A7/828? " on the AUB.
'horn removal' or: deconstructing an A5/A7/828?
Simply put, You can get close, but no it's not practically possible to save both the horn flare and the cabinet.
Advantage: Cabinet
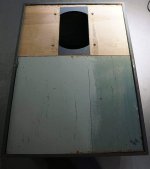
The 828's top and sides are 5/8" paperboard, and so once gutted they are not very good except to me as square starting point with ok enough cosmetics.
So we concentrated on salvaging the baffle (I barely do straight lines, let alone new circles) to mount a GPA 416-8C in a reasonably rigid ~12 ft3 ish sealed box - for about half the 416 spec'd Vas (iirc).
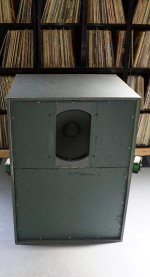
enter: Voice of the Futon MKI
- Innards were gutted save for the corner blocks left in place.
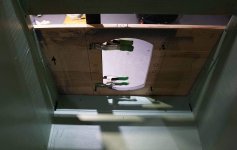
- slanted horn board removal leaves dado'd slots visible in the front, these are filled.
- existing front face was reinforced, extended with wood support pieces salvaged from a futon. This makes a continuous seat for the full-length removable front baffle.
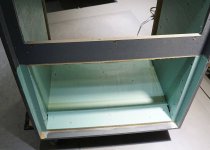
- Top and Bottom are reinforced with 3/4 ply (good stuff), sides are 3/4 (probably flooring ply). Having left the corner blocks intact forced cutting these into jigsaw shapes: boo.
All additions screwed (probably too many) and glued with generous application of PL Premium, such that we're probably approaching constrained layer dampening of a sort.
- rear panel seat was given an additional insert step (pine) for better sealing, better rear panel screw bite.
- rear panel (not paperboard) 2x4 is removed (paucity of glue, popped right off!) and was glued and screwed with the nicer (some sort of hardwood) pre-finished pieces from the futon
The front panel/baffle is mocked up, i.e. screwed but not glued yet, as I want to leave it open for modification or revision for now. Front panel screw pattern matches the rear for interchangeability.
Finally, steel from victim futon #2 was added to the exterior face of the front panel for rigidity and reinforcement. Attached from the rear, it joins the baffle with the filler panel.
Unfortunately, I've not yet been able to remove the baffle without some unsightly damage to the exterior face. along the top edge. And note that the opening is offset. This forces orientation as seen for woofer clearance with the cabinet's panel seat.
The paint scheme is 'Accidental Mondrian'.
Next up... Voice of the Futon MKII with EF styling package!
'horn removal' or: deconstructing an A5/A7/828?
Simply put, You can get close, but no it's not practically possible to save both the horn flare and the cabinet.
Advantage: Cabinet
The 828's top and sides are 5/8" paperboard, and so once gutted they are not very good except to me as square starting point with ok enough cosmetics.
So we concentrated on salvaging the baffle (I barely do straight lines, let alone new circles) to mount a GPA 416-8C in a reasonably rigid ~12 ft3 ish sealed box - for about half the 416 spec'd Vas (iirc).
enter: Voice of the Futon MKI
- Innards were gutted save for the corner blocks left in place.
- slanted horn board removal leaves dado'd slots visible in the front, these are filled.
- existing front face was reinforced, extended with wood support pieces salvaged from a futon. This makes a continuous seat for the full-length removable front baffle.
- Top and Bottom are reinforced with 3/4 ply (good stuff), sides are 3/4 (probably flooring ply). Having left the corner blocks intact forced cutting these into jigsaw shapes: boo.
All additions screwed (probably too many) and glued with generous application of PL Premium, such that we're probably approaching constrained layer dampening of a sort.
- rear panel seat was given an additional insert step (pine) for better sealing, better rear panel screw bite.
- rear panel (not paperboard) 2x4 is removed (paucity of glue, popped right off!) and was glued and screwed with the nicer (some sort of hardwood) pre-finished pieces from the futon
The front panel/baffle is mocked up, i.e. screwed but not glued yet, as I want to leave it open for modification or revision for now. Front panel screw pattern matches the rear for interchangeability.
Finally, steel from victim futon #2 was added to the exterior face of the front panel for rigidity and reinforcement. Attached from the rear, it joins the baffle with the filler panel.
Unfortunately, I've not yet been able to remove the baffle without some unsightly damage to the exterior face. along the top edge. And note that the opening is offset. This forces orientation as seen for woofer clearance with the cabinet's panel seat.
The paint scheme is 'Accidental Mondrian'.
Next up... Voice of the Futon MKII with EF styling package!
Attachments
Enter: Voice of the Futon MKII EF!
and now for Voice of the Futon MKII EF
EF is for the Extra Futon styling package. Limited edition, because now we've just about used up all of the futon.")
This primarily applies to the end nearest the 416 where it replaced the 3/4 ply.
So what did we learn from MKI, and improve on MKII?
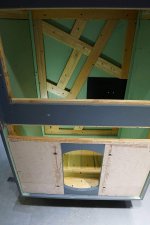
- eschewed are the wooden support pieces for build out of the front baffle seat. Instead we went right in with the larger prefinished hardwood pieces.
- corner blocks: this time, removed. A bit more effort initially, but worth it to save the jig-saw piece nature of the interior panels down the line.
- the existing front panel cross-tie is reinforced, with expectation of further reinforcement (brackets) and to serve as a tie-in point for the new front panel.
We'll likely also apply this approach retroactively to the MKI, and possibly lose the front steel in the process.
- additional rear panel bracing where MKI revealed a hot spot. (also to be applied to MKI retroactively)
- finally, we forgot that we had some almost-Altec Green paint for the front panel/baffle.
What next? Experiments in internal post-tensioning to drive box resonance up.
and now for Voice of the Futon MKII EF
EF is for the Extra Futon styling package. Limited edition, because now we've just about used up all of the futon.
This primarily applies to the end nearest the 416 where it replaced the 3/4 ply.
So what did we learn from MKI, and improve on MKII?
- eschewed are the wooden support pieces for build out of the front baffle seat. Instead we went right in with the larger prefinished hardwood pieces.
- corner blocks: this time, removed. A bit more effort initially, but worth it to save the jig-saw piece nature of the interior panels down the line.
- the existing front panel cross-tie is reinforced, with expectation of further reinforcement (brackets) and to serve as a tie-in point for the new front panel.
We'll likely also apply this approach retroactively to the MKI, and possibly lose the front steel in the process.
- additional rear panel bracing where MKI revealed a hot spot. (also to be applied to MKI retroactively)
- finally, we forgot that we had some almost-Altec Green paint for the front panel/baffle.
What next? Experiments in internal post-tensioning to drive box resonance up.
Attachments

So we concentrated on salvaging the baffle (I barely do straight lines, let alone new circles) to mount a GPA 416-8C in a reasonably rigid ~12 ft3 ish sealed box - for about half the 416 spec'd Vas (iirc).
Hmm, empty cab - front/rear baffles, screw blocks, driver 0.2 ft^3 [Vid], I get right at 13.8 ft^3, so did I miss something?
Driver still 8.0625" down from inside top plate [id.]?
GM
Hmm, empty cab - front/rear baffles, screw blocks, driver 0.2 ft^3 [Vid], I get right at 13.8 ft^3, so did I miss something?
Driver still 8.0625" down from inside top plate [id.]?
GM
Thanks always GM. Yes, the vol. estimate of 12-ish is probably on the low side. I too originally came up with 13.x but I didn't want to be too optimistic. I'll measure the inside dims next time I open them up.
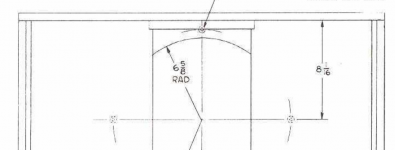
GPA sheet specs 'Br' depth as 6 15/16".
Attachments
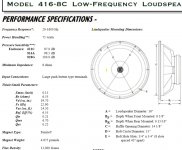
Hmm, empty cab - front/rear baffles, screw blocks, driver 0.2 ft^3 [Vid], I get right at 13.8 ft^3, so did I miss something?
GM
Thanks as always GM.
Finally got the boxes open (trying the 515s instead of 416s)...
Interior dims:
21" d
26" w
38.5" h
depth measurement roughly accounts for front/rear bracing and cavities, might be a touch on the low side (int. vol. might be slightly more) if anything.
Using those dims, I get 12.16 cuft, before accounting for the driver cone/basket.
Driver still 8.0625" down from inside top plate [id.]?
GM
Location of driver center ('dustcap') is
Measured from the exterior:
- 9.0" to the nearest lip (inner face).
- 9.625" to the cabinet exterior face (i.e. + the 5/8" paperboard)
Extrapolated for the interior:
- ~ 8.375" from the nearest face
- Status
- This old topic is closed. If you want to reopen this topic, contact a moderator using the "Report Post" button.
- Home
- Loudspeakers
- Multi-Way
- Enter: Voice of the Futon [Dehorning the Altec 828]