Hello,
I need to build a 24L passive radiator cabinet for my next speaker project. I have this idea that I'm sure somebody else has tried before, but I'm having trouble finding example builds on the net... Causing me to think maybe this isn't such a hot idea after all.
My cabinet will be 9" deep, 13" wide, and 20" high. I'd like to cut 9 x (20"x13"x1") panels out of baltic birch, use a jigsaw to cut out the insides then glue those panels together. The front and back panels would have cutouts for the drivers and stuff and would have the BB veneer on the face. The sides, top, and bottom would be exposed ply.
I have a few questions:
1) Any big downsides to this approach besides wasting more wood?
2) Is the smoothness or shape of the inside of the cabinet important as long as I get the internal volume right? (I'm planning to have average 1" thick around for a sturdy build and I was thinking of cutting out an odd shape to defeat any standing waves. Does the inside have to be smooth?)
3) I imagine these looking great. Has anybody actually done this and found differently?
4) For the front baffle, I wanted to round-over the sides and top, which would expose the ply... Has anybody done this and does it look good? It's better for sound, but if the look isn't awesome, I would just go with a square edge instead.
5) tips on sealing the inside to prevent any leaks?
Thanks!
Colin
Search on translam, that's how it's normally described.
1) No
2) No need for smooth, varied surface is better but only slightly as the variation will be small relative to the wavelengths in-cab.
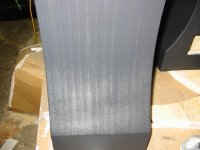
3) They can separate with humidity and other issues can occur, but aside from that, it's a darned attractive way to build a speaker.
4) Yup. Looks awesome.
5) Your layers should be well-glued to ensure no leaks, you can use diluted woodglue as a coating for extra sealing power.
1) No
2) No need for smooth, varied surface is better but only slightly as the variation will be small relative to the wavelengths in-cab.
3) They can separate with humidity and other issues can occur, but aside from that, it's a darned attractive way to build a speaker.
4) Yup. Looks awesome.
5) Your layers should be well-glued to ensure no leaks, you can use diluted woodglue as a coating for extra sealing power.
I’m not sure what you are describing before the questions. A box as big as you are making should have at least a brace between the back & the baffle. We use full top-bottom holey braces for that baffle. We also take the opportunity to use that brace to distribute driver reactive force to the rest of the cabinet by fitting it tight to the driver magnet.
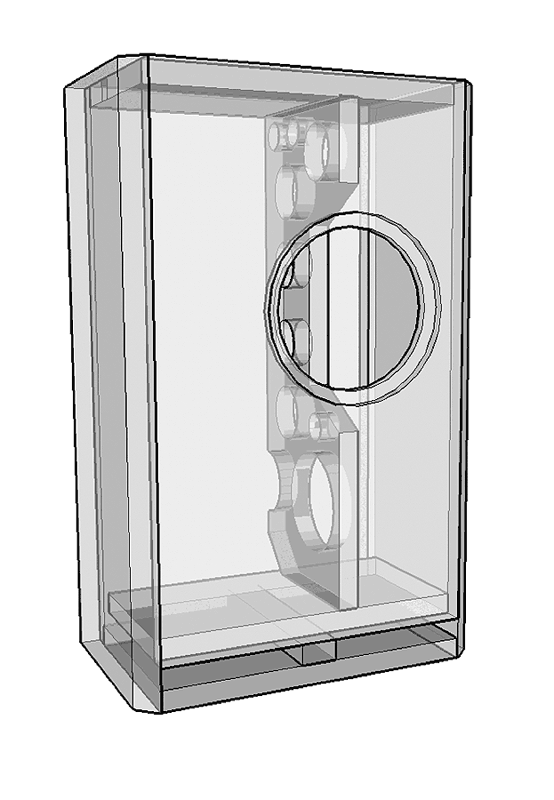
25mm BB is overkill for a box this small. 18mm is more than sufficient. We have built bigger box (but with appropriate internal structure) out of 15mm.
There are lots of examples of natural plywood boxes… try looking on the FR Forum. You’ll find even more unfinished ply boxes as people hook them up to listen before finishing and they don’t get finished :^)
Can’t find any but i know they ar eout there.
I have seen corners flat, with roundover, and with chamfers (what we typically do).
If you cut the panels well you should have no leaks,
dave
Now, with badmans comment, i understand that you mean translam construction.
To my mind a huge waste of material and you end up using the ply in a direction in which it is not meant to be used — so have to have thicker walls. And i have seen them “break” more often than is comfortable.
It’s only advantage is the ability to “easily” build strange shapes — expect a whole lot of sanding.. If you are doing a rectangular box do yourself a favour and just use the ply it is meant to be used.
And yes, you will find natural ply translam boxes illustrated here.
dave
3) They can separate with humidity...
If you are worried about that you coul use marine ply.
When Dave says a whole lot of sanding, he isn't kidding.
And you're sanding a lot of glue, and power tools will have fun with all the grain directions(and clog media very quickly).
So a lot of that whole lot o'fun will be by hand.
But if you are willing and able, it can look very cool.
Have fun, show us pictures!
p.s. seal w/epoxy!
And you're sanding a lot of glue, and power tools will have fun with all the grain directions(and clog media very quickly).
So a lot of that whole lot o'fun will be by hand.
But if you are willing and able, it can look very cool.
Have fun, show us pictures!
p.s. seal w/epoxy!
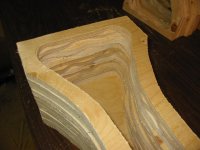
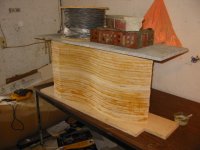
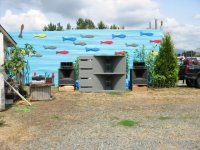
Yes many have made them including moi. I too used the front to back laminates rather than stacking them and the purpose was for the funky shape. I cut them wavy on the inside thinking that would help with standing waves. Turns out to be incorrect
The inside leftovers I repurposed by cutting them into fish shapes and mounting them on a cruddy old wall in back that I painted first.
The inside leftovers I repurposed by cutting them into fish shapes and mounting them on a cruddy old wall in back that I painted first.
Attachments


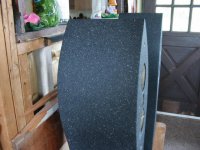
Troels Glavensen built his Ekta mk2 cabinet with a front baffle which uses the exposed side plys of Baltic Birch across the entire baffle width.
EKTA-mkII
======
Another idea with can also reduce baffle diffraction distortion is to stack up 2-thick front baffle boards, and cut (left, top, right) 45-degree edge bevels to expose the wood plys just along the outside edges. A grill cloth could be sized to still expose these side plys.
EKTA-mkII
======
Another idea with can also reduce baffle diffraction distortion is to stack up 2-thick front baffle boards, and cut (left, top, right) 45-degree edge bevels to expose the wood plys just along the outside edges. A grill cloth could be sized to still expose these side plys.
The easiest way to get the exposed ply look is to simply buy it, as pictured.
Your access to this site has been limited
If the link doesn't work (they are rebuilding the website), look for "MAXI EDGE PLYWOOD PANELS"
The cheapest and least wasteful way to get the exposed ply look is to DIY it from a bunch of scraps and offcuts. I did exactly this for round-overs on a current build, see post 61:
pattern control below 400Hz
I agree with Badman's answers (post 2). To prevent the problem he mentions "They can separate with humidity"
a) use waterproof glue
b) "stitch" the layers together
-by hammering dowel "nails" into predrilled, glue filled holes
OR
-with normal screws
OR
-with normal screws
Attachments
Think about using LVL or Parallam type products. You might be able to get your hands on a few beam cutoffs. Hope you've got some serious woodworking equipment to put them to good use, but they'd be anisotropic in strength like you're hoping plus a lot less likely to delam on you.
When Dave says a whole lot of sanding, he isn't kidding.
And you're sanding a lot of glue, and power tools will have fun with all the grain directions(and clog media very quickly).
So a lot of that whole lot o'fun will be by hand.
But if you are willing and able, it can look very cool.
Have fun, show us pictures!
p.s. seal w/epoxy!
I don’t know how much woodworking experience Dave and boswald have, but there is no reason to believe excessive sanding will be necessary. If you do the glue ups properly with the right amount of glue a small bead will develop along each seam from the glue oozing out between the boards when you clamp them together.
Do not attempt to wipe it off while the glue is wet. You will make a huge mess and then a lot of sanding will be necessary.
Instead let the beads dry for about 20 to 30 minutes until they become firm, but not fully hardened. Then use a razor blade or sharp chisel and just peel away the beads of glue. Done carefully there will be almost no glue left on the surface of the wood. A light sanding may be necessary in spots, but certainly nothing like the situation that boswald described.
I wasn't talking about excess from assembly, but the -1 layers of the plywood(12 in 13 layer,etc). Squeezeout is a doddle.
And Rob's method above pretty well takes care of any size mismatches. Again, I see no reason to have to resort to excessive sanding with a well thought out build plan.
Thanks all... I have access to a CNC, a laser cutter, a belt sander and pretty much anything else I might like to learn to use. I have no real woodworking experience, but I want to gain it.
Honestly, I'm not worried about the waste since the components have cost me way more than the wood. It will be a 2-way design with an 8" woofer (Dayton DSA215), a horn (B&C 250 driver mated to a Faital-Pro LTH102 waveguide), and a passive radiator (Dayton DSA270-PR). Last night I changed the PR and increased the volume to 27L. Cross-over will be active. Wood cost is really the least of my financial issues with this build. I just want the coolest looking and best sounding speakers and I want to build them myself - no matter how long it takes. I'm already 3 months in on research of how to design a speaker.
With the "translam" design, do you still recommend a vertical brace? I suppose I could use the cut-out from any one of the middle panels to create one.
Dave, we had talked about your (eventual) designs for the A7MS a while back by email. I am still interested in building that set of speakers, but probably for a friend, once those drivers become available... I've designed the above for my living room and I'm committed to it now having purchased the components and exhausted the budget already")
Honestly, I'm not worried about the waste since the components have cost me way more than the wood. It will be a 2-way design with an 8" woofer (Dayton DSA215), a horn (B&C 250 driver mated to a Faital-Pro LTH102 waveguide), and a passive radiator (Dayton DSA270-PR). Last night I changed the PR and increased the volume to 27L. Cross-over will be active. Wood cost is really the least of my financial issues with this build. I just want the coolest looking and best sounding speakers and I want to build them myself - no matter how long it takes. I'm already 3 months in on research of how to design a speaker.
With the "translam" design, do you still recommend a vertical brace? I suppose I could use the cut-out from any one of the middle panels to create one.
Dave, we had talked about your (eventual) designs for the A7MS a while back by email. I am still interested in building that set of speakers, but probably for a friend, once those drivers become available... I've designed the above for my living room and I'm committed to it now having purchased the components and exhausted the budget already
Rob,
That sounds like great advice in terms of build plan.
I'll cut 1mm extra on all sides and trim to size with a hand router. (The CNC can't handle 9" thickness, unfortunately). That is the excuse I need to learn to use a hand router
Also, I was planning to stitch together the layers with screws, which will hopefully help prevent the layers from separating.
Colin
Translam
If it is for a passive radiator box then the translam build may be overkill. I built a sealed box with translam and a 1/2" Al plate in front with bracing at 2" thick for a sealed box and it worked. It is easy to do with less woodworking skills if you have the great jigsaw and a nail gun to help with the gluing.
If it is for a passive radiator box then the translam build may be overkill. I built a sealed box with translam and a 1/2" Al plate in front with bracing at 2" thick for a sealed box and it worked. It is easy to do with less woodworking skills if you have the great jigsaw and a nail gun to help with the gluing.
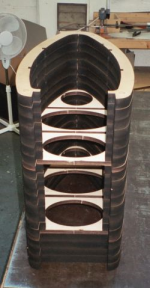
I did vertical braces in mine by cutting slots into the inner sides and then sliding the braces in once glued.
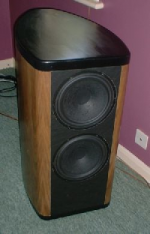
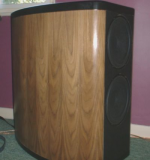
Dug up some old pics I can't believe it was 16 years ago! Finish was walnut veneer. You can see the slots in the 1st pic I hadn't put the braces in yet.
Rob.
Dug up some old pics I can't believe it was 16 years ago! Finish was walnut veneer. You can see the slots in the 1st pic I hadn't put the braces in yet.
Rob.
Attachments
Rob,
That sounds like great advice in terms of build plan.
I'll cut 1mm extra on all sides and trim to size with a hand router. (The CNC can't handle 9" thickness, unfortunately). That is the excuse I need to learn to use a hand router
Also, I was planning to stitch together the layers with screws, which will hopefully help prevent the layers from separating.
Colin
This is very difficult to do with a hand router, because you only have the 1" width of the inside piece frame to balance it on. The router can then easily tip and put a gouge into the edge. Even with experience it's hard to prevent the router from tipping as you move it around.
A much better method it to use a router table to trim the excess so there is no possibility of tipping the bit.
Also, I would leave more than 1 mm excess on the boards. With 1 mm, which is only 1/32" the glue up alignment is much more difficult than it has to be. About 1/4" oversize would leave 1/8" to be trimmed off on each edge, which is no problem for the router trim bit.
My router table is just a 3 foot square of mdf with a hole / 4 bolt holes in the middle for a normal hand router to bolt in. It needn't be complicated.
Another option is to made a longer 'foot' for the hand router if you cannot hold it in place on the narrow strips (one of mine has a 12" x 4" base permanently attatched) edit : long enough to bridge both sides for stability.
If the Colin has access to cnc then he can put in location holes for dowels / pins to locate properly before routing.
Rob.
Last edited:
- Status
- This old topic is closed. If you want to reopen this topic, contact a moderator using the "Report Post" button.
- Home
- Loudspeakers
- Multi-Way
- Exposed ply cabinet build