Hi everyone. I've browsed here for a couple of years but never posted because I don't feel like I have the knowledge that most of you have. That's why I decided to go with a kit for my first DIY build. Based on the feedback I've heard on CSS and talking with one of the owners, I decided to go with the Criton 1TD kit. I wanted to post my build because there isn't a whole lot of info out there about these guys yet and based on what I have seen so far and their customer service, they deserve a lot more business. I also want to apologize because I can't figure out how to insert images in line with the text and they are all showing up as small thumbnail attachments. I'll try to post them in the order that I'm talking about them.
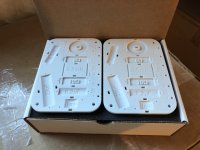
I ordered the kit with the knockdown cabinet and the standard crossovers. The kit came packaged very nicely and damage free. I forgot to take pictures before pulling everything out, but they wrap the MDF panels up very well to prevent damage and cleverly use the foam for the inside of the boxes to further insulate all the important parts.
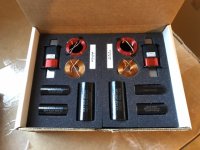
What really stands out about this kit is the crossover boards and packaging. I've replaced capacitors in some of my other speakers before but I've never built one from scratch and looking at some of the other kits, I was a little intimidated by trying to read from a schematic and make sure everything was assembled correctly. I don't really even know how to check that it is once everything is hooked up. The crossover boards from CSS, which they call SmartNode boards, are super cool. All the components are labeled with little cutouts on the top and on the bottom, the holes the wires go through are all labeled with letters. I may not be the sharpest tool in the shed, but I'm still able to figure out which hole is square and which one is round The packaging also makes them look really high end, which is a nice touch. You feel like you are opening a Christmas present
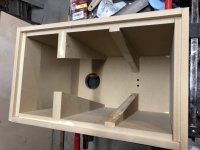
I'm definitely a better woodworker than speaker builder, but I decided to go with the cabinets from CSS to save some time on the construction and minimize my time working in the garage at this time of year. The cabinets appear well designed, with rabbited edges that make alignment of the panels really easy. It also creates a much stronger joint and basically eliminates the potential for getting an air leak at the joint. The only thing I didn't really like were the braces. As you can see from the errant glue on one side of a brace in one of the pictures below, they are long and narrow wedges and if you aren't paying attention, you can easily end up trying to glue the wrong side. It's also important to note that the braces around the woofer have to be aligned with the narrow part at the front or they will block part of the cutout for the woofer. I would prefer to see a brace that is more idiot proof but these still work fine. One other note for anyone who hasn't assembled a cabinet with all rabbited edges before: Leave some room to push the baffle in. If you clamp too tight, it will be almost impossible to push it flush where it needs to go.
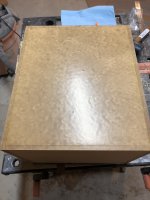
If you have enough clamps, you can put both cabinets together in about an hour. This is really nice because if you start early in the day, you can be working on your finishing work by early afternoon. Depending on how fast you work or how you plan to finish, you could almost get the whole thing done over a long 3 or 4 day weekend. I will be veneering mine in rosewood and wanted to share a couple tips for how I do it, since this might be what I'm best at.
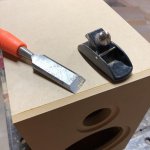
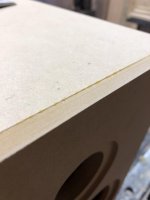
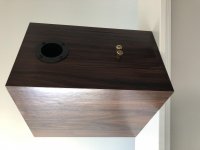
One of the images below shows the seam on the cabinet after glue up. As you can see, there is a little bit of glue and about a 1mm edge where the clamps didn't quite press hard enough. This might all be visible under the veneer if not taken care of. I like to use a combination of a sharp chisel or a small hand plane to remove the glue and edge and then hit it with a little bit of 100 grit sand paper on a block to level it out.
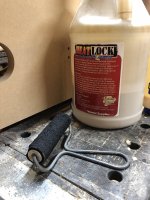
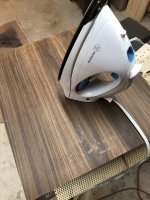
For attaching the veneer, I don't have access to a cold press, so I don't work often with raw veneer. I mainly stick to paper backed. When I'm doing paper backed, I like to use the Heat Lock glue from Supporting Cabinet Makers and Woodworkers for 15 Years! - Exotic Wood Veneer, Vacuum Press Systems, Tools and Supplies. However, I have had some issues with this in the past when I first started using it and my technique is slightly different than the instructions. I developed my technique because I can't always apply the veneer within the couple of hours after drying like the directions specify. I like be able to put a piece on after I get home from work and prep the next piece for glue, which depending on the temperature, might not be dry before I go to bed. This led to problems with the glue activating under the heat the next day. What I do now when I can't apply the veneer quickly after drying is apply an extremely thin layer of wet glue to the substrate only (not on the veneer itself). It should feel like your roller is tacky and sticking as you roll it across the cabinet and you should still be able to see the dried glue underneath. Then you can position your piece and heat with the iron. The fresh glue will get rubbery once the heat is applied and dry out creating a bond between the two pieces. I've done this numerous times and have had no fails yet. Just make sure your wet glue is really thin.
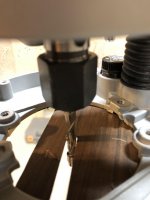
For trimming, I like to use a spiral down-cut flush trim bit. This helps prevent tear out and keeps the veneer pressed to the substrate while trimming so you don't get any edges lifting. Unfortunately, I realized I grabbed the wrong bit right after I took the picture and was using a spiral up-cut
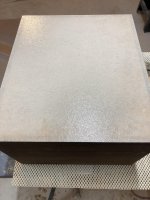
For finish, I will be using General Finishes Arm-R-Seal. It is a much better product than the wipe on Minwax stuff and really is about the same price. It wipes on much easier because it is a little thicker, which makes it easy to get a nice finish in less coats and I don't have to worry about streaking as much, especially if is a larger work surface.
So over the 4 day weekend, I got the cabinets completely glued on Friday night and started doing the veneer on Saturday morning. I got two sides a day on and was done by Christmas eve. I wired up the crossovers while waiting on the glue to dry for veneer. Each crossover took about 1.5-2 hours but I was going really slow to make sure I had everything correct.
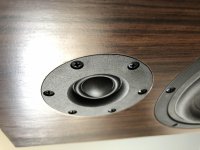
I got impatient and wanted to get these tested before the full finish is complete, so I hooked everything up put about 2 hours of listening into them on Christmas day. Probably not the most ideal situation since the drivers were clamped into place, but so far I am really liking them. The bass is authoritative and deep from a bookshelf speaker and the tweeter has a lot of detail without sounding bright. I have a pair of Monitor Audio Silver 1 and I already like the Criton better. It seems the Criton is able to retrieve more low level detail and has an overall more neutral sound. Color me impressed.
I'll post some more pictures once I get the cabinets completely finished and some more time on them for listening impressions. I should be able to finish these up by January 1 given the extra time off I'll get.
I ordered the kit with the knockdown cabinet and the standard crossovers. The kit came packaged very nicely and damage free. I forgot to take pictures before pulling everything out, but they wrap the MDF panels up very well to prevent damage and cleverly use the foam for the inside of the boxes to further insulate all the important parts.
What really stands out about this kit is the crossover boards and packaging. I've replaced capacitors in some of my other speakers before but I've never built one from scratch and looking at some of the other kits, I was a little intimidated by trying to read from a schematic and make sure everything was assembled correctly. I don't really even know how to check that it is once everything is hooked up. The crossover boards from CSS, which they call SmartNode boards, are super cool. All the components are labeled with little cutouts on the top and on the bottom, the holes the wires go through are all labeled with letters. I may not be the sharpest tool in the shed, but I'm still able to figure out which hole is square and which one is round
The packaging also makes them look really high end, which is a nice touch. You feel like you are opening a Christmas present I'm definitely a better woodworker than speaker builder, but I decided to go with the cabinets from CSS to save some time on the construction and minimize my time working in the garage at this time of year. The cabinets appear well designed, with rabbited edges that make alignment of the panels really easy. It also creates a much stronger joint and basically eliminates the potential for getting an air leak at the joint. The only thing I didn't really like were the braces. As you can see from the errant glue on one side of a brace in one of the pictures below, they are long and narrow wedges and if you aren't paying attention, you can easily end up trying to glue the wrong side. It's also important to note that the braces around the woofer have to be aligned with the narrow part at the front or they will block part of the cutout for the woofer. I would prefer to see a brace that is more idiot proof but these still work fine. One other note for anyone who hasn't assembled a cabinet with all rabbited edges before: Leave some room to push the baffle in. If you clamp too tight, it will be almost impossible to push it flush where it needs to go.
If you have enough clamps, you can put both cabinets together in about an hour. This is really nice because if you start early in the day, you can be working on your finishing work by early afternoon. Depending on how fast you work or how you plan to finish, you could almost get the whole thing done over a long 3 or 4 day weekend. I will be veneering mine in rosewood and wanted to share a couple tips for how I do it, since this might be what I'm best at.
One of the images below shows the seam on the cabinet after glue up. As you can see, there is a little bit of glue and about a 1mm edge where the clamps didn't quite press hard enough. This might all be visible under the veneer if not taken care of. I like to use a combination of a sharp chisel or a small hand plane to remove the glue and edge and then hit it with a little bit of 100 grit sand paper on a block to level it out.
For attaching the veneer, I don't have access to a cold press, so I don't work often with raw veneer. I mainly stick to paper backed. When I'm doing paper backed, I like to use the Heat Lock glue from Supporting Cabinet Makers and Woodworkers for 15 Years! - Exotic Wood Veneer, Vacuum Press Systems, Tools and Supplies. However, I have had some issues with this in the past when I first started using it and my technique is slightly different than the instructions. I developed my technique because I can't always apply the veneer within the couple of hours after drying like the directions specify. I like be able to put a piece on after I get home from work and prep the next piece for glue, which depending on the temperature, might not be dry before I go to bed. This led to problems with the glue activating under the heat the next day. What I do now when I can't apply the veneer quickly after drying is apply an extremely thin layer of wet glue to the substrate only (not on the veneer itself). It should feel like your roller is tacky and sticking as you roll it across the cabinet and you should still be able to see the dried glue underneath. Then you can position your piece and heat with the iron. The fresh glue will get rubbery once the heat is applied and dry out creating a bond between the two pieces. I've done this numerous times and have had no fails yet. Just make sure your wet glue is really thin.
For trimming, I like to use a spiral down-cut flush trim bit. This helps prevent tear out and keeps the veneer pressed to the substrate while trimming so you don't get any edges lifting. Unfortunately, I realized I grabbed the wrong bit right after I took the picture and was using a spiral up-cut
For finish, I will be using General Finishes Arm-R-Seal. It is a much better product than the wipe on Minwax stuff and really is about the same price. It wipes on much easier because it is a little thicker, which makes it easy to get a nice finish in less coats and I don't have to worry about streaking as much, especially if is a larger work surface.
So over the 4 day weekend, I got the cabinets completely glued on Friday night and started doing the veneer on Saturday morning. I got two sides a day on and was done by Christmas eve. I wired up the crossovers while waiting on the glue to dry for veneer. Each crossover took about 1.5-2 hours but I was going really slow to make sure I had everything correct.
I got impatient and wanted to get these tested before the full finish is complete, so I hooked everything up put about 2 hours of listening into them on Christmas day. Probably not the most ideal situation since the drivers were clamped into place, but so far I am really liking them. The bass is authoritative and deep from a bookshelf speaker and the tweeter has a lot of detail without sounding bright. I have a pair of Monitor Audio Silver 1 and I already like the Criton better. It seems the Criton is able to retrieve more low level detail and has an overall more neutral sound. Color me impressed.
I'll post some more pictures once I get the cabinets completely finished and some more time on them for listening impressions. I should be able to finish these up by January 1 given the extra time off I'll get.
Last edited:
I'm having trouble getting the pictures to upload so I'm going to try and do it in smaller batches.
Attachments
-
 IMG_3464.jpg96.2 KB · Views: 685
 -
 IMG_3465.jpg119 KB · Views: 654
 -
 IMG_3474.jpg649.4 KB · Views: 706
 -
 IMG_3480.jpg627 KB · Views: 294
 -
 IMG_3470.jpg552.3 KB · Views: 602
 -
 IMG_3468.jpg321.9 KB · Views: 624
 -
 IMG_3479.jpg462.9 KB · Views: 260
 -
 IMG_3481.jpg638.8 KB · Views: 281
 -
 IMG_3482.jpg617.2 KB · Views: 303
 -
 IMG_3478.jpg372.1 KB · Views: 333
What I do now when I can't apply the veneer quickly after drying is apply an extremely thin layer of wet glue to the substrate only (not on the veneer itself). It should feel like your roller is tacky and sticking as you roll it across the cabinet and you should still be able to see the dried glue underneath. Then you can position your piece and heat with the iron. The fresh glue will get rubbery once the heat is applied and dry out creating a bond between the two pieces. I've done this numerous times and have had no fails yet. Just make sure your wet glue is really thin.
Thanks for that tip!
What thickness veneer are you using?
It’s standard 10 mil paper backed. I think the veneer itself is 1/42” so that plus the 10 mil paper.

I was hoping to get a lot more done this past weekend, but the veneer (and my wife) had other plans. I only ended up getting the bottoms done and two coats on the rest of the panels.
For those of you who have never worked with rosewood before, it can have a lot of sap and oil. This can make it difficult to get the finish to dry correctly when applied. It's strange, because I've had pieces that have no issues and others that continue to be tacky for days and become very hard to properly finish. There are other woods like this, so here is my tip for finishing them:
What I've done that has worked for me is wipe the wood with mineral spirits first, trying to really rub it in and break down some of the oil. I like the General Finishes Arm-R-Seal wipe on poly for finish. If the first coat stays tacky or really gums up the sandpaper after drying overnight, I do my next coats by putting some mineral spirits on the rage then dipping in the Arm-R-Seal, so it is a thinner coat. If your coats are still having trouble drying, wipe the surface in between coats with mineral spirits. It might take several coats like this, but eventually you will get a solid surface that sands like normal poly.
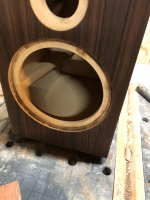
Something new I learned on this build was in relation to the driver cutouts. My flush trim bits have a bearing that made it impossible to trim the veneer around the speaker cutouts. I did some searching online and found other people using a laminate trim bit, which doesn't have an actual bearing but can still flush trim. Watch out with the lack of a true bearing though, as you can see from the picture, I got my router set just a bit too deep and burned some nasty spots in the MDF.
For those of you who have never worked with rosewood before, it can have a lot of sap and oil. This can make it difficult to get the finish to dry correctly when applied. It's strange, because I've had pieces that have no issues and others that continue to be tacky for days and become very hard to properly finish. There are other woods like this, so here is my tip for finishing them:
What I've done that has worked for me is wipe the wood with mineral spirits first, trying to really rub it in and break down some of the oil. I like the General Finishes Arm-R-Seal wipe on poly for finish. If the first coat stays tacky or really gums up the sandpaper after drying overnight, I do my next coats by putting some mineral spirits on the rage then dipping in the Arm-R-Seal, so it is a thinner coat. If your coats are still having trouble drying, wipe the surface in between coats with mineral spirits. It might take several coats like this, but eventually you will get a solid surface that sands like normal poly.
Something new I learned on this build was in relation to the driver cutouts. My flush trim bits have a bearing that made it impossible to trim the veneer around the speaker cutouts. I did some searching online and found other people using a laminate trim bit, which doesn't have an actual bearing but can still flush trim. Watch out with the lack of a true bearing though, as you can see from the picture, I got my router set just a bit too deep and burned some nasty spots in the MDF.
Attachments

Well, things have not gone as smoothly in the finish department as I had hoped. I could not get the Arm-R-Seal to dry completely and finally ended up wet sanding it down with mineral spirits to a flat finish. Once I had wiped that off and let it dry, the finish felt smooth and my fingers finally slid across the surface like it should.
I'm not sure if it is the temperature or still just issues with the Rosewood. I ended up after sanding down, doing two coats of Minwax Polycrylic Satin. It is a water based finish but will stick to oil based finish as long as the finish is dry. Overall, not an ideal scenario but I at least have a cabinet with a dry and smooth finish on it now. I'll be doing final assembly this weekend and will post some more pictures of the inside of the cabinets and crossovers.
I'm not sure if it is the temperature or still just issues with the Rosewood. I ended up after sanding down, doing two coats of Minwax Polycrylic Satin. It is a water based finish but will stick to oil based finish as long as the finish is dry. Overall, not an ideal scenario but I at least have a cabinet with a dry and smooth finish on it now. I'll be doing final assembly this weekend and will post some more pictures of the inside of the cabinets and crossovers.
OK, finally got the final assembly finished earlier this week. A couple things that weren't clear to me were crossover placement, foam placement, port length and how to secure the extension tube, and how to install the binding posts. I emailed CSS and they were quick to respond and very thorough in their response. Here's what they told me and some additional info from my experience of this build:
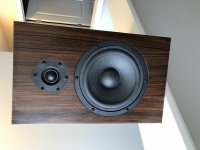
I spent a good amount of time listening on Friday and Saturday, Now that everything is actually fully assembled and not held together with clamps, I can honestly say these speakers are amazing. The bass on this kit is incredible. I think anyone would easily be happy with these without a subwoofer. You probably would have to be listening to dub step at crazy levels to feel the need. I really like this tweeter a lot as well. Lots of detail and air without ever sounding bright. The imaging and soundstage is all there as well. Overall, this is a great speaker for the price. I know a lot of people here talk about how great DIY is and I would say these speakers have convinced me. I think I will be happy with these for a very long time.
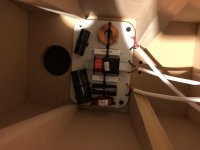
Below are some final assembly and finished pictures.
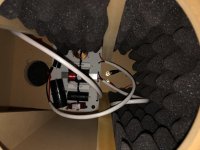
- They said the bottom or back of the cabinet is where the crossover should go, just keep the inductors away from the woofer magnet. Based on the layout of the braces, it was difficult to put the crossover on the bottom and have access to the back screws. I ended up putting them on the back of the cabinet instead of the bottom because it felt easier to reach all the screws. It would be nice if the holes were already pre-tapped though. That would make install a lot easier since it is almost impossible to reach a drill inside one the cabinet is finished. Since it was MDF, I just used pressure to get the screw started.
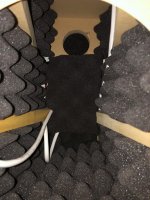
- They said most important things for the foam were to cover the back wall directly behind the woofer and not block the ports and that there should be enough to do the whole cabinet. I told them I had mounted the crossovers on the back and they said that was fine, just cover the top of the crossover with foam but don't try to put the foam under the crossover. The amount of foam was basically perfect to cover the whole cabinet with only a small section above the port not having any covering on the inside.
- They said ports need to be 9" long and you can use electrical tape or glue. I chose electrical tape. It should be noted that with the tape and the extension, it is a tight squeeze into the cutout on the back. Glue might be an easier option. The first one I used way too much tape and while trying to push the port in place it ripped. Even when going down to only one layer of tape, it was tight.
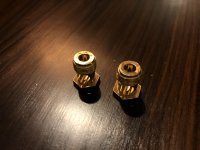
- They said the binding posts are meant to be tapped in with a hammer, just to remove the screw on cap with the coloring before hand because they've seen that part chip/flake before when hammered.
I spent a good amount of time listening on Friday and Saturday, Now that everything is actually fully assembled and not held together with clamps, I can honestly say these speakers are amazing. The bass on this kit is incredible. I think anyone would easily be happy with these without a subwoofer. You probably would have to be listening to dub step at crazy levels to feel the need. I really like this tweeter a lot as well. Lots of detail and air without ever sounding bright. The imaging and soundstage is all there as well. Overall, this is a great speaker for the price. I know a lot of people here talk about how great DIY is and I would say these speakers have convinced me. I think I will be happy with these for a very long time.
Below are some final assembly and finished pictures.
Attachments

Last edited:
- Status
- This old topic is closed. If you want to reopen this topic, contact a moderator using the "Report Post" button.
- Home
- Loudspeakers
- Multi-Way
- CSS Criton 1TD Build and Review