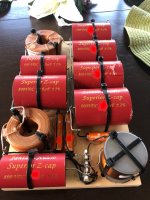
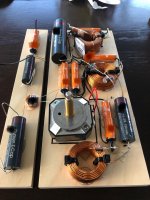
Spending some of my spare time here and there putting the crossovers together. Out of respect to TG I have tried to color out the component values. In case you can’t read the name on the resistors they are Path out of Poland. Component layout works pretty good. Almost everything daisy chains together without adding extra wiring. Everything is mounted to the board with hot glue and silicone, heavy items I also added zip-ties.
As I’m closing in on cabinet design and in ordering custom panels for binding posts and locating the attenuator for the compression driver I had to make some decisions.
The way I’m designing and ordering the rear custom panels will allow for changes in the future by just changing panels. But for the build now I will have one set of binding posts for the mid, tweeter and super tweeter along with the designed crossover with an attenuator and the Fusion 500w plate amp for the bass, no crossover.
I believe the pocket I’m building into the cabinet for the plate amp and crossover components will be large enough to accommodate changes in the future without having to modify the actual cabinetry.


I can hear the super tweeter,,,and it is needed,,,the big horn goes not so high,,mostly because of the crossover ( younger people who have heard the speaker have easy to hear the super tweeter)
you make the crossover same way as mine,,,and mine is mounted in a little box just like Troels
Hmmm i have read about the Resistor you use,,,and will really like to try them..(money)
As you know i use crossover for the 18" ,,and one amp .....i have tried the hypex also,,but for now i prefer one amp
you make the crossover same way as mine,,,and mine is mounted in a little box just like Troels
Hmmm i have read about the Resistor you use,,,and will really like to try them..(money)
As you know i use crossover for the 18" ,,and one amp .....i have tried the hypex also,,but for now i prefer one amp
I can hear the super tweeter,,,and it is needed,,,the big horn goes not so high,,mostly because of the crossover ( younger people who have heard the speaker have easy to hear the super tweeter)
you make the crossover same way as mine,,,and mine is mounted in a little box just like Troels
Hmmm i have read about the Resistor you use,,,and will really like to try them..(money)
As you know i use crossover for the 18" ,,and one amp .....i have tried the hypex also,,but for now i prefer one amp
Good to know that the super tweeter is really needed, makes the amount of time to integrate worthwhile.
I’ve used Path Audio resistors a couple of times, I think with positive results.
Good to know about the Hypex, if I don’t like it I have the crossover components to switch over.
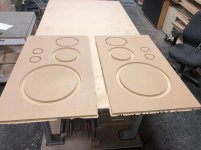
Getting closer. On the 3rd try on the front panel. I think one more try before running for real. Need another 1/16” deeper recess for the flange on the 10” & 18”, I goofed on the dimension between the ports, need to move apart by 3/4”.
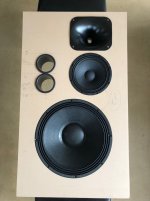
Here is a quick video of the CNC at work. Just a little over a minute to do its work.
YouTube

Here is a quick video of the CNC at work. Just a little over a minute to do its work.
YouTube
Had a good day at the shop, doesn’t seem like a lot of acomplishment for 9 hours. Shop tech CNC’d the front panels yesterday so I could proceed today.
Spread plenty of glue
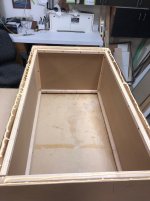
Needed a little help in keeping straight, hired this lovely clamp
A quick sand and I sprayed clear lacquer on the Maple frame. Better to make sure humidity doesn’t get to the wood.
The Maple ply was direct glued to the front panel, the rest of the Maple ply will be attached using a 1/8” layer of polyurethane for dampening. Since the Maple ply is prefinished I hit it with 100 grit to give the glue something to grab to.
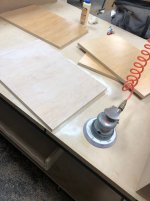
First panel with the polyurethane troweled on and ready to place
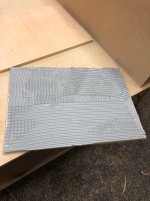
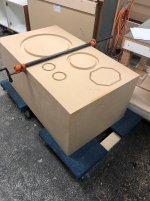
So finished attaching the top’s, bottoms, and fronts today. The screws in the Maple ply will be removed after the polyurethane sets. You can see I have small gaps everywhere, this is intentional. Once all the interior Maple ply is placed I will used the same polyurethane to caulk all the gaps. This will keep the entire internal Maple “box” floating within the outer Medex shell.
Did I mention these speakers are huge!
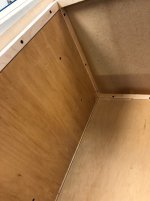

Spread plenty of glue

Needed a little help in keeping straight, hired this lovely clamp

A quick sand and I sprayed clear lacquer on the Maple frame. Better to make sure humidity doesn’t get to the wood.

The Maple ply was direct glued to the front panel, the rest of the Maple ply will be attached using a 1/8” layer of polyurethane for dampening. Since the Maple ply is prefinished I hit it with 100 grit to give the glue something to grab to.

First panel with the polyurethane troweled on and ready to place

So finished attaching the top’s, bottoms, and fronts today. The screws in the Maple ply will be removed after the polyurethane sets. You can see I have small gaps everywhere, this is intentional. Once all the interior Maple ply is placed I will used the same polyurethane to caulk all the gaps. This will keep the entire internal Maple “box” floating within the outer Medex shell.
Did I mention these speakers are huge!

Last edited:
I am excited to see how you install internal braces and subenclosúre for the mid!
The-Loudspeaker
The-Loudspeaker
Last edited:
I am excited to see how you install internal braces and subenclosúre for the mid!
The-Loudspeaker
Juhazi, thanks for following along. Braces, which will include the sub enclosure for the mid, crossover, and plate amp are next up. I have already pre-cut the pieces. I hope I have a plan!
Really fine work..not bad with the Rover cnc...i tried at first to countersink my speaker unit
but it was not good with the massive ash tree i used at first (very unstable front,even with
30mm) much better with 30mm MDF without countersink
Thanks! And I understand about the countersinking.
I’m using 2 layers of 19mm material, countersinking the 18” goes almost all the way through the first layer. But for the look I’m going for I needed them flush.
Still trying to find a vendor to source some custom trim rings for the 10” and 18” drivers. Anyone have a recommendation?
Got a little mid week shop time in. The cabinet shop has been really busy for a while, now the guys are pretty much back to leaving at 2:30, so worthwhile for me to get maybe 3 hours in and not be in their way.
Finished up the braces, except for trimming to fit. Each cabinet gets 3 horizontal braces, one on each side of the 10”, which also makes its sub cabinet, and one centered on the 18”.
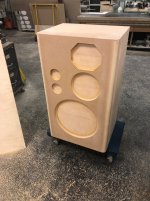
But main item of the day was putting the 1 1/2” roundover on both vertical sides of the fronts. A good amount of material to cut away, very messy. Kind of hard at this point to see in pics, but really softens up the look. Glad to get this out of the way, and not have to be covered in Medex dust all day doing this on Saturday morning.
This is the biggest bit you can fit into a router, next size up would be a custom bit in a shaper, FYI.
To show sense of size I took a pick with a 55 gallon drum for reference.
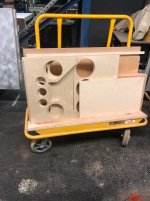
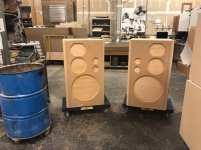


I had the run of the shop again today. Made some good progress
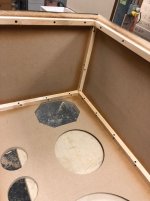
Started out cutting the openings in the second layer of the front baffle. Cut it close with a jig-saw, then used a 1/4” router bit with a roller on the end that traced the CNC cut in the first layer. Now the “box” is complete. All finished Maple interior.
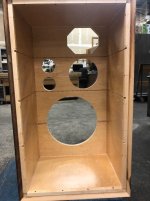
Then after fitting and labeling each of the braces I gave them a quick sand with 220 grit. Then into the paint booth for a couple coats of high solids, semi-gloss clear. I’m making every effort to minimize humidity from being able to wreck havoc with the wood.
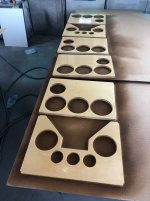
The clear is dry to the touch in 25 mins, so then started final assembly. I also caulked all the corners with polyurethane.
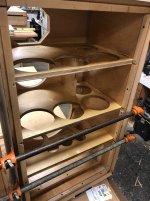
Start of the private enclosure for the mid
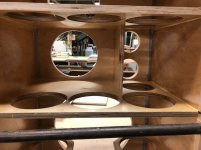
A deviation from TG’s build, I added a brace centered on the 18”. Not sure if really needed, especially with 1 1/2” cabinet sides, but didn’t think it would hurt. Also ties into closing the private space for the crossover and plate amp.
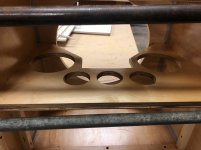
View from the front
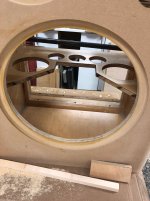
Front view of the mid enclosure
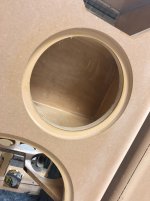
All that’s left for woodworking is the two layers that make up the rear panel. The Maple panel is ready to go. But final Medex panel will take some time making the opening for the crossover and plate amp.
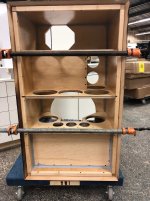
Started out cutting the openings in the second layer of the front baffle. Cut it close with a jig-saw, then used a 1/4” router bit with a roller on the end that traced the CNC cut in the first layer. Now the “box” is complete. All finished Maple interior.

Then after fitting and labeling each of the braces I gave them a quick sand with 220 grit. Then into the paint booth for a couple coats of high solids, semi-gloss clear. I’m making every effort to minimize humidity from being able to wreck havoc with the wood.

The clear is dry to the touch in 25 mins, so then started final assembly. I also caulked all the corners with polyurethane.

Start of the private enclosure for the mid

A deviation from TG’s build, I added a brace centered on the 18”. Not sure if really needed, especially with 1 1/2” cabinet sides, but didn’t think it would hurt. Also ties into closing the private space for the crossover and plate amp.

View from the front

Front view of the mid enclosure

All that’s left for woodworking is the two layers that make up the rear panel. The Maple panel is ready to go. But final Medex panel will take some time making the opening for the crossover and plate amp.

Thanks for your continued interest and replies.Really amazing woodwork
i think it is a good idea with brace behind the 18" ,,i wish i have done that,,
Best Bjarne
Adding the brace at the center of the 18” keeps the bracing consistent at +/- 10” between.
The driver shouldn’t “see” the brace as this location aligns with the actual driver brace.
- Home
- Loudspeakers
- Multi-Way
- Big Speaker Project, 18” + 10” + CD/horn, super tweeter
