Yes, I`m aware of this. I may try again and predrill holes that are larger diameter than the screws. But I think a little bit thicker glue would be better also. Maybe "liquid nail", or similar?
Liquid Nails, or some similar polyurethane adhesive could work as well, it certainly can fill a bit of space more easily.
Yes, would probably work very well, but I need at least 5 more layers of ply, so I would be a valued cling wrap customerNot sure how much is on a roll? Here in Norway I have only seen the small rolls that you use to wrap food in. Or maybe you are talking about some other product?
It's commonly known as 'shrink wrap' here in the US, can be found in big box home stores like Lowes or Home Depot in the moving and packing aisles. You can generally get rolls ~150mm to ~500 mm or so.
GM and ToS bring up good points, you may not need as many layers. You could possibly try adding some CLD material to the outside.
Noico 2 mm 1.7 qm Selbstklebende Alubutyl Anti Drohn Dammmatte, Auto Dammung (Larmschutz, Schalldammung und Schallschutz fur Kfz): Amazon.de: Auto
I've used similar Noico products on various projects, and it works very well. I typically use a vinyl floor tile adhesive to hold it in place. It does have adhesive on one side, but I feel better with adding adhesive.
Of course there are many different options available to mitigate vibration and resonance of wood panels.
Cheers,
Gable
Another option could be to kerf cut some thicker ply and coat the back in resin before bending to shape.
Built my first pair of horn flares for replica Altec A7 cabs this way along with a number of 8 lane commercial 1/24th scale slot racing tracks, which swore me off of doing it this way ever again unless had the need for deep slots/whatever on the finished side.
GM
Liquid Nails, or some similar polyurethane adhesive could work as well, it certainly can fill a bit of space more easily.
GM and ToS bring up good points, you may not need as many layers. You could possibly try adding some CLD material to the outside.
I typically use a vinyl floor tile adhesive to hold it in place. It does have adhesive on one side, but I feel better with adding adhesive.
+1, though use Locktite PLxxx depending on the app.
Yeah once you have the flare/frame-bracing, time to either stiffen it if wanting to raise its composite Fs above its intended pass band or mass load it to push it below it, with short horns typically falling in the latter category, so historically have bonded ceramic tile or similar building rehab scrap with a flexible adhesive or old roofing and/or old vinyl or rubber floor tiles with a rigid adhesive.
Right, those 'peel n' stick' tiles don't stay stuck on a vertical surface in hot weather.
Anyway, like you said, lots of options and wherever there's building/remodeling going on there's normally a veritable cornucopia of cheap/free materials.
GM
Built my first pair of horn flares for replica Altec A7 cabs this way along with a number of 8 lane commercial 1/24th scale slot racing tracks, which swore me off of doing it this way ever again unless had the need for deep slots/whatever on the finished side.
GM
Yep the only time I needed this technique I bought some 8x4 mdf that was already cut.
This company sells bendable plywood (I think all the grains run in the same direction in the plies. Maybe the radius is big enough that 2 layers of 8mm would suffice.
Rob.
Tried contact glue, but it didn`t work that well. Applied to both surfaces, and let it dry for 20 minutes. Still felt a bit sticky to touch, should probably have waited longer, because I was able to remove the ply again without too much force.. Maybe a bit too cold in my garage. I went back to regular white glue again, and predrilled holes for the screws. Also used a belt sander to remove all burrs. This time it worked out well, and I have now screwed and glued two more layers. About 70-80 holes to drill in each layer, but it only takes a few minutes.
As you say, I could just have stayed with one layer, and used something else, maybe strips of wood/plywood, resin/fibre glass, but screws/ply is easy, and don`t require any special tools. Also, It`s cold outside, so I can`t leave the door open for fresh air..
Maybe a bit more work laminating more layers of ply, but it will be very rigid and strong, and also easier to get a nice finish I think. Got more sheets of ply yesterday. The sheets are 4mm, about 1/6". So one layer each day hm.. maybe ready for the back chamber next weekend
Tried contact glue, but it didn`t work that well. Applied to both surfaces, and let it dry for 20 minutes. Still felt a bit sticky to touch, should probably have waited longer, because I was able to remove the ply again without too much force.. Maybe a bit too cold in my garage. I went back to regular white glue again, and predrilled holes for the screws. Also used a belt sander to remove all burrs. This time it worked out well, and I have now screwed and glued two more layers. About 70-80 holes to drill in each layer, but it only takes a few minutes.
As you say, I could just have stayed with one layer, and used something else, maybe strips of wood/plywood, resin/fibre glass, but screws/ply is easy, and don`t require any special tools. Also, It`s cold outside, so I can`t leave the door open for fresh air..
Maybe a bit more work laminating more layers of ply, but it will be very rigid and strong, and also easier to get a nice finish I think. Got more sheets of ply yesterday. The sheets are 4mm, about 1/6". So one layer each day hm.. maybe ready for the back chamber next weekend
I think it is really good that you have mapped out a technique that works for you for now, on this build.
Glue is not what we think it is. The thinner the layer(s) of glue, the stronger it actually becomes - much more so than one almighty layer of glop. I will try my best to explain.
Coat both surfaces with a mildly diluted layer of PVA (white glue). The glue will soak into the plywood, saturating the surface fibres, and making them them stand up. When tack dry, give each surface a slightly thicker layer of PVA, and while wet, screw them together like you have done. What will happen is the wood fibres on both surfaces interlock with each other (very much like Velcro does) with the glue acting as a common matrix holding everything together. It is also incredibly strong!
It takes a fair long while to understand the nature of materials, and is a key element of constructive building.
Great to see you really going for it - maybe some more pictures, eh?
ToS
Yes, could probably have done better with the glueing, but is seems to work well anyway.I think it is really good that you have mapped out a technique that works for you for now, on this build.
Glue is not what we think it is. The thinner the layer(s) of glue, the stronger it actually becomes - much more so than one almighty layer of glop. I will try my best to explain.
Coat both surfaces with a mildly diluted layer of PVA (white glue). The glue will soak into the plywood, saturating the surface fibres, and making them them stand up. When tack dry, give each surface a slightly thicker layer of PVA, and while wet, screw them together like you have done. What will happen is the wood fibres on both surfaces interlock with each other (very much like Velcro does) with the glue acting as a common matrix holding everything together. It is also incredibly strong!
It takes a fair long while to understand the nature of materials, and is a key element of constructive building.
Great to see you really going for it - maybe some more pictures, eh?
ToS
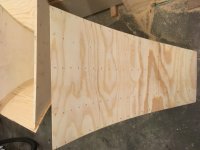
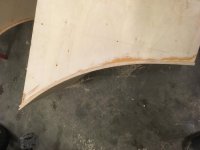
Two pictures from yesterday. Three layers of ply, I applied the 4th layer this afternoon. As you can see, a lot of holes after removing the screws. They are only 13mm long, so they do not penetrate the inner layer anymore. The fit is not bad.
Attachments
Yes, could probably have done better with the glueing, but is seems to work well anyway.
Two pictures from yesterday. Three layers of ply, I applied the 4th layer this afternoon. As you can see, a lot of holes after removing the screws. They are only 13mm long, so they do not penetrate the inner layer anymore. The fit is not bad.
Actually, that looks pretty darn good
doesn't have to be 'work perfect' to work perfectly well.ToS
Actually, that looks pretty darn good
ToS

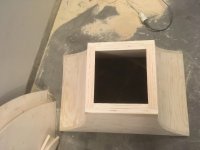
Yes, starting to get rather heavy. Hopefully it won`t need any extra dampeningLooks good!
I bet it's nice and heavy too, looks like it won't ring.
- Status
- This old topic is closed. If you want to reopen this topic, contact a moderator using the "Report Post" button.
- Home
- Loudspeakers
- Multi-Way
- Midbass-FLH, fully formed Tractrix, or shortened JMLC (or Hyp, Exp)?