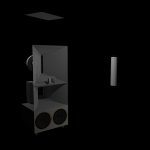
OKYes a hypex horn. The JBL is a 12" driver. I think that is the main reason for the difference in length. I built these a long time ago so haven't got the hornresp models anymore but I think the throat was smaller to get a similar compression ratio, which made the horn longer.
")
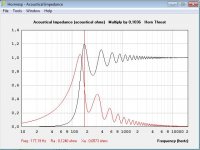
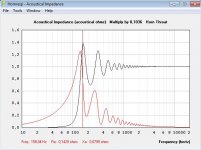
Tried some more simulations today. With a mouth area of 80x50cm, a length of 60cm, and throat area 20x20cm, I see almost no difference in the Acoustical Power of Expo, hypex, Tractrix or Le Cleach. Tractrix and Le Cleach have lower ripples in the Acoustical Impedance than the other two. First picture is Acoustical power in 2PI space (all 4 about the same), the next is Acoustical Impedance for Le Cleach (Tractrix about the same), and the last one is Acoustical Impedance for the Hypex (expo about the same). Also, I notice that even if the Acoustical Power look the same, the F12 frequency is not the same in the F12 text box. For Le Cleach the textbox says 100Hz, for Hypex 118Hz, the last two about 105Hz. Don`t know why.
Attachments
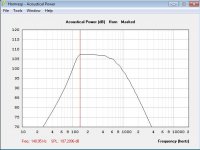
I see almost no difference in the Acoustical Power of Expo, hypex, Tractrix or Le Cleach. Also, I notice that even if the Acoustical Power look the same, the F12 frequency is not the same in the F12 text box.
The theoretical cutoff frequencies differ because each of the flare profiles is slightly different. In practice however, the performance results will be effectively the same. For best effect, the tractrix and Le Cléac'h profiles should ideally only be used with horns having fully formed mouths. You can see from the attachment that there is little to be gained in applying the Tra and Lec profiles to significantly truncated horns (particularly given the additional work required to calculate the curve data - if not exported directly from Hornresp).
Attachments
The theoretical cutoff frequencies differ because each of the flare profiles is slightly different. In practice however, the performance results will be effectively the same. For best effect, the tractrix and Le Cléac'h profiles should ideally only be used with horns having fully formed mouths. You can see from the attachment that there is little to be gained in applying the Tra and Lec profiles to significantly truncated horns (particularly given the additional work required to calculate the curve data - if not exported directly from Hornresp).
But there seems to be a little difference in the impedance plots. Not sure if this matters, but it seems that Le Cleach and Tractrix have less ripple than Hypex and Expo.
I did use Hornresp to export the data
But I had to swap height/width to get the 80cm width and 50cm height. From the data it seems that I got it right. Not sure about the width/2, difficult to say before the sheet is cut.. Also, I used "Con" under "Flare width". I Also tried "Uni", but I don`t know if the result will be different?
I should probably reduce the length of the horn with the thickness of the back chamber wall? Would probably not make a lot of difference?
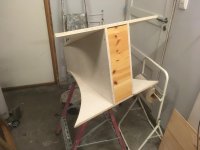
I plan to use 2x18mm layers of plywood for top/bottom, and 5x layers of 4mm plywood for the curved sides. 36mm top/bottom is probably overkill, but the sheets are already in the garage..
I built my first horn earlier this year. It was a LeCleach horn with a 112 degree backwards sweep to the mouth. This beastie is big, and with eq, I have a useable range of between 90hz to about 9khz, with a steep fall off either side. I'm a full range single cone driver kind of guy, so my use here with your multi driver set up is a bit limited.
You can get good bass with a LeCleach, but they have to be big, and I mean really big. On my next horn build I will make the backward sweep 180 degrees. This will more or less stop any of the sound bouncing back into the horn, and although there is a certain amount of beaming, it's very nice, as you are hearing sound emanating from an invisible sphere projected by the horn. Get it right and the sweet spot will be about 3ft across for the treble - well, that's what I got, but with a compression driver, I cannot really say. The bass frequencies will roll right around the lip of the mouth and integrate nicely with the acoustics of the room.
The construction process is far easier with more petals, as being smaller they are a lot easier to bend. But building horns properly takes a long time, and my advise is to make a prototype out of corrugated cardboard and masking tape to get your technique and sound voicing sorted out before making a total commitment.
One thing I will say is horns are ruthless in amplifying any discrepancies introduced at the throat, and a smooth transition from the edges of the compression chamber really helps the end result. You have to get the driver absolutely in the middle of the throat. You might have to go through a few prototypes, but hey, this is DIY - right?
Thanks
You're welcome!
Nope, I only used tractrix because it was your reference.
True, though look how narrow its [peaking] BW is due to its extreme truncating of the HF, mids.
GM
I see almost no difference in the Acoustical Power of Expo, hypex, Tractrix or Le Cleach. Tractrix and Le Cleach have lower ripples in the Acoustical Impedance than the other two. First picture is Acoustical power in 2PI space..............Also, I notice that even if the Acoustical Power look the same, the F12 frequency is not the same in the F12 text box. For Le Cleach the textbox says 100Hz, for Hypex 118Hz, the last two about 105Hz. Don`t know why.
Right, due to having 'slower' flare factors [M/T] and differing flare frequencies [expansion rate], i.e. view a truncated expo, etc., horn as a 'slice' out of a full size expo, etc., horn.
Hmm, I used 4pi since you implied these will be atop the bass bins, otherwise need to change my sims for comparison.
Regardless, when going truncated, simple conical WGs designed for the intended app like now popular due to Unity/Synergy concepts have proven to be the best overall choice IME.
Again though, your max dimensions force a bit of under sizing/truncating, so the foam mouth damping may still be required if there's any obvious HF 'ripple'.
GM
Attachments
I`ve seen some pictures of multi-petal horns, and they look nice! Maybe something for a future project. I`ll try to make it simple for this first projectI built my first horn earlier this year. It was a LeCleach horn with a 112 degree backwards sweep to the mouth. This beastie is big, and with eq, I have a useable range of between 90hz to about 9khz, with a steep fall off either side. I'm a full range single cone driver kind of guy, so my use here with your multi driver set up is a bit limited.
You can get good bass with a LeCleach, but they have to be big, and I mean really big. On my next horn build I will make the backward sweep 180 degrees. This will more or less stop any of the sound bouncing back into the horn, and although there is a certain amount of beaming, it's very nice, as you are hearing sound emanating from an invisible sphere projected by the horn. Get it right and the sweet spot will be about 3ft across for the treble - well, that's what I got, but with a compression driver, I cannot really say. The bass frequencies will roll right around the lip of the mouth and integrate nicely with the acoustics of the room.
The construction process is far easier with more petals, as being smaller they are a lot easier to bend. But building horns properly takes a long time, and my advise is to make a prototype out of corrugated cardboard and masking tape to get your technique and sound voicing sorted out before making a total commitment.
One thing I will say is horns are ruthless in amplifying any discrepancies introduced at the throat, and a smooth transition from the edges of the compression chamber really helps the end result. You have to get the driver absolutely in the middle of the throat. You might have to go through a few prototypes, but hey, this is DIY - right?
I made a small paper model of a 4 petal horn, just to test Hornresp data export. Everything fitted nicely together. Nice to know before cutting the plywood..
Last edited:
Thanks! I`ll try your numbers tomorrow. I used 2PI in most of my simulations. Don`t know how realistic this is. The horn will be rather close to a corner, but about 55cm off the floor, see rendered sketch.You're welcome!
Nope, I only used tractrix because it was your reference.
True, though look how narrow its [peaking] BW is due to its extreme truncating of the HF, mids.
GM
Just wondering, Tractrix is said to drop like a stone far above the flare frequency, but I assume that this is for the full length horn?
Attachments
FWIW, here's my old Edgarhorn System 100 midbass horn outdoors, on axis with a 2220H. (Green trace) Its mouth was 20.5"x 20.5" with about a 20.5" path from mouth to 80 sq. inch throat. The other trace was a 4 ohm K43 Klipsch type. 2220H had a higher distortion (not shown) on sine than the heavier cone/ voice coil K43 - tradeoffs between the two types. A properly bent J horn would work.
with sine wave I remember some obnoxious cone-cry from the 2220H but up above useful range.

with sine wave I remember some obnoxious cone-cry from the 2220H but up above useful range.
But there seems to be a little difference in the impedance plots.
The throat acoustical impedance can vary over quite wide limits without introducing significant variations in power output.
Also, I used "Con" under "Flare width". I Also tried "Uni", but I don`t know if the result will be different?
The "Con" option must be used if the top and bottom panels are to be flat.
I should probably reduce the length of the horn with the thickness of the back chamber wall?
I doubt you would hear the difference, provided that there is no abrupt discontinuity in profile.
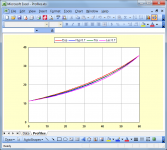
Thanks! Seems that my simulated response for about the same size horn is close to your measurements. I think it looks good!FWIW, here's my old Edgarhorn System 100 midbass horn outdoors, on axis with a 2220H. (Green trace) Its mouth was 20.5"x 20.5" with about a 20.5" path from mouth to 80 sq. inch throat. The other trace was a 4 ohm K43 Klipsch type. 2220H had a higher distortion (not shown) on sine than the heavier cone/ voice coil K43 - tradeoffs between the two types. A properly bent J horn would work.
with sine wave I remember some obnoxious cone-cry from the 2220H but up above useful range.
OK!The throat acoustical impedance can vary over quite wide limits without introducing significant variations in power output.
Then my cutting plan should be correctThe "Con" option must be used if the top and bottom panels are to be flat.
I doubt you would hear the difference, provided that there is no abrupt discontinuity in profile.
Thanks
Your sim goes a bit lower in frequency, but the horn is also a bit longer. What are you looking for when choosing the different cone lengths? Since I already have the thin ply, I`ll do a first attempt building up the curved sides with 5-6 layers. The ply is 4mm thick.Hmm, I used 4pi since you implied these will be atop the bass bins, otherwise need to change my sims for comparison.
Regardless, when going truncated, simple conical WGs designed for the intended app like now popular due to Unity/Synergy concepts have proven to be the best overall choice IME.
Again though, your max dimensions force a bit of under sizing/truncating, so the foam mouth damping may still be required if there's any obvious HF 'ripple'.
GM
Read an interesting article here, see part #2 of 9 , where damping around the mouth is discussed. Seems like good advice
Read an interesting article here, see part #2 of 9 , where damping around the mouth is discussed. Seems like good advice
Yes, a very interesting article, now downloaded and saved as a PDF - thank you, we are all learners here. Especially me.
The key element is the curl of the lip of the mouth. Take a close look at pictures of brass instruments:- trumpets, cornets, french horns and suchlike. Luthiers who make those kinds of musical instruments all say it's about the curl of the lip. How the curl channels and seamlessly connects the musical breath from the player into the surrounding air without it becoming raggedly. A horn is but a very simple passive amplifier of sound.
Just make plenty of cardboard models, and allow your imaginarium to do the work. It's all fun.
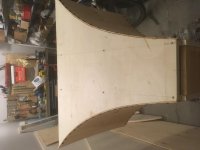
Have already cut the top and bottom pieces. Hm.. the 4mm ply seems to be bendable only in one direction.. It will still work, but a lot of wasted sheets. Must find out if it can be bent if moisted.Yes, a very interesting article, now downloaded and saved as a PDF - thank you, we are all learners here. Especially me.
The key element is the curl of the lip of the mouth. Take a close look at pictures of brass instruments:- trumpets, cornets, french horns and suchlike. Luthiers who make those kinds of musical instruments all say it's about the curl of the lip. How the curl channels and seamlessly connects the musical breath from the player into the surrounding air without it becoming raggedly. A horn is but a very simple passive amplifier of sound.
Just make plenty of cardboard models, and allow your imaginarium to do the work. It's all fun.
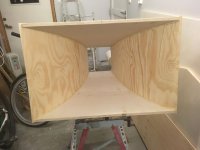
Have now started assembly of the horns. Made a jig to keep the top/bottom stable during assembly of the sides. Used screws instead of clamps. Worked very well! The screws will be removed after the PU-glue is cured. I plan on using two layers each 19mm on top/bottom, and 5-6 layers each 4mm for the curved sides. It was easy to curve the 4mm ply without using water, but only across the grain direction.
Attachments
Last edited:
Have now started assembly of the horns. Made a jig to keep the top/bottom stable during assembly of the sides. Used screws instead of clamps. Worked very well! The screws will be removed after the PU-glue is cured. I plan on using two layers each 19mm on top/bottom, and 5-6 layers each 4mm for the curved sides. It was easy to curve the 4mm ply without using water, but only across the grain direction.
You're making a decent job of this Cyberkul. Nice clean lines. Good to see you've left a bit extra wood at the joins to shave off later. Make sure the extra layers don't have air pockets (voids) between them. The screws should do it. Could even bag it up inside a wheelie bin bag liner to a vacuum cleaner to pull any bubbles in the glue out. Just thinking ahead
Tell you what, wrapping the gig in cling film makes for a brilliant cheap clamp.ToS
You're making a decent job of this Cyberkul. Nice clean lines. Good to see you've left a bit extra wood at the joins to shave off later. Make sure the extra layers don't have air pockets (voids) between them. The screws should do it. Could even bag it up inside a wheelie bin bag liner to a vacuum cleaner to pull any bubbles in the glue out. Just thinking ahead
ToS
Thanks
Yes, air pockets between the layers is a concern. If I use screws I could start with a row in the middle, and proceed with rows above and below, and finish at the top and bottom. May have to pre-drill, as the screws would penetrate the inner most layer. Vacuum could be an alternative, if not everything colapses.. I thought of using regular white wood-glue, but perhaps contact-glue could be used? If it is strong enough it would save me the trouble with air pockets. I could use some screws temporarily as well.
Last edited:
Thanks
Hmmmmm.......not sure if using screws to hold down each layer is the answer. OK, what you've got right now is what you could call a 'former'. It looks strong with good lines. This is what I've got in mind ......... you'll need some clamps (you can never have enough clamps), some cling film (or what's called pallet wrap on a roller handle) and some bags of sand.
Paint one side of your former and a precut sheet of ply with dilute PVA (Elmers white glue) let it soak into the wood until it disappears. Then slather both surfaces with undiluted glue using a squeegee. Clamp the ply sheet along the longest edge of the former's mouth. Use plenty of clamps. From the clamps onwards start strapping the former around and around with the cling film using lots of tension. The cling film will stretch - that's the idea, the amount of pressure applied is quite amazing. When you've finished, put the sandbags in the middle of the dip. The combination of everything will squeeze out all the air and loads of glue. Leave it for 48 hours before unwrapping. Then do the other side.
Or, you might get it into your head to do the other side at the same time. That's OK, it's doable. I reckon you should do it. Just think it out, do a dry run without a pre wet or gluing. Yep, two at a time means the tension on the former is equal.
In fact, thinking about it, you could even pre wet the plywood sheet(s), clamp and strap it/them to the former, let it/them dry and it/they should retain the curve of the former. Less wrestling with the rather slippy PVA later on.
Anyway, plenty of options there. Don't be afraid of making it up as you go along - I do!
- Status
- This old topic is closed. If you want to reopen this topic, contact a moderator using the "Report Post" button.
- Home
- Loudspeakers
- Multi-Way
- Midbass-FLH, fully formed Tractrix, or shortened JMLC (or Hyp, Exp)?