I'll have to play with the shims again with the newest prototypes to revisit this, since your sims show some area for improvement.
I do notice though, that the examples with no/low step have quite constant directivity up to 10khz. While the others drop faster with higher frequencies much as a normal tweeter. Better? Just different?
How did the profile differ from my design C? Have you played with design G yet? I did experiment earlier with using an ellipse as a profile. Compete PITA to model. The results were decent, but that was with earlier, cruder designs, so maybe I need to revisit that also.
I also ought to look at rounding over that small step transition to the flare.
Hi,
Very good question. I do not know, but would be interested to get opinions here.I do notice though, that the examples with no/low step have quite constant directivity up to 10khz. While the others drop faster with higher frequencies much as a normal tweeter. Better? Just different?
I'll post the differences and will give an update on design G soon. Did some simulations but had no time to summarize yet.How did the profile differ from my design C? Have you played with design G yet?
Fully agree. That's on my to do list as well.I also ought to look at rounding over that small step transition to the flare.
An opened-source design for a partially 3D printed horn
Here's my basic design for a Unity horn type 3D printed throat in case anyone wants to take on the task.
STL file for printing:
View attachment V6 stubSTL.zip


It's intended to use two (or one) 4" Celestion midrange TF0410MR and a 1" compression tweeter. A dome might work for the tweeter, but the midrange level would of course have to be greatly attenuated if so. The ends are designed to be extended with plywood to make any size horn you want to go for, adding woofers onto those panels for operation to below the 350Hz that the Celestions will work to. The plywood edges that meet the printed plastic piece have flat 90 degree edges for simpler cutting, but the edges where the wood panels meet each other will need angled cuts at least on two of the pieces.

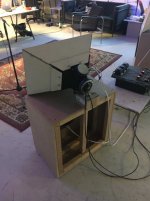
The mouth end bevel cutting, if any, is up to the builder depending on how he wants it to end. More adventurous builders can put on a second flare (like in the SynergyCalc spreadsheet) or even a curved mouth expansion. This is how I was planning to use it:

(I'm probably not going to build these myself now, even after printing the the plastic pieces and getting drivers, since realizing that I have absolutely nowhere to use or store something like those!)
You'll need a printer with a print area of at least 300mm x 300mm x 200mm high. If you print it with the CD mount end down, it can be done without using supports. I printed with a 1mm nozzle and PLA filament to make for more reasonable printing times and a stronger part. You might be able to find a way to split the part to print on smaller printers, but you'd almost certainly need supports in that case.
If anyone uses this to make a horn, please post photos!
Here's my basic design for a Unity horn type 3D printed throat in case anyone wants to take on the task.
STL file for printing:
View attachment V6 stubSTL.zip
It's intended to use two (or one) 4" Celestion midrange TF0410MR and a 1" compression tweeter. A dome might work for the tweeter, but the midrange level would of course have to be greatly attenuated if so. The ends are designed to be extended with plywood to make any size horn you want to go for, adding woofers onto those panels for operation to below the 350Hz that the Celestions will work to. The plywood edges that meet the printed plastic piece have flat 90 degree edges for simpler cutting, but the edges where the wood panels meet each other will need angled cuts at least on two of the pieces.
The mouth end bevel cutting, if any, is up to the builder depending on how he wants it to end. More adventurous builders can put on a second flare (like in the SynergyCalc spreadsheet) or even a curved mouth expansion. This is how I was planning to use it:
(I'm probably not going to build these myself now, even after printing the the plastic pieces and getting drivers, since realizing that I have absolutely nowhere to use or store something like those!)
You'll need a printer with a print area of at least 300mm x 300mm x 200mm high. If you print it with the CD mount end down, it can be done without using supports. I printed with a 1mm nozzle and PLA filament to make for more reasonable printing times and a stronger part. You might be able to find a way to split the part to print on smaller printers, but you'd almost certainly need supports in that case.
If anyone uses this to make a horn, please post photos!
Hi Brandon,
No, not really. But at the sizes I was planning to make, the more rapid flare for that would happen pretty far down the horn, so wouldn't do much until lower frequencies where room effects go all goofy anyway. So I wasn't worried too much about it. Doing that or going with a 2nd flare would make for shorter horn, though (a good thing based on horns I've played with, though there are some strong opinions out there to the contrary).
No, not really. But at the sizes I was planning to make, the more rapid flare for that would happen pretty far down the horn, so wouldn't do much until lower frequencies where room effects go all goofy anyway. So I wasn't worried too much about it. Doing that or going with a 2nd flare would make for shorter horn, though (a good thing based on horns I've played with, though there are some strong opinions out there to the contrary).
BTW, there will most likely need to be some "fillers" in the center of the midrange driver areas -- about 80mmD, 5mm deep or so disks that can be printed and glued there to take up some front volume. I left them off of the STL, intending to test first with some clay to figure how much. The similar horn throats made for the 3D printed NotAsSmallSyns horns I built used a very similar arrangement, though the mid ports had to be moved down a little way for these stubs so the tuning might vary a little -- I was trying to design something that would work with injection molding.
(edit: Tweeter end was designed to match the exit angles of DNA360 or DE250, btw.)
(edit: Tweeter end was designed to match the exit angles of DNA360 or DE250, btw.)
Last edited:
Elliptical Waveguide TypeG
Here are simulations of design G with the new SB26ADC geometry (see post #80), with the step of design G and without the step, i.e. the SB26ADC membrane directly fitted to the WG contour.
Waveguide Type G looks like this:

The respective image within ABEC, WG TypeG with SB26ADC:

Horizontal radiation normalized to 0° (with step as shown above):

And the respective SPLs from 0° to 60°(with step as shown above):

Just as a 'control', the simulations without step, i.e. with the SB26ADC directly fitting to the WG contour:

and

Pretty much the same effect of the step as seen before.
Next steps probably...
How did the profile differ from my design C? Have you played with design G yet?
Here are simulations of design G with the new SB26ADC geometry (see post #80), with the step of design G and without the step, i.e. the SB26ADC membrane directly fitted to the WG contour.
Waveguide Type G looks like this:
The respective image within ABEC, WG TypeG with SB26ADC:
Horizontal radiation normalized to 0° (with step as shown above):
And the respective SPLs from 0° to 60°(with step as shown above):
Just as a 'control', the simulations without step, i.e. with the SB26ADC directly fitting to the WG contour:
and
Pretty much the same effect of the step as seen before.
Next steps probably...
...and variations of the WG contour.rounding over that small step transition to the flare
Hmm. a helpful moderator seems to have reformated my post (#83 Open source Waveguides for CNC & 3D printing!), shrunk the pictures down to postage stamp sizes and swapped locations of the last two images!
If there's confusion, this one is supposed to be the "angled cuts on two of the pieces" image:

If there's confusion, this one is supposed to be the "angled cuts on two of the pieces" image:
Bill> they get bigger if you click on them. I've seen some forums do this automatically now.
Christoph> very interesting, what was the step? BTW play with the vertical plane radius and see if there is anything to be gained there. When I send out vG for printing it will have an integrated .05" step versus the .015" of vF a few pages back. I'll also be including a shim for printing of about .03", so I'll be able to experiment with .08", .05", and sanding it down a little bit for somewhere around .03" should give me good trend data. Also going to revisit the phase shield size, and distance from dome.
Christoph> very interesting, what was the step? BTW play with the vertical plane radius and see if there is anything to be gained there. When I send out vG for printing it will have an integrated .05" step versus the .015" of vF a few pages back. I'll also be including a shim for printing of about .03", so I'll be able to experiment with .08", .05", and sanding it down a little bit for somewhere around .03" should give me good trend data. Also going to revisit the phase shield size, and distance from dome.
Here's my basic design for a Unity horn type 3D printed throat in case anyone wants to take on the task.
If anyone uses this to make a horn, please post photos!
First I really want to thank you for the model Bill!
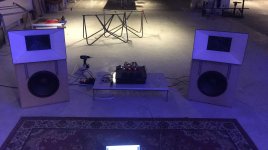
I printed these 2 weeks back and got them playing with some very thin wood and also no second flare.
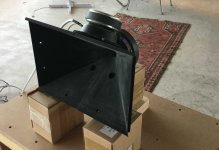
I had to print them in two pieces since my printer is nog big enough and I really recommend printing it in one piece since parts this big will always be a bit different from each other and glueing can be a pita.
But, I got them together in a sort of ok way and I really enjoy them! The width now is 600 mm and height 380 mm. Did it quick and dirty with 6 mm wood that I lasercutted and glued together.
They do sound a bit nicer than my previous unity horns who where a bit harsh in the mid section due to too much air trapped in the chamfers to the mid ports I think.
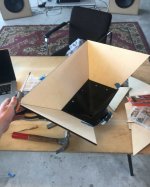
Although I printed at a height of .3 mm and a infill of 70% (3d honeycomb) there still a bit more resonant than I expected and I am thinking of printing on time again in one part on a different printer and make a mold since I'm soon be making molds for other stuff so why not try that!
On my list is also to make one waaay bigger and with some thicker wood.
Here some pictures!
EDIT: I'm making some adaptors now to be able to attach a different mid that wil play a bit lower just to se how it works out!
Attachments


Last edited:
fotsinijts -- cool! Many thanks for the pictures. I see you were able to print without supports -- I hadn't thought about being able to print halfs on-end like a whole one.
I printed mine at 40% infil, rectangular, don't notice any resonance (though haven't played sound through it -- but it seems really dense and solid per tapping on it). I had done one of my other bigger horns once that was quite resonant, it turned out that the settings for the print or printer(?) made for little or no attachment of the outer walls to the infil, like a barely-attached shell. I think I played with the extrusion width to get that cleared up.
Waaay bigger sounds interesting, keep us updated please! Have you done any measurements? If this horn is anything like my others using that driver, I think it will need some filler plugs put in front of the midranges to take up some front volume -- that should bring up the high frequencies toward the top end of the midrange band -- but too much fill and I think the response will start coming up again after the reflection notch (which would not be good - for easy crossover and distortion filtering it's best if the response stays pretty much down after the notch).
I hope this isn't too much Unity talk on this thread -- didn't mean to hijack it.
It also surprised me that half the horn stayed in place since it looked silly seeing such a big piece standing on a small feet!
The resonance isn't noticeable when ticking on the horn than it sounds very stiff and strong, which it is, but I think the biggest reason now is that the weight is very low and the whole horn moves (it's just a little but I noticed it).
I haven't changed anything about my current settings on DSP which mean crossing over at 1100hz and that goes well, still a big eq bump up at the around 5k/20k but that just seems to be the BMS4550. But I got the idea the mids play as high as they did on my previous horn.
For now I want to finish the 3d prints with some spray putty, sanding etc etc! And I will send you some measurements next week if I have the time!
If anyone wants to try this I really recommend it! I just them even without extra flares which will result in lower efficiency and less controlled directivity but still, I really liked them.
Hi Brandon,

The step with VarG was exactly 0.1inch.Christoph> very interesting, what was the step?
Will do... So far I simply ignored to optimize the vertical plane - and its radiation...BTW play with the vertical plane radius and see if there is anything to be gained there.
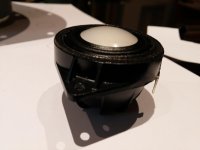
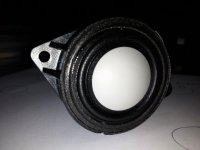
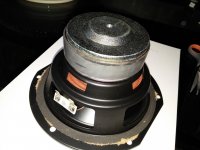
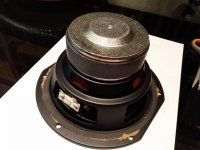
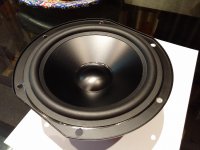
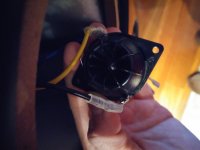
I am very curious about speakers drivers, so i show the tweeter and woofer in revel f36.
It' s not sb acoustics, but i supose it´s a cheap oem driver.
I think the Revel Concerta2 f36 image weel, have good bass, but lacks transparency and resolution, comparing to my martin logans and ribbon tweeters.
It also lacks transient response and the sound overall is veiled, i don´t understand why so many people loves them, at least with my expectations!
Attachments

- Home
- Loudspeakers
- Multi-Way
- Open source Waveguides for CNC & 3D printing!