That overlaying frame might have too little tolerance for shrinking of wood... I would leave at least 2mm extra radius.
Generally speaking very very smart and precise craftsmanship!
Thanks for the though! I’ve used this approach with Poplar, plywood and Mahogany several times over the past 2 years with no issue, none of these are a press fits in the slightest, they are precise, I find 2mm unnecessary clearance, I’d say .5mm is more than enough and that’s where I’m at.
Thanks!
Javad
Juhazi said:Obviously you don't have freezing temperatures for months every year in CA")
No, not in our homes either
I will wholeheartedly agree however, tthat California’s humidity and temperatures make wood expansion issues much better than say the Midwest of the United States
My wife's sister lives in Pacifica, CA, they don't have shrinkage problems, but some issues with mold How to prevent mold: 9 tips | MNN - Mother Nature Network
Here in Scandinavia relative humidity indoors is 20-30% for 6 months, because of continuous heating and isolation. But many houses suffer from mold because of too little ventilation.
Here is a sad story from Portugal - not a cold place actually. Translam sandwich structure is most vulnerable My first project is a 4 way speaker... - Page 14
Javad you have some serious woodworking skills. I would never find a way to recess the baffle for an incongruous driver with just a handheld router! I would throw it on the CNC router and get it done but your job on this joint was impressive and inspirational. wisely done
dave123 said:Javad you have some serious woodworking skills. I would never find a way to recess the baffle for an incongruous driver with just a handheld router! I would throw it on the CNC router and get it done but your job on this joint was impressive and inspirational. wisely done
Thanks for the kind words Dave!
Ok time for some ports! Here is where they stood before

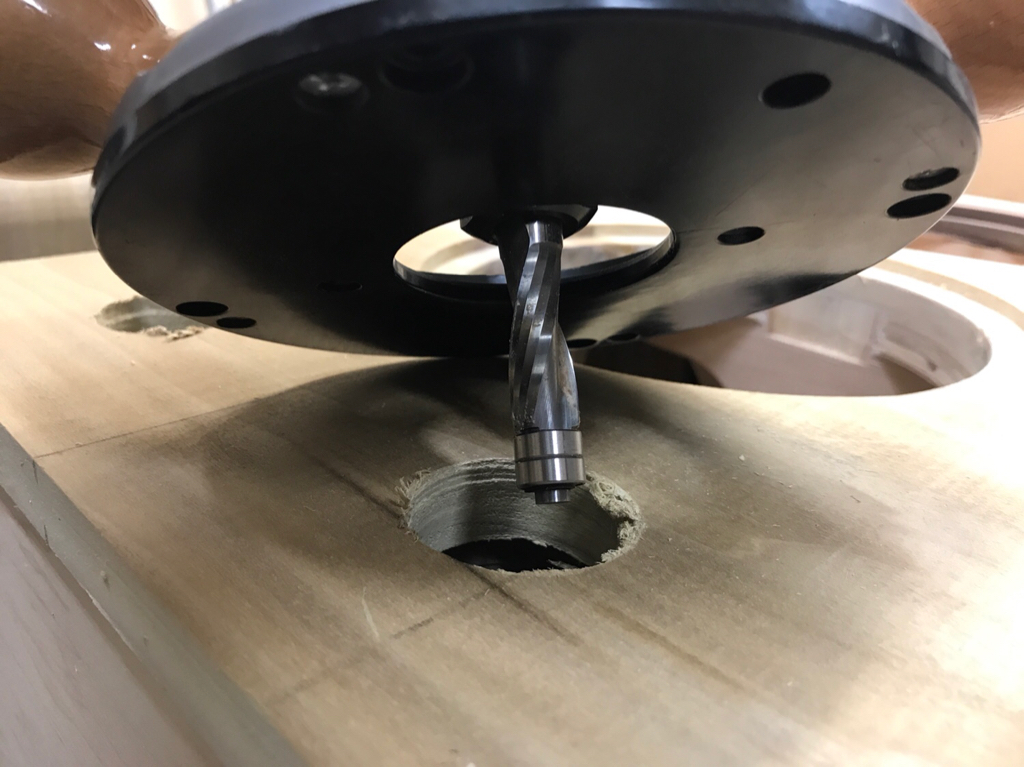
First step pinch some pilot holes through the center of the back

Now drill with 1.5” bit


The ports get installed from behind and clamped in place, ready for a 1/2” spiral cut flush bit. They’re a tight fit but if they fell out it would be disasters


Ready for a roundover

I used 3/4” as port velocity wont be an issue on these and it gives some room to the relatively tight fit


Time for some post tuning with WT2, 8” driver installed and open back sealed against the moving blanket

Ports with inner supports and flares installed, driver connected

First sweep with approx 9” long ports, Fm of 32hz

This is the model I’m targeting, about 38hz

1.5” removed

Another sweep, now Fm 35hz

1” more off, and right at 37Hz, I’m good with that

Next clamping on and locating the back!
Javad
First step pinch some pilot holes through the center of the back
Now drill with 1.5” bit
The ports get installed from behind and clamped in place, ready for a 1/2” spiral cut flush bit. They’re a tight fit but if they fell out it would be disasters
Ready for a roundover
I used 3/4” as port velocity wont be an issue on these and it gives some room to the relatively tight fit
Time for some post tuning with WT2, 8” driver installed and open back sealed against the moving blanket
Ports with inner supports and flares installed, driver connected
First sweep with approx 9” long ports, Fm of 32hz
This is the model I’m targeting, about 38hz
1.5” removed
Another sweep, now Fm 35hz
1” more off, and right at 37Hz, I’m good with that
Next clamping on and locating the back!
Javad
Some detail locating and doweling panels Holes drilled and located

Dowel center transfer inserts

Dowels finalized top and bottom

Inner port supports finalized and glued in

Glue applied to attach back, Titebond Premium around outside, Loctite construction adhesive around the braces as these don’t all fit perfectly flush to the back panel

I built this special clamping fixture as there are no square corners to clamp to

The foam pad protects the front from any damage and spreads out the load when compressed

Back clamped on, this made me nervous as the kerfs aren’t super tough and I was a little concerned about applying too much pressure to the enclosure, but the braces and inner ribs have taken any load off the kerfs, held up great


Thanks!
Javad
Dowel center transfer inserts
Dowels finalized top and bottom
Inner port supports finalized and glued in
Glue applied to attach back, Titebond Premium around outside, Loctite construction adhesive around the braces as these don’t all fit perfectly flush to the back panel
I built this special clamping fixture as there are no square corners to clamp to
The foam pad protects the front from any damage and spreads out the load when compressed
Back clamped on, this made me nervous as the kerfs aren’t super tough and I was a little concerned about applying too much pressure to the enclosure, but the braces and inner ribs have taken any load off the kerfs, held up great
Thanks!
Javad
You sure you've got 'nuff clamps on that?
That was the minimum required for a perfect fit up =)
Skills!!!
//
And tools!
These must be customer speakers or how many DIY speakers you own?
And tools!
These must be customer speakers or how many DIY speakers you own?
No just all for my experience, see the first post these are for a speaker building event. I have been selling off my builds to friends once I feel that I’ve gotten what I need from them.
rb132333; said:You have mad skills, an awesome shop and extreme patience...... very impressive.
Thank you for the kind words!
Ok, let’s get back to it!
Vlog detailing the doweling and clamping process
YouTube
Back glued on, time to do some flush trimming...
Had an issue that the back was square and didn’t match the 3 degree taper of the sides, a normal flush bit but won’t work due to the angle. Simple solution is a flush trim bit and some 3/4” MDF, I set the bit depth to just under 3/4”, a small 1/64” lip will be easily sanded off. (BTW got this Bosc Router for $79, really nice unit)


Top and bottom were easily flush trimmed with a 1/4” bit


Now ready for some CLD! I know I said I was going to use the silicone, and it would work well, but I decided I didn’t want to deal with squeeze out on this so here we have two 2x2 sheets of 40 durometer sorbothane

Rough cut to size

Glue applied to enclosure

Doweled top and bottom pieces about to be trimmed

Trimming in my new 14” band saw

Sorbothane glued to enclosure

Wood glue applied to wood and more adhesive applied to sorbothane, I did a glue up of both ends at the same time


Clamp up

Nice tight joints even on the kerfed areas which tend not to be perfectly flat after bending


More to come thanks!
Javad
Vlog detailing the doweling and clamping process
YouTube
Back glued on, time to do some flush trimming...
Had an issue that the back was square and didn’t match the 3 degree taper of the sides, a normal flush bit but won’t work due to the angle. Simple solution is a flush trim bit and some 3/4” MDF, I set the bit depth to just under 3/4”, a small 1/64” lip will be easily sanded off. (BTW got this Bosc Router for $79, really nice unit)
Top and bottom were easily flush trimmed with a 1/4” bit
Now ready for some CLD! I know I said I was going to use the silicone, and it would work well, but I decided I didn’t want to deal with squeeze out on this so here we have two 2x2 sheets of 40 durometer sorbothane
Rough cut to size
Glue applied to enclosure
Doweled top and bottom pieces about to be trimmed
Trimming in my new 14” band saw
Sorbothane glued to enclosure
Wood glue applied to wood and more adhesive applied to sorbothane, I did a glue up of both ends at the same time
Clamp up
Nice tight joints even on the kerfed areas which tend not to be perfectly flat after bending
More to come thanks!
Javad

- Home
- Loudspeakers
- Multi-Way
- Coaxial Speaker Build Thread with FaitalPro 6HX150