
I'm running this as a mono 2-way. It is good.
1) I got the miniDSP worked out.
My issue: the dedicated power supply (an external phone battery with USB ports) that I intended to use for the miniDSP is faulty / reacts oddly to the load, so it would shut down every 10 seconds. I tried skipping the DSP, using a passive crossover, and time-aligning the drivers physically (stacked driver-on-driver). The flaw was a small sweet spot - if I sat down, the mid horn blocked the output of the HF horn.
Easy fix: I now run the miniDSP off the same 12V battery* as the amp. With DSP delay, I now stack the horns mouth-on-mouth. This is a lot better.
2) My waterproofing technique (external PVA --> fibreglass bug screen --> external paint) needs to improve.
I started off trying to use huge sheets - the full 2.4m width of the roll. The problem is, it is very difficult to get a section that big to wrap around corners and lie flat. Much easier to cut the mesh into smaller sections and overlap them.
3) I'm still working on:
-smoothing / filling in the internal angles
-haven't reinforced the rear chamber
-haven't yet tried a phase plug
It sounds nice & very clear already. It has that (good-but-dangerous) property of not seeming very loud until you try to have a conversation in front of it ...and you realise you have to yell. Standing behind the horns, conversation is easy, no need to raise your voice at all. So (subjectively), the directionality is very good.**
The weak link for SQ seems to be the HF breakup of the 2" driver***. My short term fix will be to kill response >10kHz via miniDSP.
The ideal and (very) long term fix will be to keep building it up to a stereo 4-way system, and to get new (matching) diaphragms.
*A 10 watt solar panel + a charge regulator + a large (truck?) battery I rescued from hard rubbish. It was ridonculously easy to set up. Lot of alligator clips, so it looks a bit like this: https://en.wikipedia.org/wiki/Flying_Spaghetti_Monster
I haven't done the maths to see how many hours use I have - but one battery happily plays for (at least) 3 hours & I have a spare battery, so I think I have effectively infinite power.
**I should try a lap of it with a SPL meter. I guess it will show that a lot of LF is leaking.
***I'm still using the JBL / mystery speaker:
http://www.diyaudio.com/forums/multi-way/288925-4-jbl-clone-diaphragm-identification.html
Last edited:
Just minor tweaks, lately, due to laziness + wet weather. Also: no rush, since it sounds pretty good already.
I'm doing a household de-cluttering, which intersects nicely with this project.
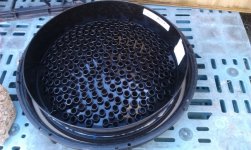
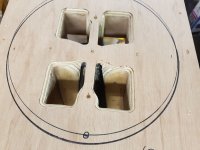
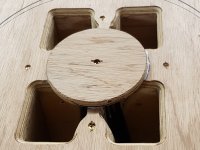
This diffuser is an old Ikea fruit bowl, that happens to be a perfect fit. I've glued it to the rear chamber's cap, with some wool sandwiched between the plastic layers. Those raised cylinders are all open, so this wool-stuffed volume is well connected to the main part of the chamber.
I'm using wood scrap and chunks of packaging foam to break up the symmetry of the other internal surfaces.
On the main body of the horn, I'm filling / stiffening the corners, and have used very primitive external damping - milk crates filled with rocks")
I'm doing a household de-cluttering, which intersects nicely with this project.
This diffuser is an old Ikea fruit bowl, that happens to be a perfect fit. I've glued it to the rear chamber's cap, with some wool sandwiched between the plastic layers. Those raised cylinders are all open, so this wool-stuffed volume is well connected to the main part of the chamber.
I'm using wood scrap and chunks of packaging foam to break up the symmetry of the other internal surfaces.
On the main body of the horn, I'm filling / stiffening the corners, and have used very primitive external damping - milk crates filled with rocks
Attachments
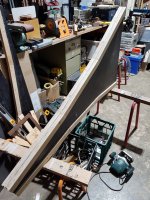
Next step: I'm going to go 2.1 way. I'm making a couple of 150cm long 100Hz horns, 90*90cm mouth, for 12" drivers. They'll cover about 2 octaves, with 2" horns taking over >500Hz.
The smaller size is:
-so they will fit in my van, thus I can make them in a workshop. The bigger one was made on site, and mostly with hand tools.
-so I can make them MUCH more rigid, yet still shift them.
-because I got a stack of cheap formply in < full size sheets.
In the medium term, I'll place them directly flanking the larger horn, roughly doubling the mouth area. In the long term, I'd like to mount them within larger bass horns (coaxial).
I only get a few hours per week to work on them, so this will probably be finished early 2018.
Here be construction pix + an image of the existing horn.
The form is a 4-cell multicell, for rigidity.
Attachments
Last edited:
Ugh, ambiguous English!
I meant one of the other meanings of 'form', not "a supporting frame". That is:
The final shape and structure of the finished horn device shall be a 4-cell multicell, for rigidity.
I boosted the cross sectional area to account for the volume the bracing takes up.
I meant one of the other meanings of 'form', not "a supporting frame". That is:
The final shape and structure of the finished horn device shall be a 4-cell multicell, for rigidity.
I boosted the cross sectional area to account for the volume the bracing takes up.
The progress has taken a while. I'm now in a better workshop (a lot more room etc), and I am making sawdust.
The current vision is to:
- sling an old 15" into the existing midbass horn, and use it over a narrower range, maybe 60Hz-120Hz (mono)
- move the 12" driver(s) to smaller mid horn(s), aiming for roughly 120Hz - 1kHz
- Switch the HF horns, go from titanium 2" to polyimide 1". This is to avoid the breakup ~10kHz
- add a fairly conventional nearfield sub using an old pair of 18" EV
I think I'll use the subwoofer as the listening chair, so that proximity gives it plenty of 'gain'. I'll cluster the midbass horns together to maximise their effective mouth size. Listening position will be ~6 metres back, so the ~2 metre spread between L and R centres should be enough.
Crossover points are approximate - they'll depend on how the clustering and positioning works.
All this subject to change, for example, I might get lazy and keep it mono.
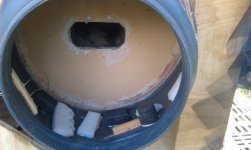
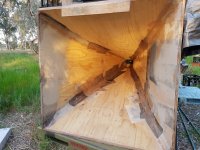
Pictured is:
- the throat of the first mid horn (150cm long, 90x90 mouth)
- the first step in filling some of the volume between the 12" cone and horn throat
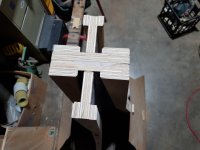
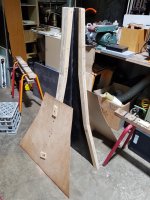
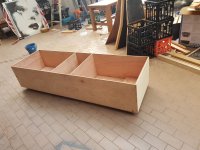
- idea* for the sub - with the midhorn and lots of junk in the background
The 1" horn I'll try is shown here Maybe Altec horn - Album on Imgur
*this is actually a wheeled day bed / storage bin that I'm making for a friend, but I chose the bracing scheme shown to get a feel for how I might put together a fairly large PPSL sub.
The current vision is to:
- sling an old 15" into the existing midbass horn, and use it over a narrower range, maybe 60Hz-120Hz (mono)
- move the 12" driver(s) to smaller mid horn(s), aiming for roughly 120Hz - 1kHz
- Switch the HF horns, go from titanium 2" to polyimide 1". This is to avoid the breakup ~10kHz
- add a fairly conventional nearfield sub using an old pair of 18" EV
I think I'll use the subwoofer as the listening chair, so that proximity gives it plenty of 'gain'. I'll cluster the midbass horns together to maximise their effective mouth size. Listening position will be ~6 metres back, so the ~2 metre spread between L and R centres should be enough.
Crossover points are approximate - they'll depend on how the clustering and positioning works.
All this subject to change, for example, I might get lazy and keep it mono.
Pictured is:
- the throat of the first mid horn (150cm long, 90x90 mouth)
- the first step in filling some of the volume between the 12" cone and horn throat
- idea* for the sub - with the midhorn and lots of junk in the background
The 1" horn I'll try is shown here Maybe Altec horn - Album on Imgur
*this is actually a wheeled day bed / storage bin that I'm making for a friend, but I chose the bracing scheme shown to get a feel for how I might put together a fairly large PPSL sub.
Attachments
Last edited:
Awesome news about the bigger/better workshop. Working in a small space can be so frustrating, especially when you're working on not small projects like big *** horns!
I like your idea about the dual 18 sub at the listening position. You going to use dsp for the delay?
Looks like the mid horn(12" driver is coming along nicely as well). The throat detail looks good. Do you plan to add any sort of filler, like Bondo, or similar to 'smooth' the transitions? Not sure how much difference that would make.
I thought the 1" horn might have been an Emilar eh500, or similar, but they didn't have vanes. Looks like a good find for sure.
I like your idea about the dual 18 sub at the listening position. You going to use dsp for the delay?
I'm stealing the idea from several prior builds.
Yea, DSP is the way to go for any low(ish) crossover point, and when delay is part of the DSP package, I may as well use it.
Looks like the mid horn(12" driver is coming along nicely as well). The throat detail looks good. Do you plan to add any sort of filler, like Bondo, or similar to 'smooth' the transitions? Not sure how much difference that would make.
I guess no difference, but I'm doing it anyway. Also smooshing lots of glue into the corners to ensure airtight seals. The 'detail' is annoying - the divided throat makes the spaces tighter and more awkward.
I thought the 1" horn might have been an Emilar eh500, or similar, but they didn't have vanes. Looks like a good find for sure.
They are nice as a workshop speaker, I'll see how they fare outdoors. They are big enough to suit a 1kHz crossover (I crossed at 800Hz earlier). I haven't done polars, but subjectively, they seem pretty uneven. The upper HF definitely has a beam that is much narrower than the horn walls.
I'm stealing the idea from several prior builds.
Yea, DSP is the way to go for any low(ish) crossover point, and when delay is part of the DSP package, I may as well use it.
Absolutely, minidsp makes it pretty easy to adjust certainly
I guess no difference, but I'm doing it anyway. Also smooshing lots of glue into the corners to ensure airtight seals. The 'detail' is annoying - the divided throat makes the spaces tighter and more awkward.
I've been there, trying to get into the tight corners at the throat can be a pain.
They are nice as a workshop speaker, I'll see how they fare outdoors. They are big enough to suit a 1kHz crossover (I crossed at 800Hz earlier). I haven't done polars, but subjectively, they seem pretty uneven. The upper HF definitely has a beam that is much narrower than the horn walls.
I wonder if it's the vanes causing issues?
Which build - is it described / depicted somewhere?I've been there, trying to get into the tight corners at the throat can be a pain.
I'd like to see more horn builds that aren't done by perfectionists with a jillion dollars worth of equipment
I think the top octave stuff is set to beam earlier than that, by the long, skinny throat.I wonder if it's the vanes causing issues?
Some people have modified or removed the vanes on similar horns, but I'm hesitant to go to the trouble*. My initial smoothing + damping tweaks did very little (I measured before and after).
Outdoors, the on-axis HF boost that beaming gives might be exactly what I want: I don't want to use electrical boost (when I only have ~10 watts available).
The direct sound will be all that matters, outdoors (not the 'power response' or 'sound field' or whatever). The horns' dispersion patterns won't have to match perfectly.
* see link RE: 811b/511b Vanes - Do You Need Them? - Tom Brennan - High Efficiency Speaker Asylum
Last edited:
Which build - is it described / depicted somewhere?
I'd like to see more horn builds that aren't done by perfectionists with a jillion dollars worth of equipment
When I was building my Inlow 135hz mid-bass horns. I'll check if I have any pics, it was a few years ago.
They were quick and dirty 'prototypes' that were in our living room un painted, with bondo spots all over them for a few years. They are remarkable mid-bass horns, in their band, ~150hz to ~700hz they are tremendous. I'm considering making another pair if I go horn loaded mid-bass on my new system. I'll have to make them look nicer this time.
off topic a bit there, but they're that good
IIRC, I used chopsticks with 320 and 400 grit sand paper wrapped around them to sand the inside corners of the throat-first horn junction area. Smash a little bit of filler in there, then once dry sand, sweat in the 41c South Texas sun, sweat more, cuss a LOT, and repeat.
That's not terribly helpful, ha.
I think the top octave stuff is set to beam earlier than that, by the long, skinny throat.
Some people have modified or removed the vanes on similar horns, but I'm hesitant to go to the trouble*. My initial smoothing + damping tweaks did very little (I measured before and after).
Outdoors, the on-axis HF boost that beaming gives might be exactly what I want: I don't want to use electrical boost (when I only have ~10 watts available).
The direct sound will be all that matters, outdoors (not the 'power response' or 'sound field' or whatever). The horns' dispersion patterns won't have to match perfectly.
* see link RE: 811b/511b Vanes - Do You Need Them? - Tom Brennan - High Efficiency Speaker Asylum
Good point, and who knows you might find a cheap pair of better fiberglass horns locally at some point in the future. Having something that works now is always worth more than a 'perfect' solution that might be. IMO
Cheers
~Gable
- Status
- This old topic is closed. If you want to reopen this topic, contact a moderator using the "Report Post" button.
- Home
- Loudspeakers
- Multi-Way
- Artichoke Horn