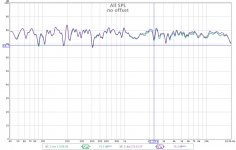

I only asked because one of your FR plots was full range 40 to 20,000 hz with no evidence of room effects in the 100 to 400 hz range that one generally sees which forces 'windowing' of measurements to limit the FR to to 200-300 to 20,000hz.
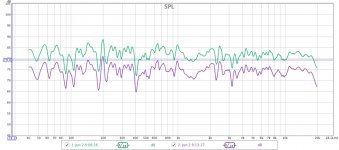
You certainly do have a 'matched pair'!
You certainly do have a 'matched pair'!
I finally made the grills for the Intimates. They will be in my workshop, so I need to protect the sticky Revelator woofer cones from dust. The grills don't seem to have much effect on the FR except at 3000Hz.
As an aside, how much smoothing do you guys normally apply to REW FR curves? Not enough and it's just a mess. Too much and I guess you are 'cheating'.
As an aside, how much smoothing do you guys normally apply to REW FR curves? Not enough and it's just a mess. Too much and I guess you are 'cheating'.
Attachments
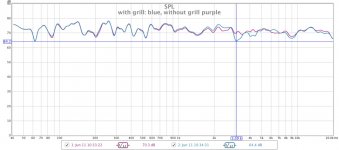
I finally made the grills for the Intimates. They will be in my workshop, so I need to protect the sticky Revelator woofer cones from dust. The grills don't seem to have much effect on the FR except at 3000Hz.
As an aside, how much smoothing do you guys normally apply to REW FR curves? Not enough and it's just a mess. Too much and I guess you are 'cheating'.
Strange, just that sharp localized dip at one fr. I've tested a lot of grille cloth over the years and found the more closed up and/or fuzzy fabrics tend to dampen HF a few dB over a broader range.
Most of the time I use 1/12th for smoothing but have gone as high as 1/24th for bragging purposes.
")
Last edited:
This speaker cloth is very thin and I stretched it quite tight.
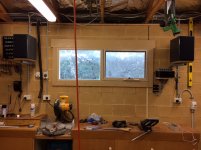
The speakers are now mounted in my workshop. They sound fantastic despite the harsh listening environment (concrete floor, brick walls & metal roof). The bass is stunning given the size of the woofer and enclosure.
I should probably measure the FR in the new environment to see how they shape up compared to the lounge room. However, they sound so good it would probably only be for academic reasons.
This was a good project. I tried some new techniques that I will certainly use again, like mitred joins and tapered internal side panels. The screw-on baffle board makes assembly and tweaking a breeze. I love the simplicity of the crossover.
A big thanks to Carl for the design and for his help along the way.
Attachments
This speaker cloth is very thin and I stretched it quite tight.
The speakers are now mounted in my workshop. They sound fantastic despite the harsh listening environment (concrete floor, brick walls & metal roof). The bass is stunning given the size of the woofer and enclosure.
I should probably measure the FR in the new environment to see how they shape up compared to the lounge room. However, they sound so good it would probably only be for academic reasons.
This was a good project. I tried some new techniques that I will certainly use again, like mitred joins and tapered internal side panels. The screw-on baffle board makes assembly and tweaking a breeze. I love the simplicity of the crossover.
A big thanks to Carl for the design and for his help along the way.
+1!
- Status
- This old topic is closed. If you want to reopen this topic, contact a moderator using the "Report Post" button.
- Home
- Loudspeakers
- Multi-Way
- Intimates 2-way Build