Thanks. I guess I got lucky as this was my first attempt at veneer. Just used PSA over baltic birch that had a light coat of wipe on poly. Been using watco danish oil for years though.
Given my own lack of skill, I was careful to design it so that, aside from the ultimate top, only one face needs veneer.
Yeah, I hope that grill doesn't rattle or resonate! Now you've got me worried. I guess I could damp it on the edges with some of that rope caulk.
Given my own lack of skill, I was careful to design it so that, aside from the ultimate top, only one face needs veneer.
Yeah, I hope that grill doesn't rattle or resonate! Now you've got me worried. I guess I could damp it on the edges with some of that rope caulk.
")
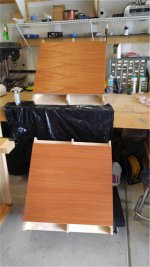
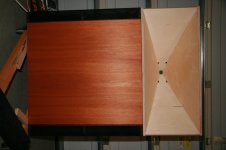
2nd unit is veneered
The second unit's front panel is veneered and a coat of finish is on it. For this one, the front panel was already attached to the cabinet so I had to trim the veneer with it in place with a utility knive. That was less nerve wracking then trimming the already veneered front panel with a router to fit flush against the top and bottom so I think I'll do it that way for the next two.
The second unit's front panel is veneered and a coat of finish is on it. For this one, the front panel was already attached to the cabinet so I had to trim the veneer with it in place with a utility knive. That was less nerve wracking then trimming the already veneered front panel with a router to fit flush against the top and bottom so I think I'll do it that way for the next two.
Attachments
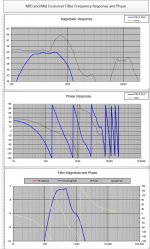
Simulation vs measurement
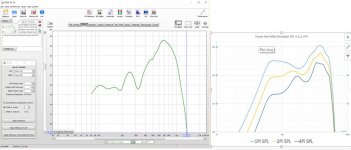
I'm still puzzling over the measured mid response I posted earlier but I'm not as puzzled as before.
I went back to HR and tweaked the L12 in my simulation to align the reflection null with the measurement. Then I exported sim results for 1, 2, and 4pi spaces and plotted them all on the same Excel graph. I made a jpg of that next to a REW chart and attached it.
The first thing I noticed was that the measurement was amazingly close to the 2 pi simulation. The data was taken in a false corner made of OSB in front of a garage door and a storage cabinet. Perhaps this material is semi-transparent to circa 200 Hz. I doubt it though because the bass bin seemed to benefit from it all the way down. My hypothesis is that boundary effects account for the missing low end response
Its interesting how the 3 different simulations come closest together just where the horn is gaining Hpattern control, 328 hz calculated. At low frequencies they are 6 db apart; at the peak only 3 db. Below the pattern control frequency, the horn can benefit from boundary support; above it there is horn gain. In between you obviously can get boundary nulls, not just from the floor.
I've assembled material for some absorption panels and hope to be in position to take new measurements within a few days and account for missing low end response.
Attachments
Finally some clean measurements
Wow! Almost two months since I updated this thread.
Here is my excuse. Like BWaslo, I was transported for mysterious chest pains. They take any chest pain I have seriously because I had a quad bypass 9 months ago. But I didn't have a flue. After two days of pain and lots of tests, a rash appeared and the diagnosis was Shingles. I'm only now getting back to where I feel like doing much of anything.
I did figure out what it takes to get clean measurements in my garage. My concept is virtually immune to sidewall reflections but has to deal with the floor and ceiling. The high ceiling garage with the speaker up on casters pushed the bounce nulls down very low in frequency to where much more absorption that I imagined or had on hand could deal with - about 8" of fiberglass top and bottom, spaced away from the boundary for greater effect.
That little dip at 500 Hz is a reflection from the plywood I have in front of the garage door on the left side. The plywood is warped and curving out into the sound path. When I padded it, the dip went away. I need to get a new panel. I cut up one of the good ones I had to make those absorption panels.
My next step is to do a crossover and then finally listen to the speaker. I did one already, which came out really well considering, but need to repeat this time using min phase measurements and not skipping the woofer mids/CD time alignment step.
I'm using a MiniDSP 2x8. I invested in a Crown CT8150 (8x125 really clean fanless watts) hoping never to have to buy an L or a C again.
As you can see the metal grills are attached to the bass bin and I'm happy to report they don't sing or rattle. They do have a resonance up in the treble but it doesn't get excited.
The inside of my horn is ready to finish and I'm wondering how to approach that. Can I just get a can of black spray paint and do a few coats, sanding in between?
Attachments
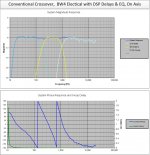
First pass crossover done
I did a conventional crossover and got phase flips at/near the crossover points. The two phase flips in the system response match the phase flips in the mids crossover filter so next, I'm going to try Harsch crossovers.
The raw mid driver response has a phase flip just past 1 Khz. I believe this is due to the reflection from the apex of the horn. I don't get a null there because I've optimized the mid port area and length.
This is done with/for a MiniDSP 2x8 so there are a fair number of PEQs used for EQ and digital delay to smooth out the transitions at crossover.
Thanks to Charlie Laub for helping me out with a problem converting measurements to minphase
Attachments
Last edited:
The first listening session
I finished pulling the MiniDSP, CT8150, and XT4002 out of my rack upstairs, rewiring it, redoing some cables and debugging the result. I took a quick listen to see if it was worth going further and stayed there until the batteries in my laptop drained. My wife poked here head in from the family room to tell my how fantastic it sounded. I couldn't agree more! I'm going to start on the 2nd horn ASAP.
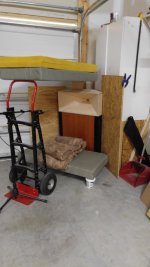
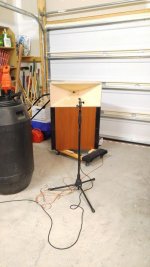
Here is a photo of the test environment - about as far from ideal as you could get. The car was just out of the picture behind the mic. Yet it sounded great anywhere in the garage as well as in the adjacent family room with the door open. I can't imagine how it will sound EQed at the listening position and with 4 bass bins instead of one.
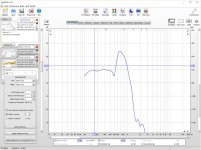
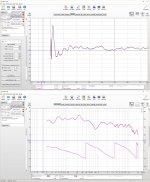
And here is the measurement itself. Not as flat as the crossover software said it would be but the crossover measurements were taken in a corner with floor and ceiling absorption.
I finished pulling the MiniDSP, CT8150, and XT4002 out of my rack upstairs, rewiring it, redoing some cables and debugging the result. I took a quick listen to see if it was worth going further and stayed there until the batteries in my laptop drained. My wife poked here head in from the family room to tell my how fantastic it sounded. I couldn't agree more! I'm going to start on the 2nd horn ASAP.
Here is a photo of the test environment - about as far from ideal as you could get. The car was just out of the picture behind the mic. Yet it sounded great anywhere in the garage as well as in the adjacent family room with the door open. I can't imagine how it will sound EQed at the listening position and with 4 bass bins instead of one.
And here is the measurement itself. Not as flat as the crossover software said it would be but the crossover measurements were taken in a corner with floor and ceiling absorption.
Attachments
Finally got a decent picture so I thought I would show it.
Yesterday I looked at distortion and confirmed what I had been hearing - I had a problem at high levels. I took the mids out and rounded off the inside edge of my surround clearance trench and apparently solved it. This was always on my list of things to do but in the excitement of the assembly process, it got deferred. I knew I was it trouble when Art Welter said over in his SynTripp thread that you had to allow for Xmech.
Now distortion products measure -50 db in the midrange at an output level of 90 db. For the BMS4550 CD, they are down 40 db from 800 Hz to 8 Khz.
This thing continues to blow me away.
Attachments
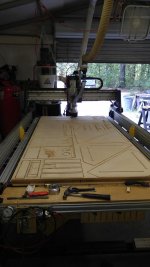
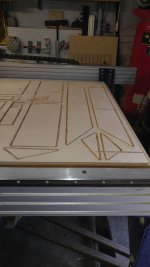
Making the 2nd horn
My CNC friend had some time available on his machine, so off I went. After an hour of setup and 2.5 hours of carving, I had all the pieces I need for my 2nd Synergy. That sounds pretty quick and easy but it omits the hours of CAD and creating/modifying tool paths in preparation.
The far end of the sheet has the pieces for a bolt-on secondary flare. This extends the horizontal pattern control frequency down to 230 Hz or so and lowers the vertical pattern control to about 900 Hz, if I recall correctly. This gives me about 3 db more between 200 and 400 Hz, per HornResp, where I'm now seeing an increase in HD (from -50db). I'm hoping it will give me better pattern control in the 500 to 1000 Hz region. But the flare is almost 4' wide so I'm not sure if my wife will let it in the house. The horn itself and the 2ndry flare are tight in the corner to lessen the visual impact. OTOH, I'm not sure if the 2-3 db estimated improvement in response ripple over the length of the listening couch will be audible.
You can see detailed polars of Art Welters SynTripp, both with and without secondary flare, in the first post of his thread. His, while similar dimensions and coverage angles, appears to be smoother in the first 20 degrees off axis than mine. I'd really like to know why that is.
Attachments
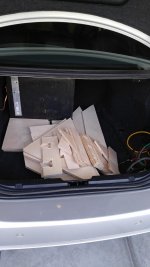
Starting 2nd build
Here we go. I'm trying to embed photos in the text.
Starting with a pile of parts in my car's trunk.
Edges of some parts need to be cleaned up
After 15 minutes of fiddling with a sander and rasp, I have the first vertical flare fully seated
https://photos.google.com/photo/AF1QipPAFSKMMhlNksR9Fel4sVSkLpHIgDoUL9MkG6o8
This shows some of the nicest things about using CNC:
speaker mounting holes are dead center
surround relief trench is dug precisely
a simple frustrum is created with 2.5 D milling. I will fill in with modelling clay to fill more of the air space
parts are held in precise alignment with dados, but not without some fiddling.
Here we go. I'm trying to embed photos in the text.
Starting with a pile of parts in my car's trunk.
An externally hosted image should be here but it was not working when we last tested it.
Edges of some parts need to be cleaned up
An externally hosted image should be here but it was not working when we last tested it.
After 15 minutes of fiddling with a sander and rasp, I have the first vertical flare fully seated
https://photos.google.com/photo/AF1QipPAFSKMMhlNksR9Fel4sVSkLpHIgDoUL9MkG6o8
This shows some of the nicest things about using CNC:
speaker mounting holes are dead center
surround relief trench is dug precisely
a simple frustrum is created with 2.5 D milling. I will fill in with modelling clay to fill more of the air space
parts are held in precise alignment with dados, but not without some fiddling.
Attachments
Last edited:
I clicked the embed image icon in the go advanced screen and pasted in the URLs. Does anybody know why those links aren't linking and why we are seeing links instead of pictures? They are fresh links as I just uploaded the pictures to a shared google photos alboum.
Trying again
trying as attachment to the URL
Attaching my local copy
Trying again
An externally hosted image should be here but it was not working when we last tested it.
trying as attachment to the URL
Attaching my local copy
Attachments
AHA! Now I got it!
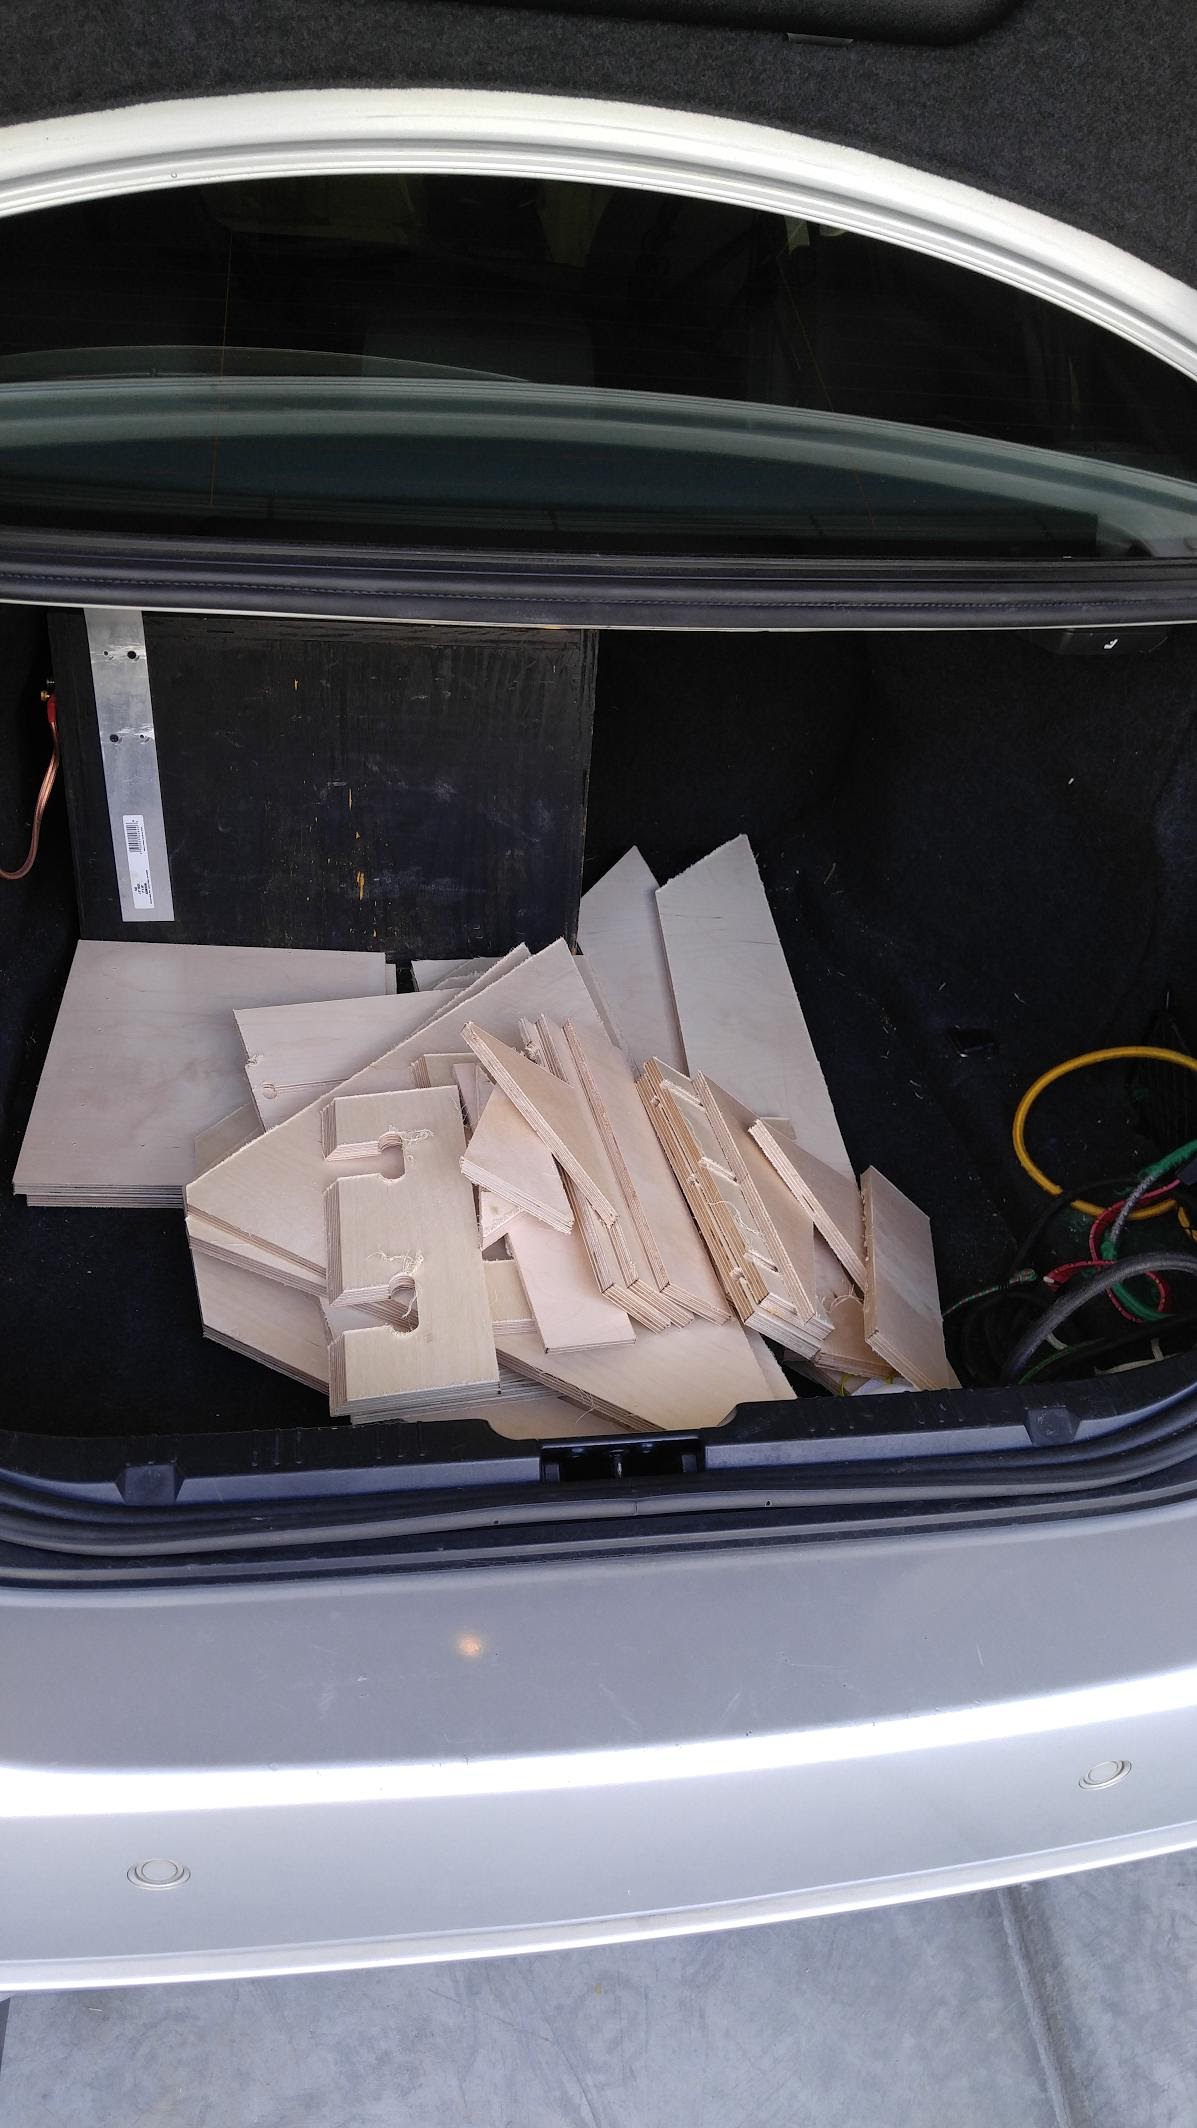
Pile of parts:
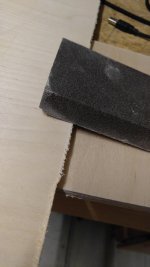
Cleanup edges sanding towards the edge and down over it:
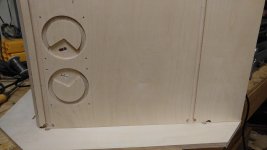
Got the first vertical flare seated after sanding the width and the length of the "plug" just right. Too tight and I'll have trouble when there is glue on it. Yes, the fillets are oversize.
Pile of parts:
Cleanup edges sanding towards the edge and down over it:
An externally hosted image should be here but it was not working when we last tested it.
Got the first vertical flare seated after sanding the width and the length of the "plug" just right. Too tight and I'll have trouble when there is glue on it. Yes, the fillets are oversize.
An externally hosted image should be here but it was not working when we last tested it.
Well I thought I'd be back at it sooner. But not till this AM did I complete the dry fitting of the vertical flares with the top and bottom plates. If I get these together perfectly square, then everything else will fit but I won't do any gluing until I've dry fit everything else. In fact, I think this time I will build the mid chamber boxes on the outsides of the vertical flares first as they will hold the flares in alignment for gluing.

This may be all for today as its already to hot and muggy to spend much time in the garage.
This may be all for today as its already to hot and muggy to spend much time in the garage.
- Status
- This old topic is closed. If you want to reopen this topic, contact a moderator using the "Report Post" button.
- Home
- Loudspeakers
- Multi-Way
- My Synergy Corner Horn and Bass Bins