A good day to post that comment. I have just got mine up and running, couldn't wait to get the cabinets finished fully, Getting used to the sound, deeper and faster bass that my LNBs with a Dalesford 8" driver but it should be like that! The mid range and lower treble seems a lot more forward and is taking a bit of getting used to. I will be posting pics and comments to my thread very soon, so keep an eye out for new posts on my thread!
Last edited:
HiFi Answers/Cambridge R50 TL Monitors
I built a pair of these in the 70s and to this day have never heard anything close to them. I had to abandon them in a house in Amsterdam in the early 80s. (No one strong enough to help me get them from the 4th floor).
Considering building another pair. The question is, can one use the Kef B164 instead of the B139?
Personally I thought the Coles/T27 combination caused coloration in the stereo image and would like to be able to adjust their levels or combine the top in a single unit....
I'm aware that Wilmslow Audio do a top of the range crossover based on the R50 and there are 'replacement' units for the other Kef units.
Anyone done a comparison?
Can I use B164s instead of B139s?
Stick to the original specs. as you say you've never heard anything close to them.
Stick to the Kef/Coles units and get hold of the Falcon Type 53 crossover. The 2 HF units are commoned at the crossover, but you could easily attenuate one or other if you still feel it is necessary.
Stick to the Kef/Coles units and get hold of the Falcon Type 53 crossover. The 2 HF units are commoned at the crossover, but you could easily attenuate one or other if you still feel it is necessary.
Hello,
I repaired a pair of R50 few months ago and I can tell you I never eerd something good like these speakers.
I share here with you my experience :
BEFORE and DOCS
[Update 08/08/2013]
Pub Cambridge Audio
Full Size
https://dl.dropboxusercontent.com/u/7577946/Cambridge R50/Cambridge audio r50 advertising.jpg
Schema
https://dl.dropboxusercontent.com/u/7577946/Cambridge R50/R50rearbaffle-JerryB.jpeg
https://dl.dropboxusercontent.com/u/7577946/Cambridge R50/CambridgeR50UserManual.01.jpeg
https://dl.dropboxusercontent.com/u/7577946/Cambridge R50/CambridgeR50UserManual.02.jpeg
I repaired a pair of R50 few months ago and I can tell you I never eerd something good like these speakers.
I share here with you my experience :
BEFORE and DOCS
An externally hosted image should be here but it was not working when we last tested it.
An externally hosted image should be here but it was not working when we last tested it.
An externally hosted image should be here but it was not working when we last tested it.
An externally hosted image should be here but it was not working when we last tested it.
An externally hosted image should be here but it was not working when we last tested it.
[Update 08/08/2013]
An externally hosted image should be here but it was not working when we last tested it.
An externally hosted image should be here but it was not working when we last tested it.
An externally hosted image should be here but it was not working when we last tested it.
An externally hosted image should be here but it was not working when we last tested it.
An externally hosted image should be here but it was not working when we last tested it.
An externally hosted image should be here but it was not working when we last tested it.
Pub Cambridge Audio
An externally hosted image should be here but it was not working when we last tested it.
Full Size
https://dl.dropboxusercontent.com/u/7577946/Cambridge R50/Cambridge audio r50 advertising.jpg
Schema
An externally hosted image should be here but it was not working when we last tested it.
An externally hosted image should be here but it was not working when we last tested it.
- The PRO 9TL Domestic by Chris Rogers
- The PRO 9TLMKII Domestic by Chris Rogers
- BJ Webb R50 Construction
https://dl.dropboxusercontent.com/u/7577946/Cambridge R50/R50rearbaffle-JerryB.jpeg
An externally hosted image should be here but it was not working when we last tested it.
An externally hosted image should be here but it was not working when we last tested it.
An externally hosted image should be here but it was not working when we last tested it.
https://dl.dropboxusercontent.com/u/7577946/Cambridge R50/CambridgeR50UserManual.01.jpeg
https://dl.dropboxusercontent.com/u/7577946/Cambridge R50/CambridgeR50UserManual.02.jpeg
An externally hosted image should be here but it was not working when we last tested it.
Here inside the beast :
some work to do :
An externally hosted image should be here but it was not working when we last tested it.
An externally hosted image should be here but it was not working when we last tested it.
An externally hosted image should be here but it was not working when we last tested it.
some work to do :
An externally hosted image should be here but it was not working when we last tested it.
An externally hosted image should be here but it was not working when we last tested it.
AFTER CLEANING
Coles Tweeter were HS so I biiught new ones :
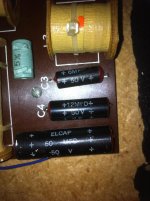
I rebuild filters with Mundorf and russian Capacitors
I changed he connectors
https://dl.dropboxusercontent.com/u...dge R50 filter crossover_FAB2007 (Custom).jpg
And Finally ;-)
An externally hosted image should be here but it was not working when we last tested it.
An externally hosted image should be here but it was not working when we last tested it.
An externally hosted image should be here but it was not working when we last tested it.
Coles Tweeter were HS so I biiught new ones :
An externally hosted image should be here but it was not working when we last tested it.
An externally hosted image should be here but it was not working when we last tested it.
I rebuild filters with Mundorf and russian Capacitors
An externally hosted image should be here but it was not working when we last tested it.
I changed he connectors
An externally hosted image should be here but it was not working when we last tested it.
https://dl.dropboxusercontent.com/u...dge R50 filter crossover_FAB2007 (Custom).jpg
And Finally ;-)
An externally hosted image should be here but it was not working when we last tested it.
An externally hosted image should be here but it was not working when we last tested it.
An externally hosted image should be here but it was not working when we last tested it.
An externally hosted image should be here but it was not working when we last tested it.
An externally hosted image should be here but it was not working when we last tested it.
An externally hosted image should be here but it was not working when we last tested it.
An externally hosted image should be here but it was not working when we last tested it.
First of all i am only trying to help!
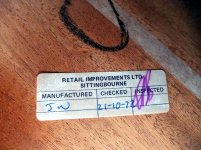
I was fortunate at the age of 24yrs in 1972 working at a shopfitting company in Sittingbourne Kent UK was able to cut and assemble these R40 & R50 speaker cabinets for the Cambridge loudspeaker company.
I am now 65yrs and 41yrs further on i had to wait to only just obtain my first pair of original R50`s.
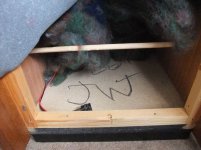
When each person assembled these speakers when finished there initials were written inside on the bottom and mine have JW and John worked on the bench next to myself so i would of helped him take these speakers to our large press when assembly was complete and the glue was all wet ready for it to cure which took about 2 1/2 hours, the press was right next to our heater so curing in all weathers was no problem.
My initials are KG so some of you may have those written on the inside of your own speakers cabinets.
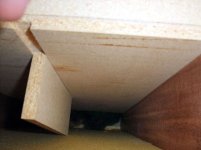
The drawings in the .pdf ones do have some errors other than that pointed out. The Major one is the fact that a groove 12mm x 5mm deep and being machined from 75mm down from the top of the front baffle plate on the right side looking at the front extends to within 12mm of the bottom so the air does not escape! The groove is 22mm in from the edge because of the softwood fixing battens.
This groove is to easily enable the connecting wires from all the speakers and the crossover in the top void to escape down to the base void and to the rear of the cabinet for external connection. The whole front baffle plate with speakers can be assembled on the bench and when soldering completed the groove has a sealing putty like substance pressed over it so when assembling the front completed baffle to the cabinet the putty seals the groove with it`s wires where it crosses the dividing panels for the different voids thus keeping them airtight to one another.
This is an easier and more professional way than drilling holes for wires into each void and aralditeing each hole. It also enables all to be completed on the bench.
The Super Tweeter recess hole in the front baffle is 3" and NOT 4"
The 2" x 1 1/2" softwood batten in the bass void goes front side to side and is not a "T" shape with part going to the rear of the cabinet. We used to use this to lift with one hand and steadying the top of the cabinet with the other when removing them from the press.
I am at the moment renovating my R50`s back to original as far as possible.
I have replaced the end edges veneer with iron on Teak wood veneer instead of contact glue and plain teak veneer. To give the aged look or Patina stain the new teak with Georgian Medium Oak stain and apply some French polish and wire wool and wax polish after hardening. The finish on the side panels was always Shellac which was sprayed on to give the French polish look.
I hope i have been some help to those thinking of making there own speakers from those very fine drawings. Of course time moves on but this is how they were constructed from 1972 to 1976 at our factory.
Keith Graham
Great to see another R50 in bits.
I am also starting to rebuild a pair but the campartment filling has been moved about, if you haven't already take a look at my thread "Cambridge R50/Ex Baobab speakers".
I am trying to find out how all the filling is suposed to fit correctly, apart from the stuff shown in my pics there is a roll and sheet of what looks like carpet underlay. Have you taken the foam off the front of yours and if so can you help?
Keith
I was very interested to hear that you made the cabinets for the R50s in the 70s. I recently bought a pair myself but they are not up to the standard of the Cambridge Audio made version. The main panels are white melamine faced while the sides and backs (where showing) are just painted gloss white. The front is not a single panel but split into two, one for the two HF units and one for the mid and bass, the gap between them forming the end port of the mid line, this being the full width of the speaker. Inside it does have the right wool filling and uses chicken wire to keep off the bass driver.
Now the seller told me he got them off a friend who worked for Cambridge Audio in the 70s and they were a prototype. I didn't think much of this story when I looked at them as they were very much home-made. However when I managed to get to the crossover I found that the capacitor values were not the same as those on the circuit diagram and I think it's unlikely that someone who made them up at home would go to the length of playing with the crossovers, so I think there may be some mileage in the story after all. Perhaps Cambridge played with changing the values before going into full production. I was
wondering if you were aware of the existence of any such prototype speakers from your work with Cambridge.
Incidentally rather than change back to the standard values (as the inductor values are unmarked this could potentially have a very strange effect on the crossover points) I replaced all the caps with individual equivalents from Wilmslow audio and they sound lovely. The nicotine staining on the melamine could not be cleaned well and hence I took the decision to cover them in wood effect vinyl as a temporary measure while I consider other potential options in the long term.
Thanks, Lawrence
Attachments
Hello Lawrence,
Just read your post and as you can see i don`t get here that often.
It was a shame that your speakers were painted on the sides but i do understand that as even when we were making these the bought in panels the teak veneer was so thin that we often used to just sand through in places and the polisher had to colour them in!...it was very difficult. All was sanded by hand and not by large drum sanders.
The mention of a prototype i have never heard of but i do know that the pair i have are about the 2nd pair ever made.......they were given to John to assemble as he was a known good cabinet maker but the parts and shapes of the board inside the speakers are ALL different and when assembling he made a mistake and put a piece in the wrong way around.....one is correct and the other incorrect...but they were always kept in pairs where ever they went so i have them now after all these years.....and whats more i can prove that they are the earliest ones by the pictures of the insides and also the label with it`s date. John`s bench was next to mine so i heard and also witnessed the conversation between the foreman and himself.....i talked to him after and saw first hand what he had done so as not to make the mistake myself. Of course as you can imagine loads of pieces of board all dripping with glue during assembly one just carries on and assembles hence the difference.
You can see the piece of wood right inside the tapered rear tunnel where it is the wrong way around compared to the other.
You can also see the lambs wool right at the top of the tunnel where it goes through the various tunneling to the front of the speaker...of course this was all laid in upon assembly....there was no wool in the large rear tapered tunnel but just from the mid range and around the base speaker compartment.
When i opened mine up the wool had clumped and dropped due to the vibrations and so was all teased out again on assembly....i did keep the same wool and the amount is important as we had to weigh it before inserting so the correct amount was in each one.
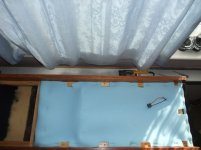
I did replace my foam though with the blue....there has to be a cut out around each screw hole otherwise when screwing the front panel on the screws will grab the foam and spin it around and tear it but you won`t know until you remove it again!
I am thinking of replacing my black laminate to the top but of course these things are always on the back boiler so to speak.
I love my R50`s dearly and have never heard anything like them but i am at the moment selling some R40`s on the bay as i don`t have the time to restore them and i need the space now
Keith
Just read your post and as you can see i don`t get here that often.
It was a shame that your speakers were painted on the sides but i do understand that as even when we were making these the bought in panels the teak veneer was so thin that we often used to just sand through in places and the polisher had to colour them in!...it was very difficult. All was sanded by hand and not by large drum sanders.
The mention of a prototype i have never heard of but i do know that the pair i have are about the 2nd pair ever made.......they were given to John to assemble as he was a known good cabinet maker but the parts and shapes of the board inside the speakers are ALL different and when assembling he made a mistake and put a piece in the wrong way around.....one is correct and the other incorrect...but they were always kept in pairs where ever they went so i have them now after all these years.....and whats more i can prove that they are the earliest ones by the pictures of the insides and also the label with it`s date. John`s bench was next to mine so i heard and also witnessed the conversation between the foreman and himself.....i talked to him after and saw first hand what he had done so as not to make the mistake myself. Of course as you can imagine loads of pieces of board all dripping with glue during assembly one just carries on and assembles hence the difference.
You can see the piece of wood right inside the tapered rear tunnel where it is the wrong way around compared to the other.
You can also see the lambs wool right at the top of the tunnel where it goes through the various tunneling to the front of the speaker...of course this was all laid in upon assembly....there was no wool in the large rear tapered tunnel but just from the mid range and around the base speaker compartment.
When i opened mine up the wool had clumped and dropped due to the vibrations and so was all teased out again on assembly....i did keep the same wool and the amount is important as we had to weigh it before inserting so the correct amount was in each one.
I did replace my foam though with the blue....there has to be a cut out around each screw hole otherwise when screwing the front panel on the screws will grab the foam and spin it around and tear it but you won`t know until you remove it again!
I am thinking of replacing my black laminate to the top but of course these things are always on the back boiler so to speak.
I love my R50`s dearly and have never heard anything like them but i am at the moment selling some R40`s on the bay as i don`t have the time to restore them and i need the space now
Keith
Attachments

This all fascinating! I'm so glad to have been directed here by a fellow member of the KEF forum where I usually lurk about.
I have just purchased a bit of a "clunker" set of Cambridge TL-200s, that I understand are actually R-50's with a higher power crossover.
These are to be a restoration project for me, and I am really looking forward to it! I simply adore the TL design when executed correctly. In fact for the last several years we here have had IMF 80's as the main speaker in our living room. These do double duty for 2 channel stereo music listening, and Home Theater (No Sub Required!)
The TLS80's are BIG, and overpower the room with their girth. The TL-200's are much more room friendly shape. I hope to get at least similar sound quality from them when properly finished.
Before opening these TL-200's up I had a 20 minute listen at home (the previous owner had recapped the filters using Polypropylene cap's from Parts Express). 20 minutes was about all I could take. I found them so ridiculously forward in the mid's, shrill in the HF, and thoroughly unbalanced across the spectrum. Bass was seemingly pretty good, but my head was splitting after that 20 minutes from the rest of things.
So I ordered up some proper R-50 high powered crossover kits from Falcon as a start.
But the biggest surprise (and huge disappointment) was when I opened them up. I found zero long haired wool in the lower section behind the woofer. There is a plug of some white polyester fiber in the lower part of the first section of the line (going up the back).
Behind the B-110 there's another wad of polyester, and behind that a small blob of the original wool. There's nothing at all in the upper section of the B-110 line.
Behind the tweeters there's nothing at all in way of wool or polyester fill, but in the lowest part of the line jammed up from below IS a wad of polyester.
I'm going to assume that someone along the way decided they could "improve" their sound by replacing much of the wool. with other material. But my goal is get these back to at least close to original as possible.
Now I have a real problem! I need to find out exactly what's missing. (Wool) I need to source it and I need to find out exactly how much to get and where to put it.
If anyone can assist with information to these questions I would be eternally grateful.
Thanks all!
Fascinating stuff. I made a pair of R50 look-alikes in the 1970s. The design was published in Practical Hi-Fi. I remember loads of high-density chipboard and hundreds of screws. The chipboard was a laminate sandwich with car underseal on the inside and veneer on the outside, but I never got round to putting on the veneer as I wanted so much to use them! I doubt that made much difference. They were simply fantastic, driven by a Beolab 5000 (which I have only today taken out of service). As far as the lambs' wool is concerned, I was sceptical that this could be the best acoustic absorbent but, as I was doing A-level physics at the time, I did a project comparing materials that might do the job and, amazingly, it was long-haired lambs' wool that worked best. Being in Edinburgh, I sourced mine by acquiring a fleece from a sheep-shearing business in the Scottish borders and cutting/carding myself to get the required mass. It made the speakers stink for a year or two (it was completely untreated, straight off the fleece) but worked wonderfully. The speakers lasted for years. We finally had to dispose of them when we moved into our current house in the mid 1990s, as there was insufficient room. I still hanker after them: the bass response was fantastic, particularly if you're an organ enthusiast! The instructions did say how much (weight) of lambs' wool to use, and from what I can remember the density was such that when evenly distributed it supported itself without much danger of it moving about. The idea is to distribute it through the transmission line so that as much sound as possible is absorbed. The length of the line is then such that any sound that does make it to the port is back in phase with the sound from the woofer (i.e. half a wavelength). I think there was also some stuffed behind the mid-range unit, just to damp any chamber echo (that box is sealed), but I'm not so sure of that. If I ever come across the instructions again I'll post a scan; but I suspect they went when I disposed of the speakers.
Hi all,im new to this site and to this game,I am restoring a pair of R50s.In my own opinion i have done a cracking job on re-venering ,sanding and re-staining the cabinets.The problem i have is the two tweeters on one dont work,as it is both, the bottom keff t 27 is out would this break the circuit to the top tweeter,which i cant identify.As it is both could it be something else before i pay out for replacments.Is there anyway to check before making an exspensive mistake.Any info would be greatly apreciated as i need these beautiful things to do what they should.Thanks.
Last edited:
Hi,I am in the middle of restoring my R50s.I have re-venered the cabinets and are looking very nice,for my first attempt. Now for the technical bit.I have the Kef and the Cole not working on one side. Could it be they have blown,or more likely something else.I am on a limited budget and don't want to spend out on the wrong things.How could I test? I am a complete novice to this but eager to learn.If I do have to replace,should I source original or replacements, i .e falcon acoustics? Can I change just the side which has blown,or will I have to do all 4 to keep them even?I also need to re_foam the midrange,or again better to replace? Where would I get original spares from.Sorry,lits of questions but I don't want to make the wrong move.Thanks in advance.
Hi Mikey, I am a Noob here but would think if neither tweeter is working it would more likely be a crossover/connection problem. I've no idea whether a continuity test alone on the tweeters would tell you. It would certainly be worth forking out a few for a cheap multimeter anyway. They are so useful once you have one.
Last edited:
Mikey G,
Contact Falcon and order the capacitors to replace everyone on your crossovers. They are old and most likely out of spec.
Do not use Solens or other PP caps, use the original style that Falcon sells.
I bought a beat up pair of Tl 200's / (R 50's) a little over a year ago locally.
Replaced all the drivers except the B 200's which are okay (thankfully) Also replaced the crossovers with the ones with the updated slope on the B 110 ( I can't remember the model), all from Falcon. Teased out the wool and rewired the pair. Made a new baffle for one of the speakers to replace a damaged one.
These things are 30+ years old. They are in a room ~ 16' X 40'. Wonderful sound. Well worth the effort and $ imo.
You could try moving the working drivers to the non working drivers box and see what happens. If they still do not work then its a crossover issue, if they work then defective drivers.
I did replace my foam though with the blue....there has to be a cut out around each screw hole otherwise when screwing the front panel on the screws will grab the foam and spin it around and tear it but you won`t know until you remove it again!
-----------
Dear Keith i am in the process of restoring a a pair of 1976 Cambridge Audio TL100 (The export version of the r40).
When i opened the cabinets i found out that the foam was cut behind the speakers possibly from the guy who replaced some caps in the crossovers in the 80's or 90's when my Dad had these.
Now i was looking for a replacement and didnt know what type of foam to use so i ordered a 5mm (same as original) acoustic transparent foam .
Is this the right type or i need another type ?
Thanks
Andreas
- Status
- This old topic is closed. If you want to reopen this topic, contact a moderator using the "Report Post" button.
- Home
- Loudspeakers
- Multi-Way
- Cambridge Audio R50 and Rogers Monitor repair