Hi, I would like to share my first build with you, the Clearwave RBR. First many thanks to Jed for the design.
I have already purchased drivers for my next build but I thought it best to start with something not too difficult.
The components were purchased from Madisound with the crossover upgrade option.
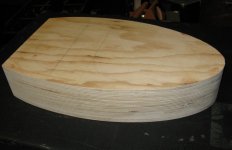
I wanted to depart from the square box design and was inspired by the Theophany speakers I had seen in the local hifi shop which have curved sides. I designed the cabinets in AutoCAD ensuring the same internal volume as the original design, printed off the curved shape onto paper that I used as a template. I decided not to mitre the front baffle, as I will always use them with the front covers (kids and cats) and I liked the sharper lines.
I cut out the top, bottom and two middle curved partitions with a jig saw and joined them on top of each other with a couple of long screws. I then sanded them while they were joined together to obtain a consistent curved profile.
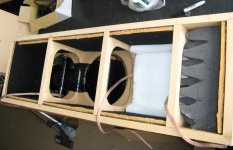
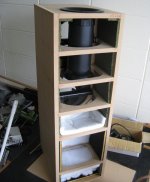
The frame of the cabinets were assembled with wooden dowels, screws and PVA. A fair amount of thought went into the order of the assembly, screwing the frame together to drill the dowel holes, then taking apart to screw and glue some of the parts and finally gluing the dowels in place and the frame as 3 parts. I was really concerned that the frame would not be square and true after assembly, which was important to allow the layers to join without being racked and the smallest chance of a gap developing between the layers.
There are 6 layers of 3mm MDF (pre-bent with a little water and a few very light kerfs cut with a knife). Each layer was then strapped and glued one, then two at a time to the frame with HEAPS of PVA. The first layer is also doweled to the frame.
Each of the layers were made oversize then routed to their final dimensions.
Inside each speaker has Intertechnik acoustic foam and a little Acousta Stuf fiber.
Wood veneer is locally sourced Rimu joined in 300mm wide strips with about 5 coats of low sheen polyurethane.
The stands are from 60mm O/D diameter 6mm thick walled steel pipe welded to 6mm thick MS plate. Holes have been tapped for steel spikes that I haven’t yet installed. Only one coat of paint with a couple more to go.
I'm not sure that this construction will scale up to a larger pair of floor standing speakers but I'm looking forward to starting the next pair.
Thanks for checking out my pictures. I think I have the “DIY bug”.

I have already purchased drivers for my next build but I thought it best to start with something not too difficult.
The components were purchased from Madisound with the crossover upgrade option.
I wanted to depart from the square box design and was inspired by the Theophany speakers I had seen in the local hifi shop which have curved sides. I designed the cabinets in AutoCAD ensuring the same internal volume as the original design, printed off the curved shape onto paper that I used as a template. I decided not to mitre the front baffle, as I will always use them with the front covers (kids and cats) and I liked the sharper lines.
I cut out the top, bottom and two middle curved partitions with a jig saw and joined them on top of each other with a couple of long screws. I then sanded them while they were joined together to obtain a consistent curved profile.
The frame of the cabinets were assembled with wooden dowels, screws and PVA. A fair amount of thought went into the order of the assembly, screwing the frame together to drill the dowel holes, then taking apart to screw and glue some of the parts and finally gluing the dowels in place and the frame as 3 parts. I was really concerned that the frame would not be square and true after assembly, which was important to allow the layers to join without being racked and the smallest chance of a gap developing between the layers.
There are 6 layers of 3mm MDF (pre-bent with a little water and a few very light kerfs cut with a knife). Each layer was then strapped and glued one, then two at a time to the frame with HEAPS of PVA. The first layer is also doweled to the frame.
Each of the layers were made oversize then routed to their final dimensions.
Inside each speaker has Intertechnik acoustic foam and a little Acousta Stuf fiber.
Wood veneer is locally sourced Rimu joined in 300mm wide strips with about 5 coats of low sheen polyurethane.
The stands are from 60mm O/D diameter 6mm thick walled steel pipe welded to 6mm thick MS plate. Holes have been tapped for steel spikes that I haven’t yet installed. Only one coat of paint with a couple more to go.
I'm not sure that this construction will scale up to a larger pair of floor standing speakers but I'm looking forward to starting the next pair.
Thanks for checking out my pictures. I think I have the “DIY bug”.
Thanks
") Thanks for you kind comments. I am not new to woodwork as I have completed a lot of DIY on my home; fences, retaining walls, decks, etc. and a couple of cabinets for the kitchen.
Thanks for you kind comments. I am not new to woodwork as I have completed a lot of DIY on my home; fences, retaining walls, decks, etc. and a couple of cabinets for the kitchen.
The driver rebates were routed manually by eye. Popped the drivers in the hole, traced around the outside of them, then carefully routed the rebates. I think I'll use a router circle guide next time!
They have turned out quite solid, a relatively high pitched sound when you knock you knuckles against them.
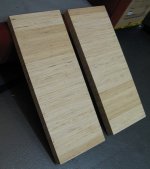
I flush trimmed the sides with a timber guide about the same size as the baffle which you can see on the photo with the straps (though I cut the mitres off the one you see in the photo). Then I ran the router along the length of the timber guide and bit by bit plunged the router untill it was flush. The same process was used on the top (see photo).
They sound great, very smooth and open sound in the mids which is the strength of this speaker. The bass is full and warm (quite a bit of gain in my room I think). The tops are good but a little bit harsh at times when driven hard.
Thanks for you kind comments. I am not new to woodwork as I have completed a lot of DIY on my home; fences, retaining walls, decks, etc. and a couple of cabinets for the kitchen.The driver rebates were routed manually by eye. Popped the drivers in the hole, traced around the outside of them, then carefully routed the rebates. I think I'll use a router circle guide next time!
They have turned out quite solid, a relatively high pitched sound when you knock you knuckles against them.
I flush trimmed the sides with a timber guide about the same size as the baffle which you can see on the photo with the straps (though I cut the mitres off the one you see in the photo). Then I ran the router along the length of the timber guide and bit by bit plunged the router untill it was flush. The same process was used on the top (see photo).
They sound great, very smooth and open sound in the mids which is the strength of this speaker. The bass is full and warm (quite a bit of gain in my room I think). The tops are good but a little bit harsh at times when driven hard.
Attachments


I flush trimmed the sides with a timber guide about the same size as the baffle which you can see on the photo with the straps (though I cut the mitres off the one you see in the photo). Then I ran the router along the length of the timber guide and bit by bit plunged the router untill it was flush. The same process was used on the top (see photo).
That is a cool idea, I will have to save that one!
Hi, I used ADOS F2 contact adhesive. Probably not the most stable glue for attaching veneer but has held together so far with no slippage.
I started with a vertical seam on the very back and wrapped the veneer around using a softish rubber roller and rolled using vertical strokes. I placed a thin plastic strip under the join and overlapped the veneer. Then I cut through both layers of the veneer (at the overlap), removed the cut section and the plastic, then rolled the veneer down. A little sanding vertically on the seam fills any join with wood dust which leaves the join almost invisible. Matching the grain colour at the seam helps.
I started with a vertical seam on the very back and wrapped the veneer around using a softish rubber roller and rolled using vertical strokes. I placed a thin plastic strip under the join and overlapped the veneer. Then I cut through both layers of the veneer (at the overlap), removed the cut section and the plastic, then rolled the veneer down. A little sanding vertically on the seam fills any join with wood dust which leaves the join almost invisible. Matching the grain colour at the seam helps.
McFeely's in Wisconsin is one stateside source for our secretVery nice work, How do you calculate the volume of something like that?
btw, you have Robertson screws there? I thought nobody else had caught on to our little Canadian secret
Cheers,
dooper
Speaking again for the veneer, did you need to apply constant pressure during the glue hardening time? If yes how?
Maybe it depends on the glue type, but I used in the past wood glue (PVA), it is very efficient when hardened, but it cannot work good when the veneer is not pressed against the surface for some time because the veneer tends to warp and thus detach from the surface
Thanks, Ralf
Maybe it depends on the glue type, but I used in the past wood glue (PVA), it is very efficient when hardened, but it cannot work good when the veneer is not pressed against the surface for some time because the veneer tends to warp and thus detach from the surface
Thanks, Ralf
Hi neutron7 and thanks for your comment. I first did scale drawings in Autocad, these drawings I print and use as cutting templates. Within Autocad it is easy to measure an area or volume plus a little bit of maths adding together the different shapes.
Hi Ralf. No I didn't use constant pressure. Once the contact adhesive is set, you just press the two pieces together. I did use the rubber roller a bit to make usre there was no air bubbles.
Next time I will try PVA and then using an iron to put the veener on.
I fabricated the stands and welded them together with a MIG welder. My welding was not very good so I finished the stand with a little bit of Epoxy filler at the join and smoothed it around with my thumb.
Grilles
How did you construct the grilles? If it was in a post I missed it - interested in the cloth material and if the grilles are raised up off the surface of the baffles?
Edit - Oh I see the flush-mounted fasteners - so, how are the grilles themselves done?
Beautiful work!
How did you construct the grilles? If it was in a post I missed it - interested in the cloth material and if the grilles are raised up off the surface of the baffles?
Edit - Oh I see the flush-mounted fasteners - so, how are the grilles themselves done?
Beautiful work!
I know this thread is two years old, but when I saw these loudspeakers I was literally blown away by the craftsmanship, and I am an avid amateur woodworker.
pop4Richard. You mentioned in this thread that you were going to build a floorstanding version of these speakers. Did you ever get around to it?
Also, has anyone else designed and built speakers with cabinets like these? This is precisely the style that I want to build once I finish a pair of Amigas that I am just getting started on.
They remind me a bit of my Paradigm Signature S8's in my living room (absolutely mindblowing loudspeakers by the way) only a "miniature version" of them.
Or, they kinda look like a hybrid of Apperion Verus Grands. Little ones, that is.
And then a technical question if I may, if some can answer it. How do the smooth back lines of the cabinet perform with respect to reducing standing waves and does anyone have any links to papers, discussions on that?
Thanks.
ATC, Scan Speak, Eton
Hi Frankie, thanks for the kind comment.
I have started a pair of floorstanders, but not using that design (as yet). I have collected a few drivers over the past 2 years, which is becoming a bit of a hobby in itself! (a bit like my wife's shoe collection), and I am not sure what direction to take in the cabinet design or which drivers to use.
I thought a good place to start was to just build a test box and have a listen to some drivers before I put a lot of effort into building another curved cabinet, which I like the look of a lot .
I’ve started with the ATC dome, 2 x SS 22w/8851 woofers and the ScanSpeak Revelator R2904/7000-05 tweeter per cabinet. To make it easier (I hope) I’m using a DEQX for the crossover.
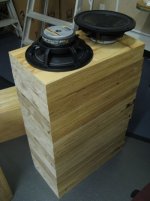
I have some ply I could use to build a laminate curved cabinet, but I like the idea of bending thin ply or MDF like the RBR build. Unfortunately this would cover the end grains of the laminated ply, which I like the look of.
Quote from Frankie
“And then a technical question if I may, if some can answer it. How do the smooth back lines of the cabinet perform with respect to reducing standing waves and does anyone have any links to papers, discussions on that? “
When you bend the MDF panel to create the curve (opposed to a laminate machined curve or deep kerfs) it becomes a lot stiffer and the panel resonance increases quite a lot. A bit like bending a hand saw and playing it with a violin bow (if one is so inclined).
I think that this would be a benefit for the cabinet design.
Does anyone have a comment on this?
Hi Frankie, thanks for the kind comment.
I have started a pair of floorstanders, but not using that design (as yet). I have collected a few drivers over the past 2 years, which is becoming a bit of a hobby in itself! (a bit like my wife's shoe collection), and I am not sure what direction to take in the cabinet design or which drivers to use.
I thought a good place to start was to just build a test box and have a listen to some drivers before I put a lot of effort into building another curved cabinet, which I like the look of a lot .
I’ve started with the ATC dome, 2 x SS 22w/8851 woofers and the ScanSpeak Revelator R2904/7000-05 tweeter per cabinet. To make it easier (I hope) I’m using a DEQX for the crossover.
I have some ply I could use to build a laminate curved cabinet, but I like the idea of bending thin ply or MDF like the RBR build. Unfortunately this would cover the end grains of the laminated ply, which I like the look of.
Quote from Frankie
“And then a technical question if I may, if some can answer it. How do the smooth back lines of the cabinet perform with respect to reducing standing waves and does anyone have any links to papers, discussions on that? “
When you bend the MDF panel to create the curve (opposed to a laminate machined curve or deep kerfs) it becomes a lot stiffer and the panel resonance increases quite a lot. A bit like bending a hand saw and playing it with a violin bow (if one is so inclined).
I think that this would be a benefit for the cabinet design.
Does anyone have a comment on this?
Attachments
-
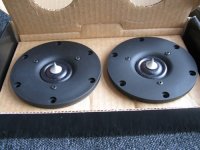 ss tweeters sml.jpg158.1 KB · Views: 295
 -
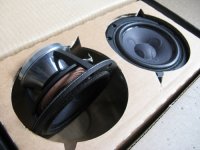 SS mids.jpg151.2 KB · Views: 296
 -
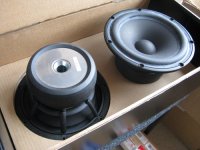 ss woofers sml.jpg153.2 KB · Views: 314
 -
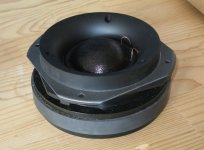 atc sml.jpg188.4 KB · Views: 706
 -
 laminate sml.jpg229.2 KB · Views: 780
 -
 front sml.jpg329.3 KB · Views: 777
 -
 back sml.jpg222.9 KB · Views: 813
 -
 baffle sml.jpg299.3 KB · Views: 803
 -
 eton sml.jpg125.7 KB · Views: 348
Richard, thanks for the response. Let me ask you this: Since it's now been 2 years since the curved cabinet build, how is the resilence of the cabinets? Are they holding up well?
I'm thinking of taking a page out of your design book and implementing that method into a pair of 3 1/2 way speakers. Scanspeak and Accuton drivers.
I'm thinking of taking a page out of your design book and implementing that method into a pair of 3 1/2 way speakers. Scanspeak and Accuton drivers.
- Status
- This old topic is closed. If you want to reopen this topic, contact a moderator using the "Report Post" button.
- Home
- Loudspeakers
- Multi-Way
- Clearwave RBR curved cabinet build