Hi Guys,
I don’t post much here but I do lurk and learn a lot from reading all the helpful info. I just finished my first speaker design and thought I’d share it here. It was a long project but very fun and I learned tons. Here is the original design thread at htguide:
http://www.htguide.com/forum/showthread.php4?t=25031
And what follows is a summary of the design…
Introduction:
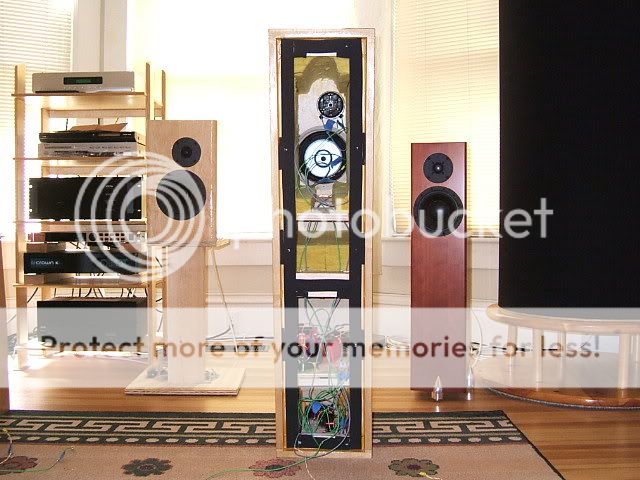
Here are the Spassvogel MT’s!
The goal of this project was to design the highest quality MT speaker that I can. Keeping to a “no compromise” principle wherever possible. In terms of sound characteristics, I was looking for really precise clarity, pinpoint accuracy, and low distortion.
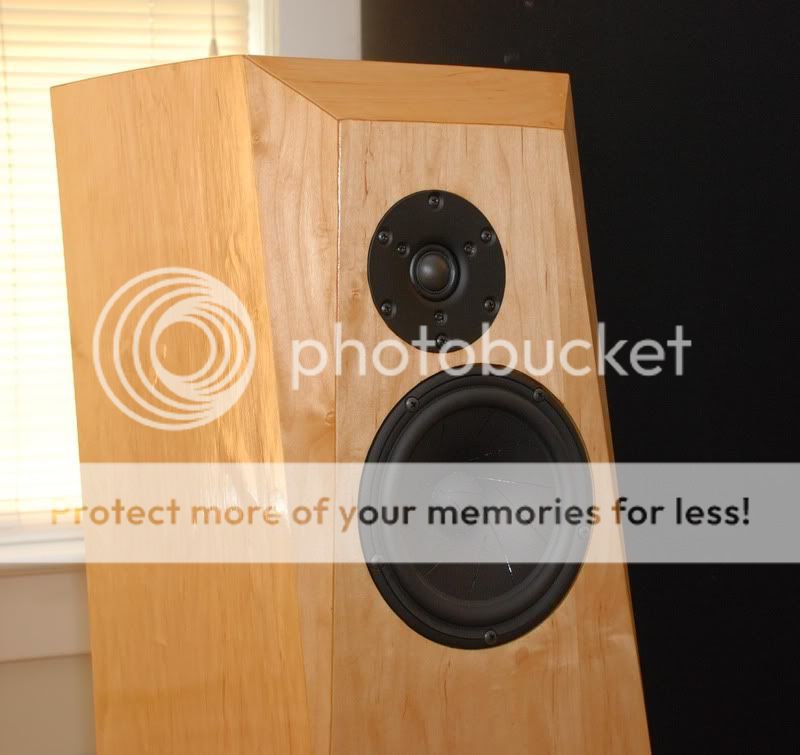
The cabinet, the drivers, and the crossover may be the 3 most important aspects of designing a speaker. So let’s dig into each aspect. The cabinets turned out not to be standard boxes. Rather, they are slanted and faceted. The drivers aren’t cheap, but they do have some of the lowest distortion characteristics available. The crossover ended up with 13 components per speaker but each one has it’s place. Total cost for drivers and crossover parts is about $1200 - $1400 for the pair. The cabinet might be a bit of a woodworking challenge for novices like myself. But it does make a pretty dramatic statement there in the room.") And I think it helped the sound characteristics significantly.
And I think it helped the sound characteristics significantly.
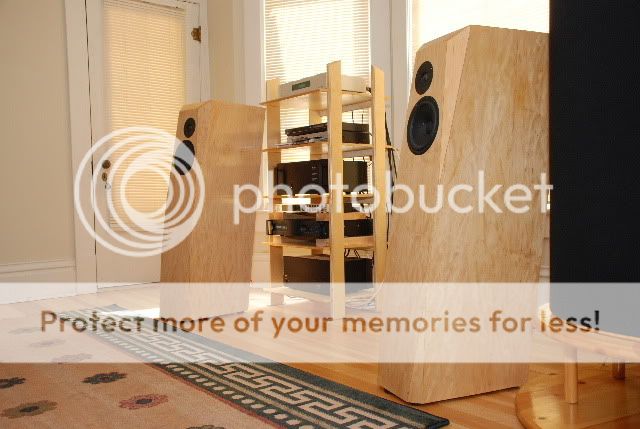
Overall, I am really happy with how these speakers came out. They sound wonderful to my ears. They do have that pinpoint clarity I was after. Yet the soundstage seems to be very large. There is an open, airy quality to the sound that seems as though everything just clicks together. To me it seems like tons of bass for an MT. They sound good both on and off axis. OK, that’s enough audio babble terminology. Let’s just say that all my expectations, going into this project, have been exceeded. It was fun, a learning experience, and the speakers turned out great. At least I think they did. Of course, everyone hears these things differently. So I’ve got to include a disclaimer that this is all to my ears, to my tastes, in my room, etc. Your mileage may vary, professional driver on a closed course, objects in mirror are closer than they appear, etc. Build at your own risk.
Big thanks to all the people at htguide who helped me through my first design project. Especially, in no particular order, ThomasW, DennisH, Taco, chasw98 (Chuck), Taco, cjd (Chris), Ryan (-k-), and Zaph (John). Thanks guys. You’re all great. :T
The drivers: Scanspeak 6600 tweeter and 18W/8531 woofer:
Given the goals of this project, I looked around for a tweeter and woofer with very low distortion, good CSD, and reasonably flat frequency response. I only considered drivers for which there are third part distortion measurements. So that brought me to the measurement posts of Zaph, MarkK, and John Marsh. Two of the best performers looked to be the Scanspeak 6600 tweeter and the 18W/8531 woofer. Low distortion, good CSD plots, and good looking frequency output.
An important note about the 6600 tweeter:
I really like this tweeter. It sounds great. But it’s not without some minor inconveniences. There’s no cover to protect it, so watch out if you have little kids around. It’s expensive. And there seems to have been 3 different versions out there- one each in 2006, 2007, and 2008. Zaph has been on top of this:
http://www.zaphaudio.com/oldversions/
I started this project in early 2007 and so I have been using a 2007 version of the tweeter. Near as I can tell, if you compare Zaph’s data on the 2007 version, above, with the 2008 version, here:
http://www.zaphaudio.com/tweetermishmash/
…the main difference is that the 2008 version is about 3 db more sensitive than the 2007 version. Other than that it looks to be pretty much the same. Which means that if you use the 2008 version you’ll have to pad down the tweeter by about 3 more ohms than I did. So for R3 in the crossover (see below) use 9 ohms rather than the 6 ohms I’m using. In my crossover and bill of materials (BOM) I’ll show exactly what I did for consistency’s sake- the 2007 tweeter padded at R3 = 6 ohms. But keep this change in mind. You’ll definitely need it.
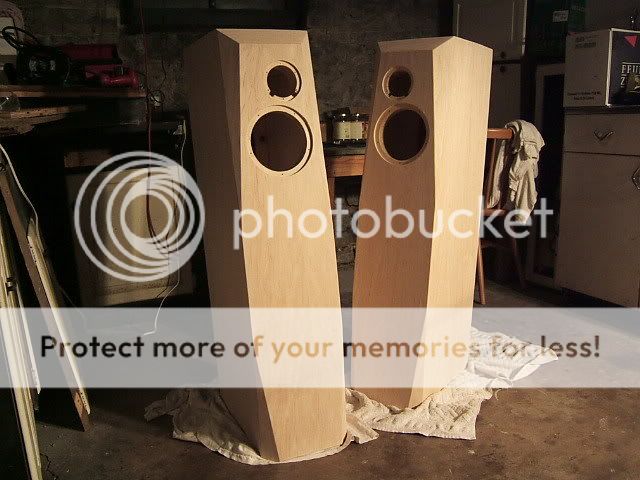
Cabinet design: Slanted and facets-
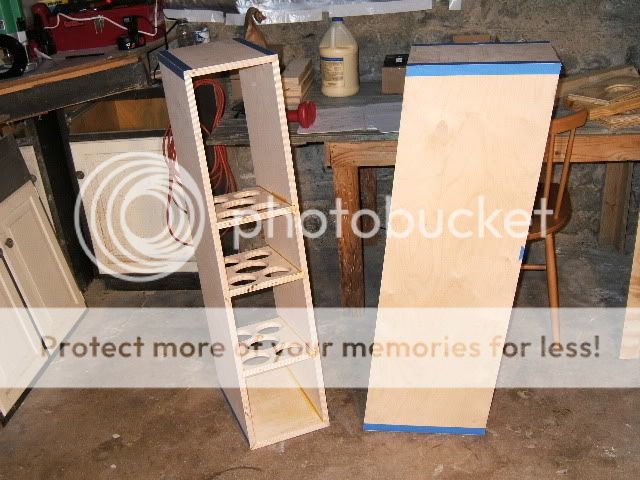
In trying to max out the capabilities of this speaker, I did not want to neglect the cabinet design and simply start with a rectangular box. So I built a series of test cabinets with different structures around the tweeter- offset versus centered, sharp edges versus roundovers versus facets, etc. Also straight versus slanted. I took measurements to see what performed best. In the end, what looked best was a slanted cabinet with the tweeter offset from the center and surrounded by facets. To see these measurements for yourself, have a look at pages 10 and 11 of this thread, starting around post #321:
http://www.htguide.com/forum/showthread.php4?t=25031&page=10
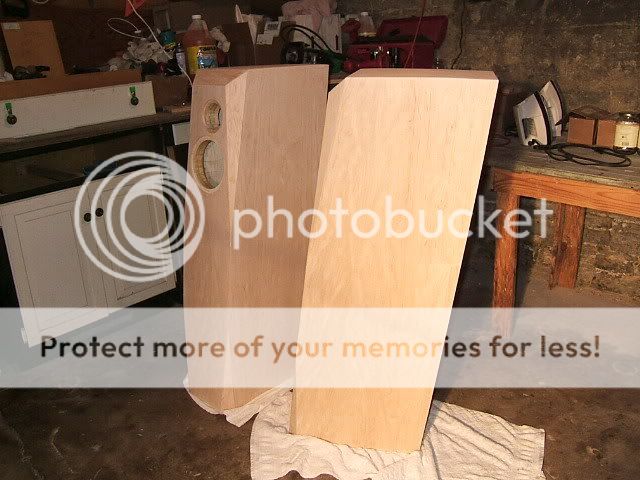
These shots of the cabinets, prior to finishing, should give a good idea of the angles and shape of the cabinets.
The project name: Spassvogel MT’s:
Well, the project needs a name. I can’t always call it “the ScanSpeak 6600 & 18W/8531 speaker.” My gal has been calling me “Spassvogel” of late. It’s German for someone who pulls your leg and jokes around a lot. Basically, it translates to ‘joke bird.’ So we’ll call these speakers the Spassvogel MT’s.
Zaph’s ZRT’s:
If you’re interested in this driver combination, you might also want to know about Zaph’s ZRT’s:
http://www.zaphaudio.com/ZRT.html
Same drivers but a somewhat different crossover and a very different cabinet. The ZRT’s can be purchased with preassembled crossovers and use a pre-made cabinet:
http://www.madisound.com/catalog/product_info.php?products_id=8362
I’ve not heard the ZRT’s so I cannot offer any direct comparison. However I did once hear another speaker designed by Zaph and I was quite impressed. So my guess is that the ZRT's also sound excellent.
The next post has all the crossover and project build info…
I don’t post much here but I do lurk and learn a lot from reading all the helpful info. I just finished my first speaker design and thought I’d share it here. It was a long project but very fun and I learned tons. Here is the original design thread at htguide:
http://www.htguide.com/forum/showthread.php4?t=25031
And what follows is a summary of the design…
Introduction:
Here are the Spassvogel MT’s!
The goal of this project was to design the highest quality MT speaker that I can. Keeping to a “no compromise” principle wherever possible. In terms of sound characteristics, I was looking for really precise clarity, pinpoint accuracy, and low distortion.
The cabinet, the drivers, and the crossover may be the 3 most important aspects of designing a speaker. So let’s dig into each aspect. The cabinets turned out not to be standard boxes. Rather, they are slanted and faceted. The drivers aren’t cheap, but they do have some of the lowest distortion characteristics available. The crossover ended up with 13 components per speaker but each one has it’s place. Total cost for drivers and crossover parts is about $1200 - $1400 for the pair. The cabinet might be a bit of a woodworking challenge for novices like myself. But it does make a pretty dramatic statement there in the room.
And I think it helped the sound characteristics significantly. Overall, I am really happy with how these speakers came out. They sound wonderful to my ears. They do have that pinpoint clarity I was after. Yet the soundstage seems to be very large. There is an open, airy quality to the sound that seems as though everything just clicks together. To me it seems like tons of bass for an MT. They sound good both on and off axis. OK, that’s enough audio babble terminology.
Let’s just say that all my expectations, going into this project, have been exceeded. It was fun, a learning experience, and the speakers turned out great. At least I think they did. Of course, everyone hears these things differently. So I’ve got to include a disclaimer that this is all to my ears, to my tastes, in my room, etc. Your mileage may vary, professional driver on a closed course, objects in mirror are closer than they appear, etc. Build at your own risk. Big thanks to all the people at htguide who helped me through my first design project. Especially, in no particular order, ThomasW, DennisH, Taco, chasw98 (Chuck), Taco, cjd (Chris), Ryan (-k-), and Zaph (John). Thanks guys. You’re all great. :T
The drivers: Scanspeak 6600 tweeter and 18W/8531 woofer:
Given the goals of this project, I looked around for a tweeter and woofer with very low distortion, good CSD, and reasonably flat frequency response. I only considered drivers for which there are third part distortion measurements. So that brought me to the measurement posts of Zaph, MarkK, and John Marsh. Two of the best performers looked to be the Scanspeak 6600 tweeter and the 18W/8531 woofer. Low distortion, good CSD plots, and good looking frequency output.
An important note about the 6600 tweeter:
I really like this tweeter. It sounds great. But it’s not without some minor inconveniences. There’s no cover to protect it, so watch out if you have little kids around. It’s expensive. And there seems to have been 3 different versions out there- one each in 2006, 2007, and 2008. Zaph has been on top of this:
http://www.zaphaudio.com/oldversions/
I started this project in early 2007 and so I have been using a 2007 version of the tweeter. Near as I can tell, if you compare Zaph’s data on the 2007 version, above, with the 2008 version, here:
http://www.zaphaudio.com/tweetermishmash/
…the main difference is that the 2008 version is about 3 db more sensitive than the 2007 version. Other than that it looks to be pretty much the same. Which means that if you use the 2008 version you’ll have to pad down the tweeter by about 3 more ohms than I did. So for R3 in the crossover (see below) use 9 ohms rather than the 6 ohms I’m using. In my crossover and bill of materials (BOM) I’ll show exactly what I did for consistency’s sake- the 2007 tweeter padded at R3 = 6 ohms. But keep this change in mind. You’ll definitely need it.
Cabinet design: Slanted and facets-
In trying to max out the capabilities of this speaker, I did not want to neglect the cabinet design and simply start with a rectangular box. So I built a series of test cabinets with different structures around the tweeter- offset versus centered, sharp edges versus roundovers versus facets, etc. Also straight versus slanted. I took measurements to see what performed best. In the end, what looked best was a slanted cabinet with the tweeter offset from the center and surrounded by facets. To see these measurements for yourself, have a look at pages 10 and 11 of this thread, starting around post #321:
http://www.htguide.com/forum/showthread.php4?t=25031&page=10
These shots of the cabinets, prior to finishing, should give a good idea of the angles and shape of the cabinets.
The project name: Spassvogel MT’s:
Well, the project needs a name. I can’t always call it “the ScanSpeak 6600 & 18W/8531 speaker.” My gal has been calling me “Spassvogel” of late. It’s German for someone who pulls your leg and jokes around a lot. Basically, it translates to ‘joke bird.’ So we’ll call these speakers the Spassvogel MT’s.
Zaph’s ZRT’s:
If you’re interested in this driver combination, you might also want to know about Zaph’s ZRT’s:
http://www.zaphaudio.com/ZRT.html
Same drivers but a somewhat different crossover and a very different cabinet. The ZRT’s can be purchased with preassembled crossovers and use a pre-made cabinet:
http://www.madisound.com/catalog/product_info.php?products_id=8362
I’ve not heard the ZRT’s so I cannot offer any direct comparison. However I did once hear another speaker designed by Zaph and I was quite impressed. So my guess is that the ZRT's also sound excellent.
An externally hosted image should be here but it was not working when we last tested it.
The next post has all the crossover and project build info…
OK, if you’ve read this far and are interested in some more details, here they are…
Cabinet and port dimensions:
The front baffle is 10” wide. The tweeter is offset from the center line by 7/8”. My cabinets are almost 44” tall, with the tweeter height about 39-40”. Just get the tweeter height to be at your ear level when you’re seated. Take into account any rubber feet you may want to put underneath the cabinets. My cabinets are about 16” deep. The 16” dimension was settled on by starting with a 10” baffle and approximating the golden ratio just to make it look nice. The whole cabinet is angled back by 8 degrees. An easy way to make the cabinets angled back is to build rectangular cabinets and then put an 8 degree doorstop underneath. But then the top of the speakers won’t be parallel to the floor. So I cut the wood such that the tops are parallel to the floor. At any rate, keep the baffle width of 10” and the angle at 8 degrees. The facets are 2” deep and cut at 45 degrees. The edge facets are about 20” long. Keep those close. The rest you can play with. All told, my speakers weigh about 87 pounds each. Yikes! 8O
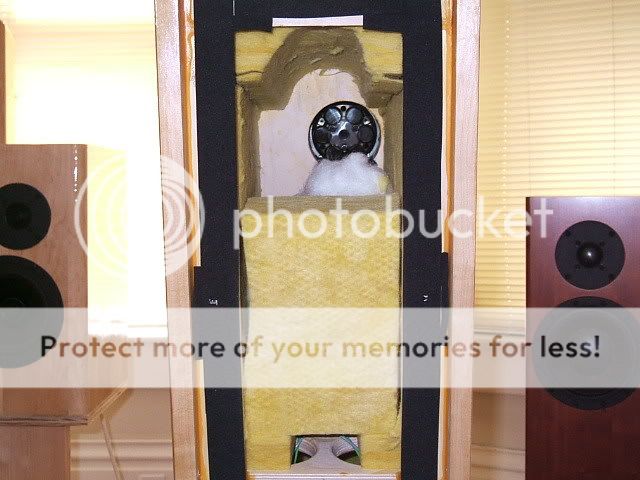
For a port, I used a 2” Precision Port centered in the rear baffle approximately behind the tweeter. The tuning is for 34 Hz. Which worked out to be the 2 flares connected together without needing a middle piece. I found a significant preference for a 34 Hz tuning over a 30 Hz tuning (among others I tried). The volume I’m using inside is about 2397 cubic inches (39.3 liters). That’s not the total internal volume of the cabinet. I sealed the cabinets off at the middle shelf brace. So that leaves lots of room in the bottom to store the crossovers. (Or you could make the speakers ~18” shorter and put them on a bass bin, etc.) I settled on this volume from some listening tests with various bass/port tunings. A photo of the shelf braces is shown here. The middle brace is where I sealed it off. (The photo shows the brace before I sealed it.)
My cabinet has a removable rear baffle. I did this because I knew that, as the design was worked on, I’d have to get in there a lot. But it makes the build more complicated. Now that the design is complete, there’s no need for the removable rear baffle.
Stuffing/acoustic absorption:
I tried different arrangements and went with what sounded best. Although the differences here seemed small. What I settled on was a piece of 3” thick Owens Corning 703 rigid fiberglass at the bottom of the cabinet, about 8”x12”. A 1.5” thick piece sitting behind the woofer at the rear of the cabinet, about 5”x8”. The rest of the innards are lined with 1.5” thick OC703 except for the front baffle. And then about 1/4 (I’m guessing) a pound of Acoustastuf placed behind the woofer. The OC703 can be tough to find and/or expensive. I had some around and it’s a little bit easier to deal with than R19 fiberglass from the hardware store. It stays together as a mostly solid piece. You can probably just use R19 (or R13, etc.) instead if it’s easier. You might want to find how much R19 provides similar absorption to the OC703 for a good place to start. Feel free to change the stuffing to personal taste.
Before adding the Acoustastuf and the rear piece of OC703:
Afterwards. Although I trimmed this rear OC703 piece from 3” thick to 1.5” after taking the photo.
Crossover:
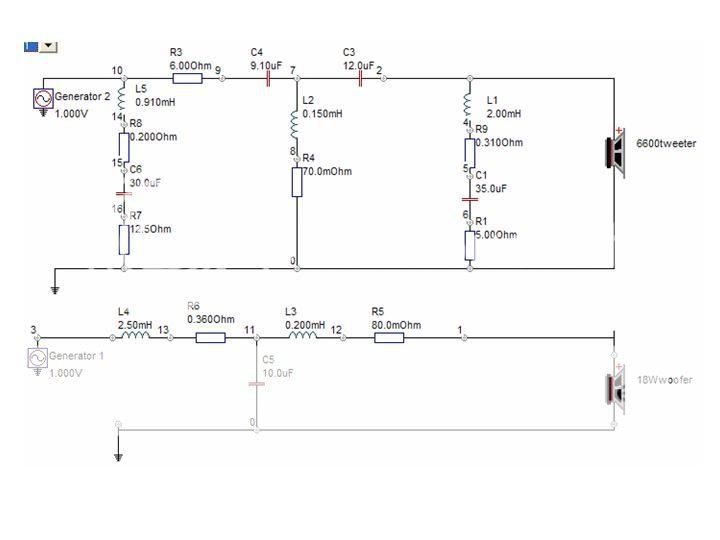
The circuit has a third-order electrical slope for each the tweeter (C4, L2, C3) and the woofer (L4, C5, L3). The resulting acoustic response is pretty much dead-on a Linkwitz-Riley fourth-order. So that turned out well. R3 is a tweeter padding resistor that you can change to taste. You will likely need to change this to about 9 ohms when using the current 2008 version of the 6600 tweeter. See the notes on the 6600 tweeter above. Besides, you may want to try different R3 values to see what you like best. There are 2 LCR notch filters present. The L5, C8, R7 filter helps keep the impedance pretty flat. The L1, C1, R1 filter suppresses a low level bump in tweeter output below 1,000 Hz. I listened with and without each LCR filter. They seem to help the sound a little, so I like having them in there. R4, R5, R6, R8, and R9 are “dummy” resistors just to account for the DCR of the inductors. They’re not physical parts of the crossover so do not put them in.
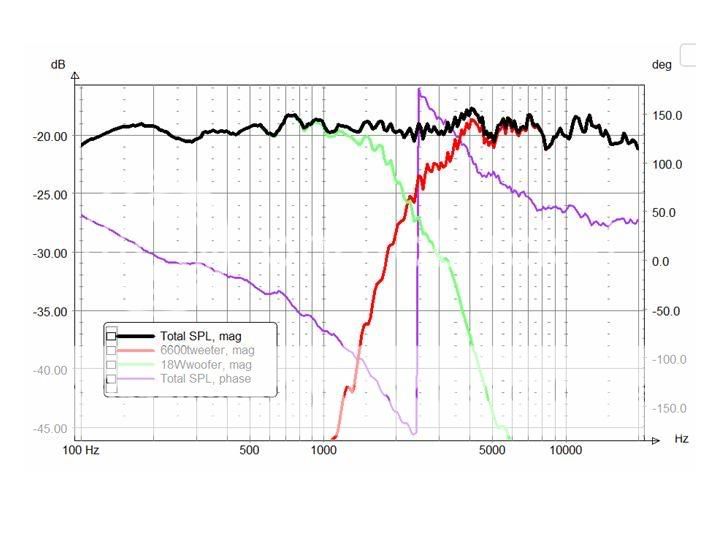
Here is the modeled frequency response using raw (not smoothed) data. I’m happy with how flat it turned out, almost +/- 3 db.
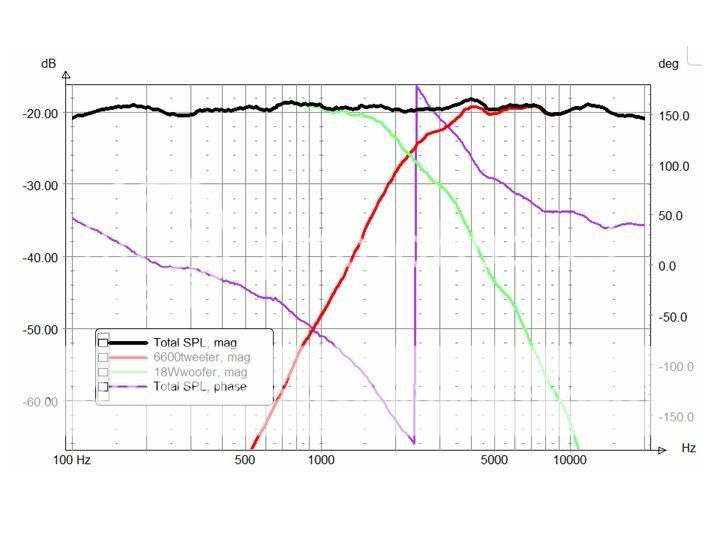
Often, when you see frequency response plots posted, there has been some smoothing applied. And the scale of the plot may be larger. So here’s what one of those looks like with 1/12th octave smoothing:
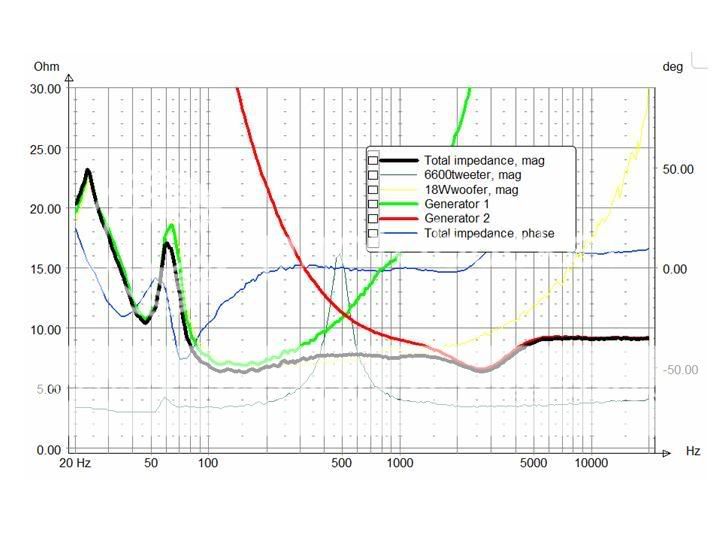
Here is the modeled impedance plot. It’s pretty flat and never drops below 6 ohms. When I use a meter to measure resistance at the binding posts, it reads 6.6 ohms. My guess is it should be fine for tube amps and receivers.
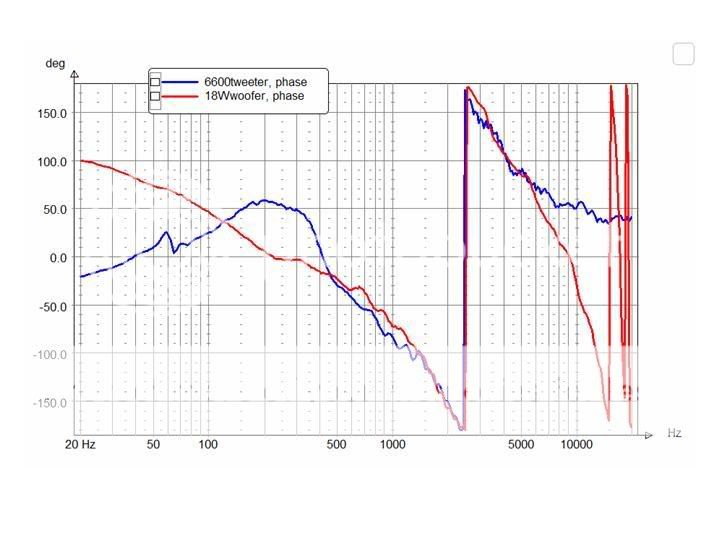
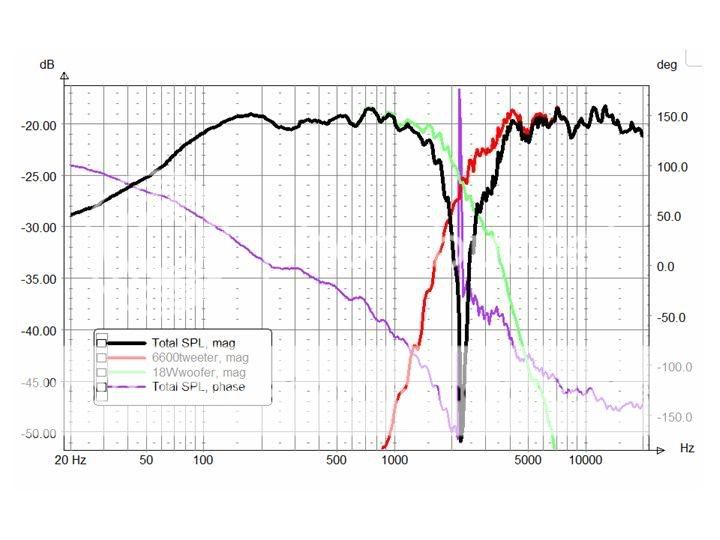
And now for the modeled phase response. Looks like good overlap between the drivers from ~500 - ~5,000 Hz.
A modeled null with a reversed tweeter. A very nice dip.
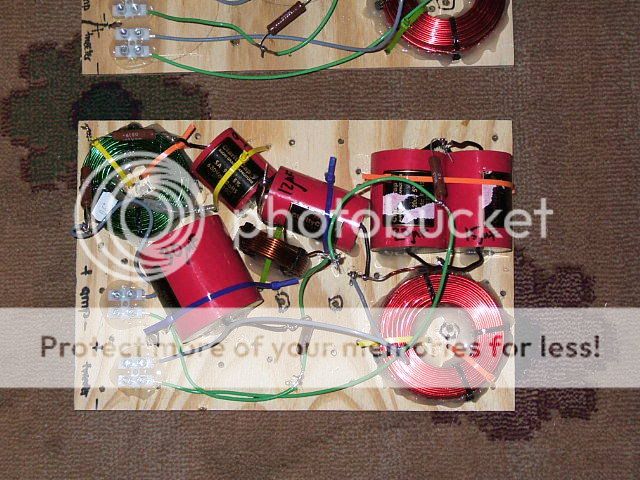
Crossover construction:
It’s pretty straightforward. Remember that R4, R5, R6, R8, and R9 are “dummy” resistors in there just to account for the DCR of the inductors. Don’t add them in. As you might be able to tell from the photo on the right side, the C1 35 uF cap is made from a 20 uF and a 15 uF cap wired in parallel. There was no 35 uF cap available so I went with the 20 and 15. Also I made the R3 tweeter padding resistor of 6 ohms from a 5 ohm and a 1 ohm resistor in series, because there was no 6 ohm resistor available. And using 2 resistors won’t hurt the heat handling either. You can see them in the top left of the photo, above the green inductor.
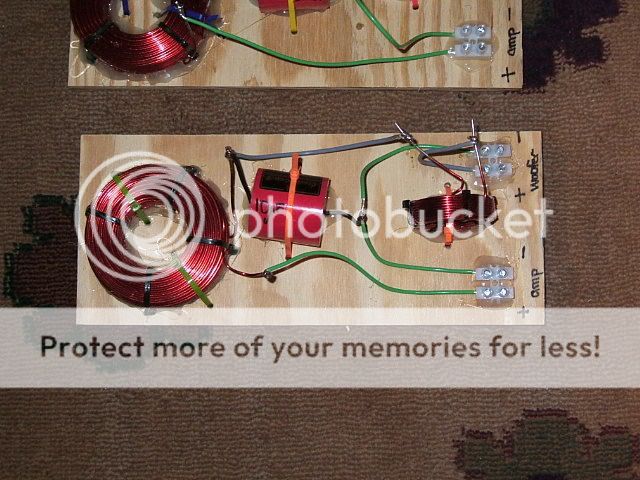
The tweeter circuit:
The woofer circuit:
Bill of Materials (BOM):
Here are the crossover and driver parts you’ll need. Binding posts, ports, wire, wood, etc. are not listed.
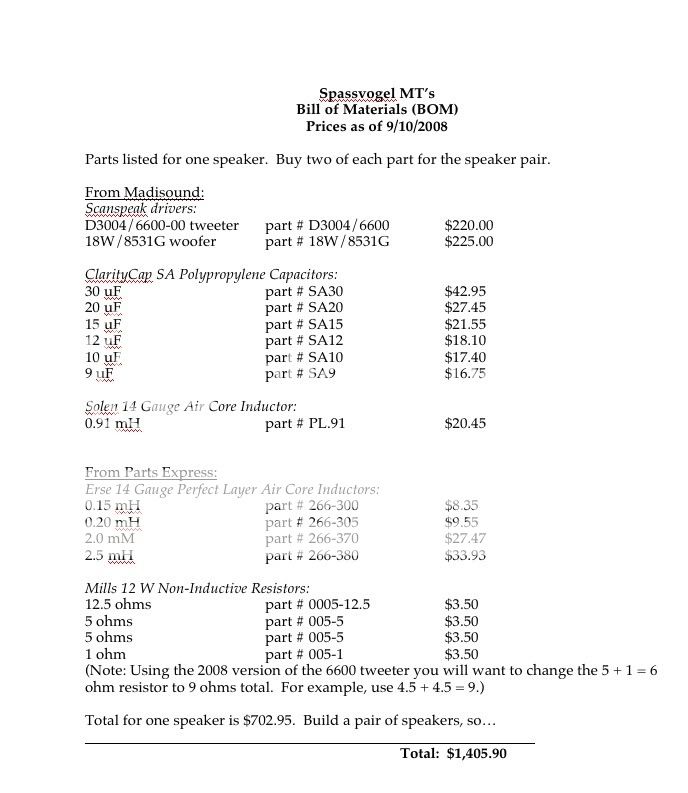
So it’s about $1400 for the pair. That was using the expensive Clarity SA caps. When voicing the crossover I used Solen caps. They sounded just fine. I think I might have heard an improvement with the Clarity Caps. It makes no sense to me why I would hear a difference and maybe there is none. But I had so much time and effort invested in this project that I just spent the cash on expensive caps to be sure. If you use the Solen caps you’ll save about $190. If you use the Dayton resistors instead of the Mills that will save about another $20. I couldn’t really tell any difference between the Dayton and Mills. So the driver + crossover cost range for the project is about $1200 - $1400, depending on how fancy you want to get.
I took lots of photos throughout the build. So if you want to see or hear about any particular aspect, feel free to ask. And heck, if anyone out there actually starts to build these things, I'd be happy knowing about it. So drop me an email. They're very fun speakers. Enjoy.
Cabinet and port dimensions:
The front baffle is 10” wide. The tweeter is offset from the center line by 7/8”. My cabinets are almost 44” tall, with the tweeter height about 39-40”. Just get the tweeter height to be at your ear level when you’re seated. Take into account any rubber feet you may want to put underneath the cabinets. My cabinets are about 16” deep. The 16” dimension was settled on by starting with a 10” baffle and approximating the golden ratio just to make it look nice. The whole cabinet is angled back by 8 degrees. An easy way to make the cabinets angled back is to build rectangular cabinets and then put an 8 degree doorstop underneath. But then the top of the speakers won’t be parallel to the floor. So I cut the wood such that the tops are parallel to the floor. At any rate, keep the baffle width of 10” and the angle at 8 degrees. The facets are 2” deep and cut at 45 degrees. The edge facets are about 20” long. Keep those close. The rest you can play with. All told, my speakers weigh about 87 pounds each. Yikes! 8O
For a port, I used a 2” Precision Port centered in the rear baffle approximately behind the tweeter. The tuning is for 34 Hz. Which worked out to be the 2 flares connected together without needing a middle piece. I found a significant preference for a 34 Hz tuning over a 30 Hz tuning (among others I tried). The volume I’m using inside is about 2397 cubic inches (39.3 liters). That’s not the total internal volume of the cabinet. I sealed the cabinets off at the middle shelf brace. So that leaves lots of room in the bottom to store the crossovers. (Or you could make the speakers ~18” shorter and put them on a bass bin, etc.) I settled on this volume from some listening tests with various bass/port tunings. A photo of the shelf braces is shown here. The middle brace is where I sealed it off. (The photo shows the brace before I sealed it.)
My cabinet has a removable rear baffle. I did this because I knew that, as the design was worked on, I’d have to get in there a lot. But it makes the build more complicated. Now that the design is complete, there’s no need for the removable rear baffle.
Stuffing/acoustic absorption:
I tried different arrangements and went with what sounded best. Although the differences here seemed small. What I settled on was a piece of 3” thick Owens Corning 703 rigid fiberglass at the bottom of the cabinet, about 8”x12”. A 1.5” thick piece sitting behind the woofer at the rear of the cabinet, about 5”x8”. The rest of the innards are lined with 1.5” thick OC703 except for the front baffle. And then about 1/4 (I’m guessing) a pound of Acoustastuf placed behind the woofer. The OC703 can be tough to find and/or expensive. I had some around and it’s a little bit easier to deal with than R19 fiberglass from the hardware store. It stays together as a mostly solid piece. You can probably just use R19 (or R13, etc.) instead if it’s easier. You might want to find how much R19 provides similar absorption to the OC703 for a good place to start. Feel free to change the stuffing to personal taste.
Before adding the Acoustastuf and the rear piece of OC703:
Afterwards. Although I trimmed this rear OC703 piece from 3” thick to 1.5” after taking the photo.
Crossover:
The circuit has a third-order electrical slope for each the tweeter (C4, L2, C3) and the woofer (L4, C5, L3). The resulting acoustic response is pretty much dead-on a Linkwitz-Riley fourth-order. So that turned out well. R3 is a tweeter padding resistor that you can change to taste. You will likely need to change this to about 9 ohms when using the current 2008 version of the 6600 tweeter. See the notes on the 6600 tweeter above. Besides, you may want to try different R3 values to see what you like best. There are 2 LCR notch filters present. The L5, C8, R7 filter helps keep the impedance pretty flat. The L1, C1, R1 filter suppresses a low level bump in tweeter output below 1,000 Hz. I listened with and without each LCR filter. They seem to help the sound a little, so I like having them in there. R4, R5, R6, R8, and R9 are “dummy” resistors just to account for the DCR of the inductors. They’re not physical parts of the crossover so do not put them in.
Here is the modeled frequency response using raw (not smoothed) data. I’m happy with how flat it turned out, almost +/- 3 db.
Often, when you see frequency response plots posted, there has been some smoothing applied. And the scale of the plot may be larger. So here’s what one of those looks like with 1/12th octave smoothing:
Here is the modeled impedance plot. It’s pretty flat and never drops below 6 ohms. When I use a meter to measure resistance at the binding posts, it reads 6.6 ohms. My guess is it should be fine for tube amps and receivers.
And now for the modeled phase response. Looks like good overlap between the drivers from ~500 - ~5,000 Hz.
A modeled null with a reversed tweeter. A very nice dip.
Crossover construction:
It’s pretty straightforward. Remember that R4, R5, R6, R8, and R9 are “dummy” resistors in there just to account for the DCR of the inductors. Don’t add them in. As you might be able to tell from the photo on the right side, the C1 35 uF cap is made from a 20 uF and a 15 uF cap wired in parallel. There was no 35 uF cap available so I went with the 20 and 15. Also I made the R3 tweeter padding resistor of 6 ohms from a 5 ohm and a 1 ohm resistor in series, because there was no 6 ohm resistor available. And using 2 resistors won’t hurt the heat handling either. You can see them in the top left of the photo, above the green inductor.
The tweeter circuit:
The woofer circuit:
Bill of Materials (BOM):
Here are the crossover and driver parts you’ll need. Binding posts, ports, wire, wood, etc. are not listed.
So it’s about $1400 for the pair. That was using the expensive Clarity SA caps. When voicing the crossover I used Solen caps. They sounded just fine. I think I might have heard an improvement with the Clarity Caps. It makes no sense to me why I would hear a difference and maybe there is none. But I had so much time and effort invested in this project that I just spent the cash on expensive caps to be sure. If you use the Solen caps you’ll save about $190. If you use the Dayton resistors instead of the Mills that will save about another $20. I couldn’t really tell any difference between the Dayton and Mills. So the driver + crossover cost range for the project is about $1200 - $1400, depending on how fancy you want to get.
I took lots of photos throughout the build. So if you want to see or hear about any particular aspect, feel free to ask. And heck, if anyone out there actually starts to build these things, I'd be happy knowing about it. So drop me an email. They're very fun speakers. Enjoy.
I’ll post this little update on the off chance that anyone has been looking at this design…
After listening to the speakers for a month, the sound seemed to be missing a little bit of the sparkle or airiness it had before. It was niggling at me. So I opened up the speakers for one last time. I took out the OC703 that was lining the top and sides. Then increased the OC703 behind the woofer to 3”. And bumped up the Acoustastuf to about 1/2 pound. It sounds better now, like I had it earlier. OK, no more changes. Really.
After listening to the speakers for a month, the sound seemed to be missing a little bit of the sparkle or airiness it had before. It was niggling at me. So I opened up the speakers for one last time. I took out the OC703 that was lining the top and sides. Then increased the OC703 behind the woofer to 3”. And bumped up the Acoustastuf to about 1/2 pound. It sounds better now, like I had it earlier. OK, no more changes. Really.
Thanks guys. These are only the second pair of speakers I’ve ever built. And the first ones I’ve designed. Very fun.
I’m not sure that the crossover here will help with the ZRT’s too much. Because of the angled and faceted baffle here, things are different. After building the final cabinets and taking measurements, I plugged in the ZRT crossover, out of curiosity. Things did not look good in the computer. But I also did not spend much time trying to optimize component values while keeping the ZRT crossover topology. So if you use and straight, rectangular cabinet, use the ZRT crossover. If you make it angled and faceted, use the Spassvogel crossover.
The cabinets are ported and tuned to about 34 Hz. The volume is about 2,400 cubic inches or about 39 liters. I know that other people tune this woofer lower, like 30 Hz in Zaph’s ZRT’s. But I found that the mids sounded a little more clear with the higher tune. I did lots of listening to various tunes. And there is still lots of bass there- much more than I expected from a 2-way. Since I completed the speakers, I have not been using my sub at all for music listening. (Movies are different, of course). They really don’t seem to need a sub for music. To my ears, at least.
These are only the second pair of speakers I’ve ever built. And the first ones I’ve designed. Very fun.I’m not sure that the crossover here will help with the ZRT’s too much. Because of the angled and faceted baffle here, things are different. After building the final cabinets and taking measurements, I plugged in the ZRT crossover, out of curiosity. Things did not look good in the computer. But I also did not spend much time trying to optimize component values while keeping the ZRT crossover topology. So if you use and straight, rectangular cabinet, use the ZRT crossover. If you make it angled and faceted, use the Spassvogel crossover.
The cabinets are ported and tuned to about 34 Hz. The volume is about 2,400 cubic inches or about 39 liters. I know that other people tune this woofer lower, like 30 Hz in Zaph’s ZRT’s. But I found that the mids sounded a little more clear with the higher tune. I did lots of listening to various tunes. And there is still lots of bass there- much more than I expected from a 2-way. Since I completed the speakers, I have not been using my sub at all for music listening. (Movies are different, of course). They really don’t seem to need a sub for music. To my ears, at least.
- Status
- This old topic is closed. If you want to reopen this topic, contact a moderator using the "Report Post" button.