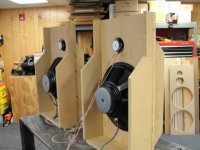
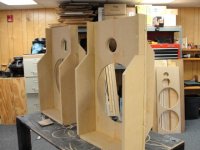
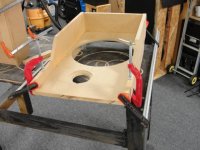
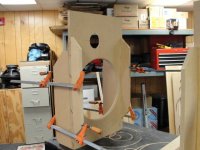
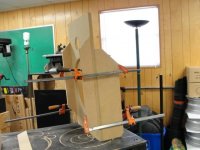
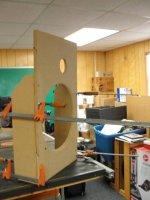
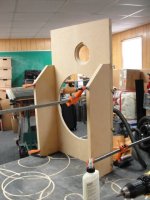
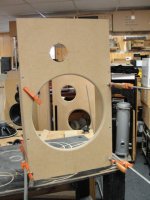
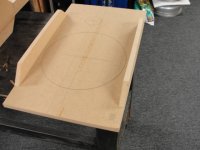
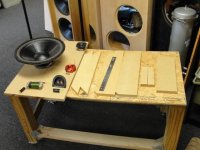
Got the wings on and just attached the platforms. Going to mount the drivers and build the crossovers next. Deciding if I should use t-nuts or just screws to mount the woofers. I like the look of Allen cap screws but not sure I want washers and nuts on the backside.


I asked about the wing taper in #3149 but did not really get an answer. I did find the below post by John (#1174):
"Tapering the upper wing is actually a good idea. 1-2" depth is ideal."
I did it more for looks than anything though but am curious about your question as well.
"Tapering the upper wing is actually a good idea. 1-2" depth is ideal."
I did it more for looks than anything though but am curious about your question as well.
The original Manzanitas that John and I built had slightly deeper wings (I think) and one was tapered. The taper is meant to prevent cavity resonances, because on side is always changing compared to the other. That also smooths out some baffle ripple.
But when I published the plans here in this thread, John wanted to make the construction easier, something just about anyone could build with material easily available. Thus the wings became a simpler shape and a little shallower, to allow for an easy build and to avoid cavity resonances.
But when I published the plans here in this thread, John wanted to make the construction easier, something just about anyone could build with material easily available. Thus the wings became a simpler shape and a little shallower, to allow for an easy build and to avoid cavity resonances.
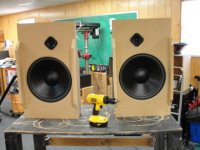
Drivers mounted
Curious, how big of a difference the woofer trap and bigger gauge inductors would be? Do you think an untrained or very casual audio enthusiast would be able to notice the difference? I ordered the 266-446 & 255-272 for now, figuring I can always upgrade in the future.


Curious, how big of a difference the woofer trap and bigger gauge inductors would be? Do you think an untrained or very casual audio enthusiast would be able to notice the difference? I ordered the 266-446 & 255-272 for now, figuring I can always upgrade in the future.
You did a great job on the baffles. They really are nice.
The better parts and the trap definitely make things more refined. But it's hard describe precisely, and like all things audio, hard to predict if two different people would consider the fancier parts worth the money.
If you already have the standard parts it probably makes sense to put the crossover together and listen. Give them 50 to 100 hours to settle in then start playing with room placement.
The fancier parts are always available. It won't change the Ultras basic sound but they will make it more polished. Likely cleaner treble with the big inductor and a bit of grunge removal in the midrange with the woofer trap.
Skorpio, did you test it I think whether or not to try 😀I have some other suggestions regarding this matter, as another coil in series with the woofer would be problematic (RDC):
#1: Instead of the trap Circuit (15uF//0,4mH), you can try with a Zobel directly accross the woofer terminals: R+C = 6R8+22uF.
This prevents the rising impedance and gives better damping and no extra coil added i series with woofer to degrade performance.
#2: A cheaper alternative would be to make the 20mH coil a part of the trap. This is done by connecting a 330nF capacitor in parallel with the 20mH.
I haven't tested theese yet, but they will be on my to-do-list")
Every now and again John would send out little tidbits of information on some of the projects he was working on. Unfortunately I never had a chance to hear most of them, just the one's he schlepped to the Lone Star Audio Fest. Those were all pretty excellent.
But in one email he went into a bit of detail, including build pics, of the upgraded 15" stand mounted Manzi. He mentioned a few times on this thread a few months later and to the best of my knowledge it just disappeared into the thread after that.
He didn't go into fine detail but I'm guessing his descriptions and photos could get you really, really close if you want to give it a shot.
Why? The large tapered wing on the back and the smaller tapered wing on the front is similar to what he did on at least one of this later commercial designs. He must have liked what it did.
The post from this thread with photos: https://www.diyaudio.com/community/threads/fast-fun-inexpensive-ob-project.110583/post-5388601. His description, including wing sizes, a few posts later. A description of crossover changes are a few posts further but doesn't go into specifics values, just the needed approximate changes.
His email describing the Manzi updates in the next post.
John's email. This was a few months earlier than the post on the forum so some of the details are a little different:
Thought I would send some pics of the design - construction process for the prototype subject I have alluded to on the DIY forum. After assembly and testing I did a couple of additional modifications, but most would not notice much change from the provided pictures.
Made some changes in the rear wing upper shape - dimensions. With the effective woofer path length increasing from 11" to 18" on the updated design, the overall system efficiency increases to the point that no pad is required on the Vifa. So the system with Vifa series trap in place nets out around 87 or so db/watt. The Q of the 15 is so high that nearly all of its native 87.5 db/watt efficiency is retained even with the large series inductor. Overall dimensions are basically the same as the original except the 4" of overall added depth. The various wing shapes and depth(s) are such that unwanted cavity resonances and stored energy are minimal, no greater than the original with the 4" rear wing depth. The only down side is it is a more complicated structure and it will require more time and care to build.
All the parts for the baffle and wings can be cut with a standard 7-14" circular saw except of course the driver cut outs. They can be done with a good router (preferred) or hand held saber saw. So a guy in an apartment with a balcony can actually build this. Just clamps and glue oh my!
Hopefully I can work on a final version with nice cosmetic qualities. Using the cheap PE 18 Mh inductor, the final configuration will have a total material cost around $ 100 each. All baffle parts are 3/4" MDF. You can get a 24" X 48" sheet at Home Depot for $12 or less most of the time. Glue is $4. A half dozen 2-1/2" wood screws can make the project a bit easier to build. With simple faux wood vinyl iron on - glue on veneer(s) you can dress them up for $20.00 a pair with some added effort. Add nice veneered finishes and the cost could easily double. You can use a simple Rast stand available from Ikea for $15.00 each or build your own. The Rast can be painted or stained if desired.
(Link for the Rast removed as it is no longer available)
So... for most folks, this revised project can be built and be operational for about $ 250 per pair with a reasonable appearance, stands and all. Not bad for a true near full range Open Baffle speaker that measures pretty darn flat on the forward axis from 38 Hz to 18Khz. A PE 60 wpc $90 chip amp will drive a pair them loud enough for most users in a typical residential room. Max input each is about 120 watts peak, or 60 or so watts average continuous. Add $150.00 or so for a decent CD player (Onkyo C-7030 or similar) and you have a darn good system for under $500!
Attachments
-
 DSC01902.JPG50.3 KB · Views: 188
 -
 DSC01901.JPG51.7 KB · Views: 176
 -
 DSC01900.JPG50.7 KB · Views: 176
 -
 DSC01898.JPG60.6 KB · Views: 159
 -
 DSC01896.JPG56.3 KB · Views: 160
 -
 DSC01895.JPG51.9 KB · Views: 153
 -
 DSC01893.JPG45.7 KB · Views: 145
 -
 DSC01888.JPG53.7 KB · Views: 152
 -
 DSC01887.JPG52.7 KB · Views: 141
 -
 DSC01866.JPG43.6 KB · Views: 143
 -
 DSC01862.JPG55.1 KB · Views: 172
Thanks so much for posting this Barry. John has come back from the great beyond in a real Halloween treat - to give us another chapter in the Manzanita story. I remember John talking about this project.
What John has done here is the make a shallow H-Baffle that makes the Manzanita baffle acoustically wider, so that more bass energy is preserved, giving better efficiency in the bass. That why the the Vifa mid/tweeter can lose its attenuation, as the bass will now be louder. Of course you might still need some attenuation, tuned to your room. You'll note that the wings are tapered and not symmetrical front and back, in order to avoid cavity resonances, a real problem with an H-Baffle.
Although no detailed dimensions are given, most readers will be able to figure it out from the post above and the photos included.
Hi @Pano,
in your post #1602 back in 2017 you describe the Ultra for the 15" GRS woofer. I´m planning to build the Ultra with the 12" Peerless, so I need to change the baffle size.
Based on the size ratio between Manza 15" and Ultra 15" I have increased the dimensions of the Manza 12" Peerless in the same ratio to get the dimensions of the baffle for the Ultra 12". Would it work like this?
Sorry for the primitive drawing
I added the bass trap to the xo last night and have been listening to music for an hour now. The improvement is clear, the bass is tighter and the mids are cleaner, at least that's my first impression. Wow. I would consider the bass trap a must, not an option.

I fired up my Ultras for the first time last night. Bass is impressive! The mids and highs seem a little muted to me though. I even put my treble trim to 10 on my preamp. To those of you who have had your Ultras for a while, does that seems to increase with break-in? I went fairly cheap on the crossover, too bad I did not see Plott's above post, haha. I could not believe the inductor prices.

They do tend to run in a bit with some hours on them but that seemed to reduce some overall roughness.
If the tonal balance isn't right when they are new then placement and toe in should be explored. Try different distances from the front and side walls. Play with toe in, too, it'll change the mids and highs somewhat dramatically.
In my build the things that absolutely mellowed out the mids and highs were:
1. Mellow caps. My build got switched over to the Daytons ... but you're already there.
2. Not enough breathing room around the back of the tweeter. Thought there was enough space when they were first built but heard a big difference once the little rascals had their backs really opened up. They became a different speaker.
Haven't seen pics of your build so it's likely just fine. Try placement and toe in. Once they get 50 or 100 hours you might want to try some resistor adjustments but they really need to cook for a bit and settle in.
Thanks, I have pics of my build in post #3166. I want the mids and highs louder, not more mellowed. They are in a pretty small carpeted room, guessing 10'x24'x7', they are on the short wall (10' wide). I will try playing with toe-in and distance to the rear wall. Maybe I will try with the Peerless on the outside (right now they are on the inside).They do tend to run in a bit with some hours on them but that seemed to reduce some overall roughness.
If the tonal balance isn't right when they are new then placement and toe in should be explored. Try different distances from the front and side walls. Play with toe in, too, it'll change the mids and highs somewhat dramatically.
In my build the things that absolutely mellowed out the mids and highs were:
1. Mellow caps. My build got switched over to the Daytons ... but you're already there.
2. Not enough breathing room around the back of the tweeter. Thought there was enough space when they were first built but heard a big difference once the little rascals had their backs really opened up. They became a different speaker.
Haven't seen pics of your build so it's likely just fine. Try placement and toe in. Once they get 50 or 100 hours you might want to try some resistor adjustments but they really need to cook for a bit and settle in.
Looks like you will be experimenting with the resistor(s) on the Vifa to bring the balance together better. Try some lower resistance if you have them available. You could also experiment with switching polarity for the Vifa.
How much you deviated from the original recommended crossover will limit how much others’ experiences will be relevant.
How much you deviated from the original recommended crossover will limit how much others’ experiences will be relevant.
I built the crossover just like this...by went cheap I just meant not 14 gauge inductors and no woofer trap.Looks like you will be experimenting with the resistor(s) on the Vifa to bring the balance together better. Try some lower resistance if you have them available. You could also experiment with switching polarity for the Vifa.
How much you deviated from the original recommended crossover will limit how much others’ experiences will be relevant.
- Home
- Loudspeakers
- Multi-Way
- Fast, fun, Inexpensive OB project