> using a multi section capacitor. Does anyone have anything they can weigh in on about that vs x3 Sprague Atoms?
These are both expensive choices.
Me being cheap, I like commodity snap-caps for large values and good generic axials like Illinois for traditional B+ values. Both from Trusted Vendors, of course; not cheap auctions and fly by night storefronts on the far side of the world.
These are both expensive choices.
Me being cheap, I like commodity snap-caps for large values and good generic axials like Illinois for traditional B+ values. Both from Trusted Vendors, of course; not cheap auctions and fly by night storefronts on the far side of the world.
Project update.
Just an update on my project so far. Waiting on parts mostly... Capacitors, Resistors, Rectifier tube 5Y3WGTA , 6AV6 NOS. I ended up buying a big 1955 radio cabinet for parts and tubes. It's a Viking 235 she still fires up after repairing the power cord and I found x2 6V6 tubes (Marconi made in Canada and Rogers made in England) among a few other cool tubes (GE made in US red label 12AX7, GE made in Canada 5U4G rectifier, Rogers made in Canada 6SL7GT ) and a few others. At this point I'm not going to cannibalize the cabinet as it still functions as a radio but I may borrow a tube or two for this project. Here is a picture of the radio after I pulled the chassis from the cabinet and gave it a little dust off... it was pretty caked.
Regards,
John
Attachments
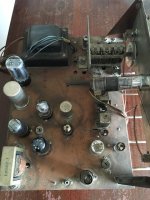
Nice PP 6V6 find - looks like it has a 'magic eye' for tuning?I ended up buying a big 1955 radio cabinet for parts and tubes. It's a Viking 235 she still fires up after repairing the power cord and I found x2 6V6 tubes
And perhaps a phono input as well?
Yes indeed! It has both of those things. I even tested the Phono input and it worked nicely. It sounded very good, I wasn't sure what to expect. I didn't notice the 6E5 light up when I tuned it into a station perhaps it's a bit dim or requires replacement.
Nice PP 6V6 find - looks like it has a 'magic eye' for tuning?
And perhaps a phono input as well?
I drew up a rough layout for the project. Should I try to move my input jack away from my 16uf-475v Capacitor? Without moving the original location it will be quite close to my power section. I am thinking I should move it all the way to the front of the chassis instead. Also I was having trouble with the old solder but I managed to get it flowing with my 30w solder iron! It took some patience but I may be able to graft my schematic into this thing more easily than I had anticipated.
I drew up a rough layout for the project. Should I try to move my input jack away from my 16uf-475v Capacitor? Without moving the original location it will be quite close to my power section. I am thinking I should move it all the way to the front of the chassis instead. Also I was having trouble with the old solder but I managed to get it flowing with my 30w solder iron! It took some patience but I may be able to graft my schematic into this thing more easily than I had anticipated.
I'd try to get the input as close to the first preamp tube as possible. If that's not easy, try to keep it away from AC and the output stages.
Use shielded cable for that link between the jack and the preamp tube, unless they are close together.
A good soldering 'station' (or a good knockoff of a good station
") ) is really essential for electronics work. With the wrong tip and too little power, you will be 'cooking' components in tube amps, waiting for the solder to melt.
) is really essential for electronics work. With the wrong tip and too little power, you will be 'cooking' components in tube amps, waiting for the solder to melt. What are you using for soldering now?
I didn't notice the 6E5 light up when I tuned it into a station perhaps it's a bit dim or requires replacement.
A blind screen is typical for 'Magic Eye' indicator tubes of this kind and age. Fortunately the 6E5 has a Russian replacement 6E5-S that is still available, but requires swapping the UX6 socket for an IO one.
Best regards!
I'd try to get the input as close to the first preamp tube as possible. If that's not easy, try to keep it away from AC and the output stages.
Use shielded cable for that link between the jack and the preamp tube, unless they are close together.
A good soldering 'station' (or a good knockoff of a good station
What are you using for soldering now?
When I install the input jack I will definitely put it close to the first preamp tube. There is a spring coiled around the phono input cable that appears to be grounded and acting as a shield. But I would rather move it anyhow. Is there a station you could recommend? I currently have a simple 30w soldering iron(and a sponge) that isn't very expensive but I have managed to be successful with it so far. My Rectifier tube showed up today! It was shipped out Monday from PacificTV. Thanks for the tip on where to get my tubes!
I have a couple of '936' soldering stations - one a 'real' Hakko, and one is a fake. (They stack). You only need one, with a selection of a few tips.Is there a station you could recommend?
They both work OK - just be sure you know what you are buying - the build quality of the fakes is lower, so you don't want to be paying Hakko prices for them. I'd recommend the real Hakko product.
60W and you can get tips for them from most suppliers.
Variable temperature, and they heat up fast (20 seconds?), so you can turn the temp down when you aren't soldering- this saves the tips.
The 'metal scrub pad in a can' thing (Hakko) works better than a sponge to keep the tip clean and doesn't cool down the iron.
The 936 is discontinued - I think the 'replacement' is the 888. It looks like something FisherPrice designed, but apparently it works.
Put this:
soldering station site:eevblog.com
into your Google search window and you'll find lots of info.
Last edited:
A blind screen is typical for 'Magic Eye' indicator tubes of this kind and age. Fortunately the 6E5 has a Russian replacement 6E5-S that is still available, but requires swapping the UX6 socket for an IO one.
Best regards!
Turns out I was blind... or the glass on my radio panel isn't as clear as it could be. The eye works! Wow it looks amazing!
I used to have a Hakko 936, and it was great. Still the best soldering iron I've ever used. Changing the temperature was a one-second task, involving a quick twist of a single rotary knob.The 936 is discontinued - I think the 'replacement' is the 888. It looks like something FisherPrice designed, but apparently it works.
An accident with a rechargeable battery pack left a hole burned right through the business end of the 936, and I replaced it with the toy-like Hakko 888.
The 888 does the actual job of soldering just as well as the 936 did, but adjusting the temperature up or down is now a pain in the rump, involving multiple sequenced button presses, instead of a simple twist of a rotary knob. (And I suspect the childish toylike appearance drops my IQ a few points every time I look at it.)
Eventually I found instructions online on how to program the 888. I created three presets, for 500 degrees (F), 700 degrees, and 750 degrees. I set the iron to 700 or 750 for actual soldering, and back to 500 when I put it down for a few minutes in between soldering tasks.
Changing presets still requires many button-presses, but fewer than the stream of presses required otherwise.
Great iron, horrid user interface. The old rotary knob was far superior from the usability point of view.
-Gnobuddy
I used to have a Hakko 936, and it was great. Still the best soldering iron I've ever used. Changing the temperature was a one-second task, involving a quick twist of a single rotary knob.
An accident with a rechargeable battery pack left a hole burned right through the business end of the 936, and I replaced it with the toy-like Hakko 888.
If you still have your 936, parts are available from Chinese sellers via ali express or ebay.
I'd rather use a 936 knockoff than the 888 -it sounds really irritating to use. Thanks for the heads up!
BTW, I've found the real Hakko tips are better (digikey, etc supply them) than the no-name ones. And the key to making the tips last is to turn that knob on the 936 'down' when not actually soldering.
Back to the regular program.....
Thanks for the recommendations on solder stations. It will be a big day tomorrow. Lots of purchases. Should be fun! I'll probably end up with a Hakko station of some sort. I suppose a 937 would be a good unit also?
I didn't search far:
First result says:
The 937 soldering station is a smart, compact station with a bright digital display. A lock-out key card feature prevents the user from changing the temperature once it is set without the key card, thus preventing inadvertent or unauthorized temperature changes.
So you should look at the details...
Unfortunately, I don't. I left it behind when I moved to BC.If you still have your 936...
Too many times to remember, I've fumed at those "push the button 59 times to move the clock back by 1 minute" interfaces since they first began showing up on early digital electronic consumer devices. Sequential pushes on one button make for cheap hardware and easy-to-write software, but they are terribly unfriendly to human beings.I'd rather use a 936 knockoff than the 888 -it sounds really irritating to use.
There have been a few times when I wished I could round up some of the designers of this sort of interface, and modify their cars so that, to steer left, you first pushed a button labelled "direction" once for left, or twice for right, and then pushed a button labelled "turn" anywhere from 1 to 50 times to vary the tightness of the resulting turn.
Add in a "push 1 to 50 times to accelerate" throttle, and a "push 1 to 50 times to brake" brake pedal, and then force these guys to spend an hour a day driving their modified vehicles around an autocross track. One car at a time, plenty of run-off space, vehicles governed to a maximum speed of 5 mph. We don't want injuries or fatalities, we just want these idiots to experience first-hand the frustration they've unleashed on millions of users!
When I was young and broke, I had the cheapest soldering iron I could find, which, of course, had no temperature control....the key to making the tips last is to turn that knob on the 936 'down' when not actually soldering.
So I used to wire a 1N4007 diode across an in-wire on/off switch, and wire the switch between the AC mains outlet and the soldering iron.
With the switch open, the diode only allows alternate half-cycles of AC current to reach the iron, dropping it to a much lower temperature for tip longevity. Flip the switch closed, and it shorts out the diode in parallel with the switch contacts; now the iron heats up to full temperature, and relatively rapidly, because it wasn't dead-cool to start with.
-Gnobuddy
The 888 is a really nice soldering iron. I think you'll be happy with it. Yeah, the push-button interface isn't great, but the important parts are all still good: it's a nice, comfortable, durable, well-balanced iron that heats up quickly and maintains a steady temperature while you work.Okay so I'll probably just get the Fisher Price edition brand new. No messing around.
When I was still a boy I taught myself to make good soldered joints with my cheap-n-crappy soldering irons, which always overheated, burned out frequently, and shocked me from time to time (literally, i.e., electric shocks.) But when I finally got my hands on a good iron, I was amazed at what a difference it made. Making good joints was so much easier now!
-Gnobuddy
The 888 is a really nice soldering iron. I think you'll be happy with it. Yeah, the push-button interface isn't great, but the important parts are all still good: it's a nice, comfortable, durable, well-balanced iron that heats up quickly and maintains a steady temperature while you work.
When I was still a boy I taught myself to make good soldered joints with my cheap-n-crappy soldering irons, which always overheated, burned out frequently, and shocked me from time to time (literally, i.e., electric shocks.) But when I finally got my hands on a good iron, I was amazed at what a difference it made. Making good joints was so much easier now!
-Gnobuddy
Thanks for the sound advice with the irons. I have a Hakko station on order. Things will be getting pretty exciting over here pretty quickly! All of my Caps, Resistors, Switches, Jacks, Fuse holders, wire, 1lb of solder, violet colored wire!!, heat shrink, output transformer, and tubes are all on the way. Now I just have to wait... Wish me luck guys!
Cheers,
John
Good luck!Now I just have to wait... Wish me luck guys!
I presume you are aware of the existence of BC Robotics in Nanaimo? Link: BC Robotics Inc. - SparkFun, Adafruit, Raspberry Pi, and More! Located In Canada | Build Something Interesting
I know this place is robotics-oriented, but I bet they have wire, solder, tools, and a few other items that might be useful to you. I always forget something when I mail-order parts, and having a local store where you can pick up that one item you forgot might be very handy.
Are you planning to use the same colour (violet) wire for all connections? Using multiple colours makes it much easier to wire up circuitry, and enormously easier to fault-find, in case you have to do that.
(I should add that I've never done business with BC Robotics; I found it via a Google search a while ago.)
-Gnobuddy
- Status
- This old topic is closed. If you want to reopen this topic, contact a moderator using the "Report Post" button.
- Home
- Live Sound
- Instruments and Amps
- First Tube Amp Project