A few months ago I made my first amplifier, being a Chu Moy pocket headphone amp (you can find more info on the Headwize site). Back then I didn't know how to make PCBs yet, so it was built on a "standard" PCB board. I also added an Ohman crossfeed filter (can also be found on Headwize) and I found this to be a real good thing, it didn't get light headaces anymore after listening for hours with a headphone.
Because I had built every part of the amp (2x mono, 1x power, 1x Ohman crossfeed) I needed a lot of wires, and although it works great, the thing isn't really attractive. When I finished the amp I decided to make some more with different crossfeeds, with 1 dual opamp, etc... so I went to the store and bought enough parts to make 5 or 6 of them.
However I didn't do anything with it until now. Last night I finished routing the PCB and the last few hours I've been busy making the PCB, drilling it, soldering parts, ...
This is the PCB layout:
The finished undrilled PCB:
The result:
I'm quite proud of myself right now") (well, of course it's nothing like Peter Daniel's work, but then again, I'm only into electronics since a year or something and I'm only 17).
(well, of course it's nothing like Peter Daniel's work, but then again, I'm only into electronics since a year or something and I'm only 17).
You can find more info on my homepage: here
Because I had built every part of the amp (2x mono, 1x power, 1x Ohman crossfeed) I needed a lot of wires, and although it works great, the thing isn't really attractive. When I finished the amp I decided to make some more with different crossfeeds, with 1 dual opamp, etc... so I went to the store and bought enough parts to make 5 or 6 of them.
However I didn't do anything with it until now. Last night I finished routing the PCB and the last few hours I've been busy making the PCB, drilling it, soldering parts, ...
This is the PCB layout:
An externally hosted image should be here but it was not working when we last tested it.
The finished undrilled PCB:
An externally hosted image should be here but it was not working when we last tested it.
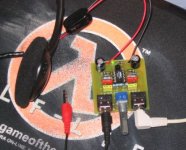
The result:
An externally hosted image should be here but it was not working when we last tested it.
I'm quite proud of myself right now
(well, of course it's nothing like Peter Daniel's work, but then again, I'm only into electronics since a year or something and I'm only 17).You can find more info on my homepage: here
Very nice.
I etched a PCB once... too much hassle than it was worth for me... the toner transfer method didn't work as well as I hoped, and then the etching process didn't complete exactly even after a very long time in the solution... All in all it was more trouble than it was worth for me. Looks like everything turned out well for you, though. Nice job on the PCB.
What kind of case are you planning on putting this amp in?
Thanksneedtubes said:Very nice.
I etched a PCB once... too much hassle than it was worth for me... the toner transfer method didn't work as well as I hoped, and then the etching process didn't complete exactly even after a very long time in the solution... All in all it was more trouble than it was worth for me. Looks like everything turned out well for you, though. Nice job on the PCB.
What kind of case are you planning on putting this amp in?
.Since I don't have a laserprinter, I don't use the toner transfer method. I print the PCB twice (not inverted) on an inktjet transparent, then align them and tape the two parts together. Then I expose it under a medium sized Philips UV tanning device for 4min 30sec. If the etching doesn't complete, try heating up the etching solution in a microwave. I do this every 5-7 minutes for 20 sec. Don't heat it up to much though, I have a feeling that this makes the copper on the PCB come lose of the green plastic (though I'm not totally sure).
I don't know yet about the case, but I have a small one lying around, maybe it'll fit in that. Then I can test my Dremel I got for New Year some more
.It's alive! (Powering some cheap headphones that don't come close to delivering hifi sound whatever amp they are plugged into.)
Attachments
- Status
- This old topic is closed. If you want to reopen this topic, contact a moderator using the "Report Post" button.