Thanks X!
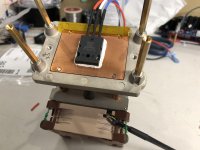
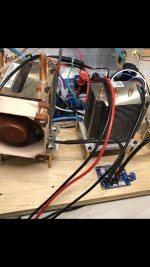
The plywood board will have three cpu coolers. One for each Mosfet, and one cooler for the pair of capMx BJT’s. For the initial power up and tweaks, all coolers will each have a Noctua pwm fan. The pwm control board has three outputs so that works nicely.
The plywood board will have three cpu coolers. One for each Mosfet, and one cooler for the pair of capMx BJT’s. For the initial power up and tweaks, all coolers will each have a Noctua pwm fan. The pwm control board has three outputs so that works nicely.
Attachments
Nice build Vuncewhat are the binding posts you use?
The test board uses generic binding posts.
For permanent builds I like these:
Gaofei GF-RED07SBP Copper Amplifier Speaker terminals Binding Posts, connector | eBay
The test board uses generic binding posts.
For permanent builds I like these:
Gaofei GF-RED07SBP Copper Amplifier Speaker terminals Binding Posts, connector | eBay
Cool - those generic ones look nice regardless
These generics binding posts are not too bad. I have bought similar and they are quite sturdy.
4X Gold Plated Audio Speaker Terminal 4mm Binding Post Banana Jack Plug B122 | eBay
4X Gold Plated Audio Speaker Terminal 4mm Binding Post Banana Jack Plug B122 | eBay
At least this one has you covered with PSU, amp, and speaker protection. Just add trafo and cpu coolers/fans.
If anyone wants to try water cooling - this is a great project for that as the actives are on flying leads.
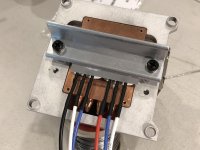
One could get a section of aluminum square channel, seal the ends with a fitting and use a clamp bar to clamp all 8 actives on it and let some water flow. Doesn’t take much water to remove 400w.
Just need some active way to monitor water flow or temp and cut power if reached.
If anyone wants to try water cooling - this is a great project for that as the actives are on flying leads.
One could get a section of aluminum square channel, seal the ends with a fitting and use a clamp bar to clamp all 8 actives on it and let some water flow. Doesn’t take much water to remove 400w.
Just need some active way to monitor water flow or temp and cut power if reached.
At least this one has you covered with PSU, amp, and speaker protection. Just add trafo and cpu coolers/fans.
If anyone wants to try water cooling - this is a great project for that as the actives are on flying leads.
One could get a section of aluminum square channel, seal the ends with a fitting and use a clamp bar to clamp all 8 actives on it and let some water flow. Doesn’t take much water to remove 400w.
Just need some active way to monitor water flow or temp and cut power if reached.
Ya, been spit balling ideas for a while.
I have a machine shop, so I can make stuff like this fairly easily.
Very tempting to route the water to the basement and drop a copper coil into the sump for heat exchange.
What would be really cool though is a some big round heat sinks that look like vacuum tubes. I found some, but they are $70ish a pop, and the fans are not standard.
Temp monitoring is very easy with a microcontroller, use an Arduino or other SBC and you can add an i2s display
Thanks X!
The plywood board will have three cpu coolers. One for each Mosfet, and one cooler for the pair of capMx BJT’s. For the initial power up and tweaks, all coolers will each have a Noctua pwm fan. The pwm control board has three outputs so that works nicely.
Nice choice on using Noctua fans. For anyone building this, I would suggest them strongly for their acoustic profile.
Hi Folks,
Just an update on the status of the GB. I am finally able to to have time to build the verification boards this weekend. Vunce has been instrumental in doing the heavy lifting and I am very grateful for his help on this. I will try to wrap this up in another week and hopefully, we can place orders for the final production boards at that point
Thanks for your patience.
X
Hello Fellow ABBB Builders!
Here is the latest news hot off the press.
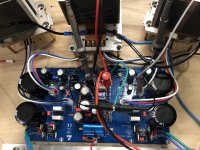
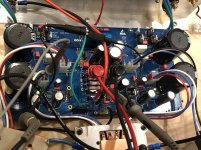
After ironing out a few details, we have an Alpha Big Boy w/Buttah singing away!
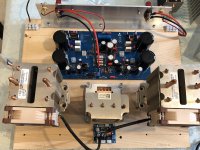
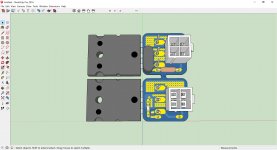
Since this project requires the Mosfets to be mounted off-board, we decided it would be best to have the snubber components mounted as close to the Mosfets as possible. This required the talents of JPS64 to layout a very small pcb to mount the Mosfet, resistor, capacitor and connection wires.
He even gave the option of using SMD or THT components. These will accompany the main ABBB board.
The SSR speaker protection/delay has also been tuned for approximately a
6sec delay time which works excellent at squashing any power-up thump and initial dc offset.
Here is the latest news hot off the press.
After ironing out a few details, we have an Alpha Big Boy w/Buttah singing away!
Since this project requires the Mosfets to be mounted off-board, we decided it would be best to have the snubber components mounted as close to the Mosfets as possible. This required the talents of JPS64 to layout a very small pcb to mount the Mosfet, resistor, capacitor and connection wires.
He even gave the option of using SMD or THT components
. These will accompany the main ABBB board.The SSR speaker protection/delay has also been tuned for approximately a
6sec delay time which works excellent at squashing any power-up thump and initial dc offset.
Attachments
-
 844028C4-5118-4995-8A18-AF902B86254C.jpg794.5 KB · Views: 359
 -
 0EDBC0A6-F6B3-4205-8847-046DCE04990A.jpg697.5 KB · Views: 339
 -
 6166C548-3639-4427-A1FE-8158061D3A9C.jpg1,020.4 KB · Views: 1,059
 -
 2FBE93F5-F667-4D6A-8AB8-C0B6CF341218.jpg1,006.9 KB · Views: 349
 -
 FE77666A-1EA4-4EDB-AFC4-371E8D154C78.jpg225.9 KB · Views: 329
 -
 06DF0AC6-CC72-46A4-9177-AD8ADB402575.jpeg240.3 KB · Views: 230
Beautiful work, Vunce! Thank you so much for leading the charge with the verification build. So glad it is singing happily now - I will have to get your notes and ask JPS64 to make some minor updates to some silkscreen typos. The board layout itself was all good, with the main change of moving the MOSFET snubber to the new small local MOSFET pin-mounted boards, which even have their own Molex Minifit Jr quick connects! I suppose one could connect the wires via soldered flying leads to these small boards and have just one Molex connector on the other end.
This was a huge undertaking so thank you for the super heavy lifting done here. Bravo on getting first sound!
Btw, what kind of bias current are you flowing and at what rail voltages? How does it sound? How quiet is it when no music playing?
This was a huge undertaking so thank you for the super heavy lifting done here. Bravo on getting first sound!
Btw, what kind of bias current are you flowing and at what rail voltages? How does it sound? How quiet is it when no music playing?
Last edited:
Thanks X!
I’m running 37vdc after the onboard capMx and .600vdc across the parallel sensor resistors, I believe that’s approximately 2.75A bias current.
All cpu temperatures are very well under control. The Mosfet coolers are running 37°C at the fins and 50°C at the aluminum angle clamp bar.
The amp at idle is silent with my test speaker setup, but I will hold off judgement until I hookup to my main speakers that are very efficient and reveal any noise.
I was listening for about 2hrs tonight using an iPhone—>Bluetooth module with Toslink output into an “old school” R-2R Dac. For only a single channel now, the ABBB sounds wonderful!!
I’m running 37vdc after the onboard capMx and .600vdc across the parallel sensor resistors, I believe that’s approximately 2.75A bias current.
All cpu temperatures are very well under control. The Mosfet coolers are running 37°C at the fins and 50°C at the aluminum angle clamp bar.
The amp at idle is silent with my test speaker setup, but I will hold off judgement until I hookup to my main speakers that are very efficient and reveal any noise.
I was listening for about 2hrs tonight using an iPhone—>Bluetooth module with Toslink output into an “old school” R-2R Dac. For only a single channel now, the ABBB sounds wonderful
!!R2R DAC eh? That's pretty cool because that is not something most people will ever get to hear. If I am not mistaken, you are using W5-2143 XKi speakers which are 90dB sensitive, so if it quiet there - will probably be pretty good at 98dB sensitivity. I am way behind you and still have not been to populate my ABBB yet. I have the parts for cap Mx in place and that's it.
Here is an assembly tip:
-Color a side of each molex header/connector with some nail polish to easily identify where each connector attaches. This eliminates the chance of reversing an Nmos with Pmos or BJT
Being in a household full of girls, I had plenty of colors to choose from, LOL!!
- Home
- Group Buys
- The Alpha Big Boy with Buttah (ABBB) 52w Class A Amp GB