Part of me hates you for this.
I am just wrapping up my M2x build and I came across this, while looking for the Melbourne boards :\
Read the entire Alpha thread (3200+ posts).
This looks to be a real winner,
Going to get order after I get paid this Friday, so please don't order with out me")
Though I doubt you will ready by then anyway.
Much respect to all those involved
-Josh
I am just wrapping up my M2x build and I came across this, while looking for the Melbourne boards :\
Read the entire Alpha thread (3200+ posts).
This looks to be a real winner,
Going to get order after I get paid this Friday, so please don't order with out me
Though I doubt you will ready by then anyway.
Much respect to all those involved
-Josh
Part of me hates you for this.
I am just wrapping up my M2x build and I came across this, while looking for the Melbourne boards :\
Read the entire Alpha thread (3200+ posts).
This looks to be a real winner,
Going to get order after I get paid this Friday, so please don't order with out me
Though I doubt you will ready by then anyway.
Much respect to all those involved
-Josh
Josh,
Congratulations on getting the M2 build done!
I have heard the ALPHA 20, but not the ALPHA Big Boy. The A20 is very nice, the ABBB should be better.
What speakers are you using?
Josh,
Congratulations on getting the M2 build done!
I have heard the ALPHA 20, but not the ALPHA Big Boy. The A20 is very nice, the ABBB should be better.
What speakers are you using?
I have 6Pi cornerhorns (101dB sensitivity) for speakers.
The front end is an Allo Katana dac running off of 3 Salas BiB power supplies tied to a Mesmerize B1 buffer pre-amp.
Really hard to describe how wonderful it sounds.
I recently visited PS Audio and heard the legendary IRS 5 speakers driven by BHK amps. I walked away feeling very proud of my system.
How will the fan(s) be powered? Separate power supply? Can someone provide a link to an acceptable (Noctua) fan?
Regards,
Steve
There is alot of discussion about this in the thread about the Alpha, lots of folks where opting for a cheap Ebay fan controller.
I disagree with going that route.
There is no need to use variable speed fans.
Best to just get a quiet fan, and run it full speed. If you want it slower, just add a resistor.
Also, another thing not discussed about fans is that they are not all the same. Fans designed for airflow (case fans) are not the same as fans designed or static pressure (CPU fans). DO not use a case fan with a CPU cooler, it will not work near as well, and be much louder.
I have a Notua 140mm NF-A14 FLX that I cool my m2 with. It is essentially inaudible. It is not variable speed, and comes with a couple for adapters to slow the speed down. I power with its own little toroid connected to a block style rectifier, onto 4 4700uF caps, and into a 12v regulator chip. The fan will run fine with out the regulator and the whole thing could be wired up point to point with no circuit board. I have an Arduino that monitors my m2, so I designed a board with both 12v and 5v regulators.
Interesting thought about using DC powered (2 wire) Noctua fans. We are using the PWM controllers because I was under impression that they can let the fans run slower for quieter performance. Using an external 12v wallwart seems to take the PWM noise out of the equation (and adding a CLC in between the PWM and wallwart is last resort). But if you say Noctua DC fans are quiet, I may have to try that. The PWM has a temp sensor so it can speed up in event that temps go past your threshold settings.
Don't worry, I still have to build and test before I order the final boards. Will get a few spares as well.
Don't worry, I still have to build and test before I order the final boards. Will get a few spares as well.
Hey Fellas,
This is how I handled fan power and control for my ALPHA20.
I used a small 10va Antek trafo feeding an AMB Labs Sigma25 regulated psu at 12vdc for the PWM fan controller. This setup uses a pair of Noctua NF-A9PWM fans. Super quiet, you’ve got to put your ear practically on top of the cpu cooler to hear the fans
I’ll probably do a very similar setup for the ABBB. Since the large Anteks have an auxiliary 12v secondary I won’t need the additional 10va trafo.
Attachments
Thank-you Joshua.
Xrk, I'm also anxious to see how you configure the fans should you choose not to use pwm ones...
I plan to use something similar to what I have in my m2.
Currently the m2 is attached to MDF and the fan just runs all the time at full speed. No real reason to vary the fan speed IMO, just let it reach equilibrium and all is good. I do agree with the idea of using a separate wall wart for power if using a pwm set up. However, good quiet wall warts are expensive, and I have had issues with inexpensive ones polluting my mains. I see no real gain for the added complexity and cost.
The problem is the board takes a very long time to heat up.
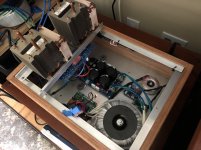
Since I was not positive the sink/fan combo was adequate when I put the amp together, I breadboarded up an Arduino Nano with 4 thermocouples, and a display so I could monitor temps.
I had boards fabricated that add some additional functionality. The Arduino will now turn the fan on (and keep it on) when heatsink reaches a set temp so the board will warm up faster. It also controls a pair of relays for the mains power. One relay to bypass the C-60 thermistor after 60 seconds, and a second to cut power to the amp traffo in the even of a DC fault at the output (the Arduino and fan have their own traffo). All these functions could be done with out the Arduino, but I like the display
But fan operation is essentially the same, it just runs all the time.
I have all the boards, and tested everything. it is just a matter of putting it all into the Chassis I purchased.
Hope that helped,
-Josh
I use cheap surplus linear 12v 1000mA wallwarts from old routers - no added SMPS noise. Arduino is a good idea and can be a lot of value added and fun to implement. I learned how to program a DIP8 ATTiny MCU to do a lot of stuff like this for essentially a few extra $. However, simplest is no MCU. The SSR Dc protection and start up delay is all done with opamps and optoisolators.
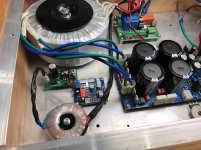
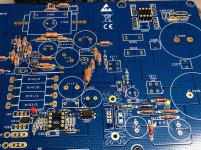
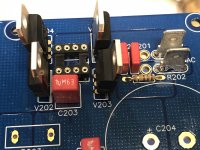
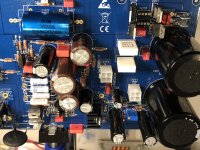
I have been so busy at work, I haven’t had anytime to get started on the verification build. However, I am envious that some of us, have been able to get started. Here is snapshot of the progress. Looking great, Vunce!
That little block of components in the foreground is the super solid state relay protection and startup delay circuit. Amazing how compact that is. Thanks to jhofland for super design there.
Actually, that reminds me - we are considering making the SSR protection circuit a new standalone circuit (in a fully built all SMT, ready-to-use format) - if there is any interest in a GB for something like that?
Attachments
Last edited:
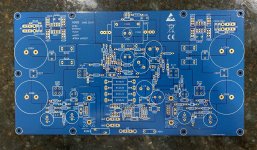
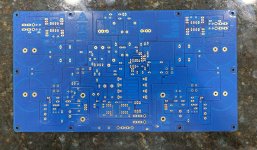
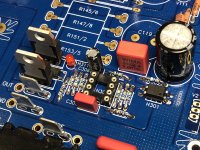
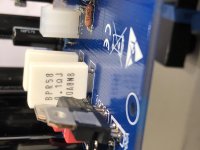
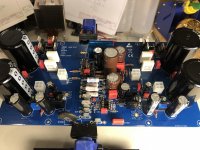
I’ve made some more progress on the ABBB. The amplifier board is fully populated, JP’s layout is superb! The components fit perfectly with room for fingers to manage all the connections. Next step is to mount the board, cpu coolers and controller to a piece of plywood (Baltic birch... it sounds better ),
make the crimps for the Molex minifit flying leads and wire it up.
By the end of the weekend, I’m hopeful for a drama free power up and first sound
),make the crimps for the Molex minifit flying leads and wire it up.
By the end of the weekend, I’m hopeful for a drama free power up and first sound
Attachments
-
 E3328C79-E6DC-4F51-BCF3-A1063F98C8D3.jpg760 KB · Views: 356
 -
 E2289C2D-10AA-44B8-94DF-59EE8D71CEC0.jpg988.7 KB · Views: 372
 -
 7E10D882-E9C1-4CC5-B606-09BCAC31DF62.jpg675.4 KB · Views: 144
 -
 DEEF2A89-88E4-4524-8F9F-3772F5C656D9.jpg991.4 KB · Views: 157
 -
 526D40D5-3596-4F74-A268-802B5CC7951A.jpg982.8 KB · Views: 174

- Home
- Group Buys
- The Alpha Big Boy with Buttah (ABBB) 52w Class A Amp GB