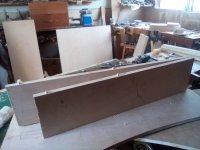
I finally got some decent plywood to build FHXL cabinets, and am halfway through reading the main build thread. I'm spite of being on page 100, this is my summary of all the posts so far:
Avoid MDF- Use plywood.
About 60g of stuffing in the V and about another 60 below the driver.
You can put a wire mesh at the bottom of the V and the front panel to hold stuffing
in place.
Measure your wood, as plywood is not always the same thickness.
Use titebond 2 glue
You can use Cat5 single wires for the interior driver wiring
Rebates for panels are not needed.
Some leave the top unglued until they have stuffing sorted out.
I have some questions:
What do people use for baffle fill, and where do you get it? (I am in Canada)
Where do you get 1/2 in thick felt?
Do there have to be rebates for the drivers, or can they be mounted flush with outside front panel (I have Alpair 10p)
Any tricks for cutting the circle for the driver in the front panel.
I will post pictures once I figure out how to insert them after I upload them!
Attachments
Do there have to be rebates for the drivers, or can they be mounted flush with outside front panel (I have Alpair 10p)
There should be a rebate for the 10p shown on the drawing?
jeff
To answer some questions:
Rebate the driver (flush mount) for sure. The 10P has a very thick bezel, that will cause diffraction effects that you don't want when not flush mount.
You can you polyfill for the baffle fill, found on most speaker builder shops (where you buy your drivers and so).
Use a router with a jig for the driver hole (google it if you don't know what i mean, and that jig can also be made diy).
Cat5 wires are somtimes used, but the whole wire assembly as multistranded cable, not a single copper wire from it. The full wire is surely good enough for such a low wattage speaker. I use generic stranded OFC copper wire for the internal wiring of speakers, the same kind that i use for the speaker cable that i build myself. I buy them in big spools so i always have left in stock.
What do people use for baffle fill, and where do you get it? (I am in Canada)
Where do you get 1/2 in thick felt?
Volume fill?
I recommend Acoustastuff and Bonded Logic cotton felt. I can supply you a kit. I have a ton of AS, and still a significant amount of felt.
GOnna be hard for me to use it.
Email me, if you want some.
Do there have to be rebates for the drivers (I have Alpair 10p)
The thick bezel really wants to be rebated. Alternatively cut out a piece of felt, cork, whatever and build up the baffle so the bezels are flush.
More important thou, is relieving the back of the driver cutout.
dave
but the whole wire assembly as multistranded cable, not a single copper wire from it.
We recommend a thin single solid core pair of wires. Pulled from CAT5/6 we have a source for quality copper at prices one would expect given the trillions of miles of it that they make.
if you want something more exotic, Take 5 in Ottawa has cryotreated really really high quality solid copper 24g wire. Much more expensive than CAT5, but stil really quite cheap. Nice stuff.
dave
Thanks for all those responses so far!
Check your email in a few minutes! Thanks!
Volume fill?
I recommend Acoustastuff and Bonded Logic cotton felt. I can supply you a kit. I have a ton of AS, and still a significant amount of felt.
GOnna be hard for me to use it.
Email me, if you want some.
dave
Check your email in a few minutes! Thanks!
Last edited:
I’ve built a few FH in my day, so a few suggestions:
In addition to rebating the baffles for drivers with thicker bezels, it’s also highly recommended to chamfer the rear side of driver through hole.
Dadoes/ rebates aren’t essential, but after literally hundreds of builds of all sorts, I certainly found they made assembly easier, and of course add more glue surface area and structural rigidity. It’d also make for a better acoustic seal if you plan on a temporarily removable top panel to allow easier access to experiment with damping fill.
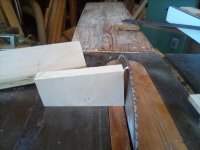
I found an angled scarfe joint between the internal vertical panel and slanted back panel provided a very large glue joint surface, as well as tight acoustic seal where it’s needed. I used a tenoning jig to hold the board vertical, and angled the blade to skim off approx 6mm of material on the rear panel. I also cut a very small wedge at the same 5dg angle as an additional glue block for the tip if the closed end.
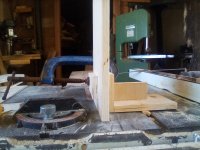
With a bit of practice on scraps - which is about all I ever used MDF for during my last decade of building- you can get pretty decent results cutting the driver hole with a shop made circle jig and router. Machine the larger diameter rebate first, then the smaller diameter hole. Penetrate that one through, then back out enough to leave about 1/32” or 1mm to prevent to router from jumping when you complete the circle. Then reverse the work piece and trim out the plug with either a short flush trim bit or coarse rat-tail file / rasp. You want as clean an edge on the through hole as possible before you bevel the backside with 45dg bit.
Or, just find a buddy or nearby cabinet shop with a CNC")
I like to size those holes for approx 1mm of tolerance; a tight friction fit is possible, but can make it an absolute bitch if you ever need to get the driver out.
Don’t get too wrapped up on wire type / gauge; I’ve used everything from the single strand #24 to which Dave refers, to #22 or so stranded zip wire. If the terminals are mounted high on the slanted back panel, there’s probably less than a foot required to get to the driver. Keep in mind that there’s many times that length of very thin wire in the voice coil of any FR driver.
Whatever type of terminal you use, I highly recommend ones that can be installed from the outside, not those bolted from inside. I found I could not hear any difference between the cheapie little plastic cup binding posts and the most expensive Eichmann or WBT, etc.
If the drivers still come with hex head mounting screws, definitely use them. They are closer in geometry to a coarse threaded sheet metal screw and work very well in plywood. Drill pilot holes and manually pre-tap before installing the drivers.
That’s about all I can think of at the moment; enjoy the build.
In addition to rebating the baffles for drivers with thicker bezels, it’s also highly recommended to chamfer the rear side of driver through hole.
Dadoes/ rebates aren’t essential, but after literally hundreds of builds of all sorts, I certainly found they made assembly easier, and of course add more glue surface area and structural rigidity. It’d also make for a better acoustic seal if you plan on a temporarily removable top panel to allow easier access to experiment with damping fill.
I found an angled scarfe joint between the internal vertical panel and slanted back panel provided a very large glue joint surface, as well as tight acoustic seal where it’s needed. I used a tenoning jig to hold the board vertical, and angled the blade to skim off approx 6mm of material on the rear panel. I also cut a very small wedge at the same 5dg angle as an additional glue block for the tip if the closed end.
With a bit of practice on scraps - which is about all I ever used MDF for during my last decade of building- you can get pretty decent results cutting the driver hole with a shop made circle jig and router. Machine the larger diameter rebate first, then the smaller diameter hole. Penetrate that one through, then back out enough to leave about 1/32” or 1mm to prevent to router from jumping when you complete the circle. Then reverse the work piece and trim out the plug with either a short flush trim bit or coarse rat-tail file / rasp. You want as clean an edge on the through hole as possible before you bevel the backside with 45dg bit.
Or, just find a buddy or nearby cabinet shop with a CNC
I like to size those holes for approx 1mm of tolerance; a tight friction fit is possible, but can make it an absolute bitch if you ever need to get the driver out.
Don’t get too wrapped up on wire type / gauge; I’ve used everything from the single strand #24 to which Dave refers, to #22 or so stranded zip wire. If the terminals are mounted high on the slanted back panel, there’s probably less than a foot required to get to the driver. Keep in mind that there’s many times that length of very thin wire in the voice coil of any FR driver.
Whatever type of terminal you use, I highly recommend ones that can be installed from the outside, not those bolted from inside. I found I could not hear any difference between the cheapie little plastic cup binding posts and the most expensive Eichmann or WBT, etc.
If the drivers still come with hex head mounting screws, definitely use them. They are closer in geometry to a coarse threaded sheet metal screw and work very well in plywood. Drill pilot holes and manually pre-tap before installing the drivers.
That’s about all I can think of at the moment; enjoy the build.
Last edited:
If the drivers still come with hex head mounting screws, definitely use them. They are closer in geometry to a coarse threaded sheet metal screw and work very well in plywood. Drill pilot holes and manually pre-tap before installing the drivers.
Do not over tighten. Just enuff to hold an imaginary washer motionless.
dave
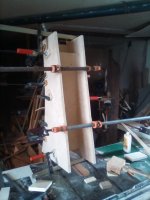
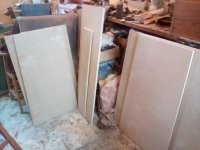
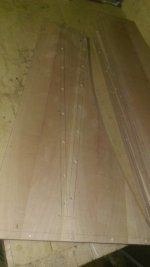
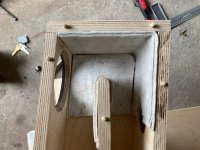
How are you planing to fix baffle? No dowels for that? This is how much I putted.
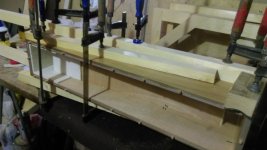
If baffle will be glued last it will be bitch to fix clamps. I used few different lengths pieces of wood on back panel so I can fasten clamps for baffle.
If baffle will be glued last it will be bitch to fix clamps. I used few different lengths pieces of wood on back panel so I can fasten clamps for baffle.
Attachments
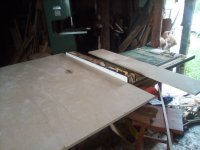
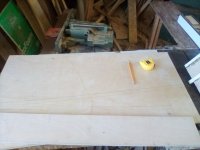
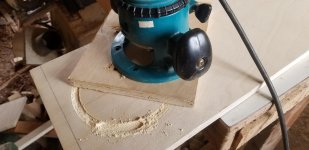
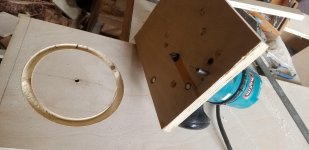
I finally got enough nerve to make a jig for my router to cut rebates for the drivers in the front baffles (why are the front panels called "baffles". Seems to me baffles should restrict something. Why these panels are called this is just baff....)
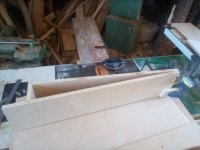
The dowels in my previous photos were just to align the backs and interior board in proper position, ensuring the 95mm opening. I will likely glue the baffles in place, after chamfering the backs, and then fit the acoustic stuff and felt from the top, once it arrives.
What about speaker terminals? Is there a better place to put that hole? I was thinking behind the felt maybe?
Attachments
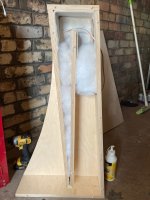
Depends on the size/shape/configuration of your terminals - I put mine just under the felt because of the way the wires come off them. From my research it's not hugely critical but putting the terminal lower down is preferable.
I also used dowels for my entire construction and I'll do it again for every speaker I can in to the future; super strong, super easy to glue, align, etc.
I also used dowels for my entire construction and I'll do it again for every speaker I can in to the future; super strong, super easy to glue, align, etc.
Attachments

Re location of input terminals; except for one early experimental build - might even have been FH1 with fixed supra-baffle?- I tended to use the cheapie round cups mounted high in the slanted rear panel behind the felt lagging; in which it was fairly easy to slice a small slit with a Olfa utility knife. As those cups are attached from the outside, fishing the short length of wire was not the hardest part of the build.
- Home
- Loudspeakers
- Full Range
- Starting to build a FHXL