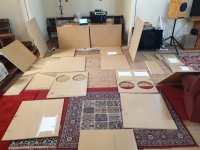
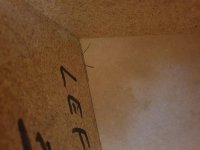
Millimeter level tolerance required on that internal baffle...
Time for a cup of coffee and a bit of a think about the risk of adjusting things for purely aesthetic reasons.
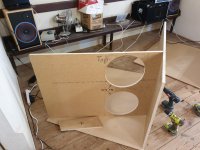
I am thinking a couple of mm twist on that baffle will.make a litre or so difference in the rear chamber of 180 litres... and that chamber is not sensitive to errors looking at Hornresp...
Time for a cup of coffee and a bit of a think about the risk of adjusting things for purely aesthetic reasons.


I am thinking a couple of mm twist on that baffle will.make a litre or so difference in the rear chamber of 180 litres... and that chamber is not sensitive to errors looking at Hornresp...
At this time it is all dry assembly. Then it all comes apart and goes back together with glue
O ye of little faith!
Takes a while for the glue to set, that buys you time.
Awesome project, would love to see it too. I have retired to Tanunda (organs, brass bands and male voice choirs).
Have recently completed a pair of THAM6 (using Jaycar 6.5 inch drivers) tapped horns to extend the lower reach of my OB's and very happy with the result. But in the context of your monsters feel entirely inadequate.
Cheers
Have recently completed a pair of THAM6 (using Jaycar 6.5 inch drivers) tapped horns to extend the lower reach of my OB's and very happy with the result. But in the context of your monsters feel entirely inadequate.
Cheers
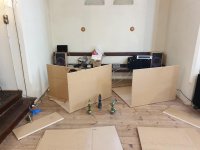
And a few hours of mucking around has the basic horns together. Minus the horn extension out the back into the tesnsept.
I can just tilt these up to access the base. I doubt I will once loaded.
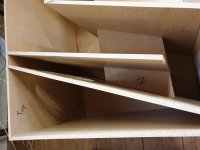
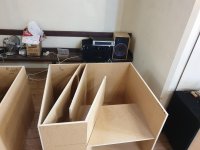
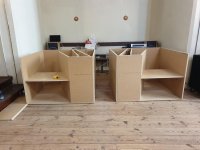
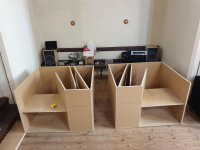
They are obviously facing back to front. They really drive into the tesnsept which forms the final expansion of the horn...
I can just tilt these up to access the base. I doubt I will once loaded.


They are obviously facing back to front. They really drive into the tesnsept which forms the final expansion of the horn...
Awesome project, would love to see it too. I have retired to Tanunda (organs, brass bands and male voice choirs).
Have recently completed a pair of THAM6 (using Jaycar 6.5 inch drivers) tapped horns to extend the lower reach of my OB's and very happy with the result. But in the context of your monsters feel entirely inadequate.
Cheers
I have some 12 inch tapped horns at home. I was honestly surprised how well they worked.
How did the Jaycar driver go?
The altronics c3088 has what I suspect is the best xmax of the mainstream electronic shop speakers out there in Australia. It is 8inch but does a pretty good job. I might plug that into Hornresp and see how it behaves sometime
I have some 12 inch tapped horns at home. I was honestly surprised how well they worked.
How did the Jaycar driver go?
With a 200Hz approx second order passive low pass filter it works nicely running in parallel with the main speakers. I originally intended to buy a pair of ScanSpeak 18w8545 that looked good in HornResponse but testing with the Jaycar that was in my collection delivered everything I was looking for.
GM, I love the conversational style of your post.
Whilst I might be misinterpreting the single English word that you used, I am guessing you would like to see the model I used.
If this was not your intent, please let me know. "No" would probably communicate that!
Sorry, I am teasing you.
If you read the first post it explains what is going on in the installation.
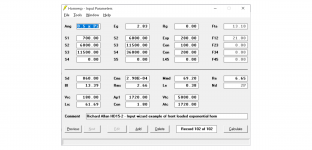
As described in the first post:
L12 is in the folded horn built from timber. This is obviously an approximation of an exponential horn in the three folds. That approximation is not unreasonable in Hornresp.
L23 is formed by the two horns facing into the transept, and is the path length to the top of the horns exiting into the transept (ref post 1)
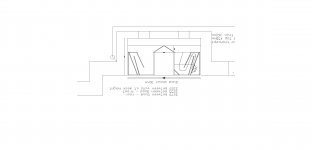
The last expansion is from the transept into the hall itself.
The model is half PI space, as there are two of these horns in the transept. The actual hornresp model is for only one of them, as you obviously need the second horn to turn the full Pi space into half pi space.
I hope that between this post and post 1 you get the hang of it.
Whilst I might be misinterpreting the single English word that you used, I am guessing you would like to see the model I used.
If this was not your intent, please let me know. "No" would probably communicate that!
Sorry, I am teasing you.
If you read the first post it explains what is going on in the installation.

As described in the first post:
L12 is in the folded horn built from timber. This is obviously an approximation of an exponential horn in the three folds. That approximation is not unreasonable in Hornresp.
L23 is formed by the two horns facing into the transept, and is the path length to the top of the horns exiting into the transept (ref post 1)

The last expansion is from the transept into the hall itself.
The model is half PI space, as there are two of these horns in the transept. The actual hornresp model is for only one of them, as you obviously need the second horn to turn the full Pi space into half pi space.
I hope that between this post and post 1 you get the hang of it.
Thanks! Yes, I followed how it all folded up in general, so combined with the response plot with unfamiliar drivers was just curious what the sim/driver specs looked like.
BTW, love the Ute! A full cement mixer trashed me and my '69 El Camino hot rod in '89 and long since given up finding one worth fixing or any suitable replacement I might can afford, but now that I know there's a USA LHD importer, 'hope springs eternal' again if the price adder doesn't push it out of my range, so thanks for that; and yes, blowers are for torque, only an electric motor does it better, quicker with max torque at 0 RPM.
GM
GM - The El Camino is in my measure an American Classic. You must have been gutted.
Given the huge number of pickups people drive over there, it amazes me that there is not something like the Ute - finding the middle ground between passenger car and truck, still in production.
I have looked at a couple El Camino's that made their way to Australia, they are not cheap here and I imagine getting parts in Australia would be gruesomely expensive.
Yeah, there was a lot of blood, sweat and tears invested in upgrades, repairs along with some memorable moments. Oh well, spiff happens and its typical [for then] PU truck construction, durability saved me from a miserable existence in an iron lung or worse and much of its mechanicals helped resurrect a '70 that was languishing in the rear of a [then] local Toyota dealer's body shop, so didn't 'die' in vain.
There's been attempts, but the long and short of it is that we as a nation have a 'bigger is better' [BIB] mentality, especially when it comes to vehicles needing to be a second home due to spending way too many hours commuting, etc., as folks are ~forced to move further away from work, etc..
I can't remember the last time I didn't hear on the so called [obsolete] morning 'rush' hour traffic about at least one death and/or life long seriously crippling accident.
Factor in that there's more perks for both the manufacturers and buyers, the former continues to promote this more profitable line, though this has been slowly going away for obvious reasons.
GM
Last edited:
Today was long. I thought that all the pre-work yesterday would make this easy. It did mostly.
The hard bit was adding braces to everything that braces could fit to. More measuring and cutting and glueing and screwing.
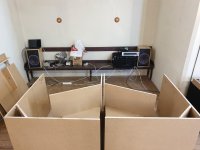
The build order was kind of middle out. Middle baffle first.
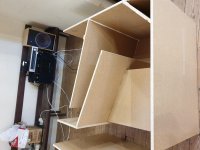
Then the second baffle and braces.
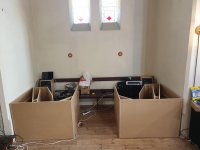
Shoving them into their approximate location (I put nine giant felt pads on the bottom - a damn fine idea as it turns out.)
They fit pretty well. A gap of about 20mm on the left hand side for the design desk width.
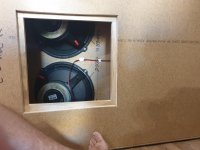
Then bolting the drivers in. I angsted over the driver access hole - and in the end made it 400mm a side. I wish I had made it much taller, as getting the top bolts in was a real hassle. I ended up doing contortions on the floor and getting cramp.
And swearing a lot. But anyone that knows me would kind of expect that anyway.
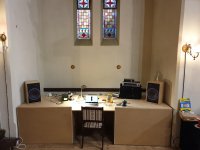
So, the tops went on.
Both went on fine, and all the screws went into the baffles hidden away inside the box. Phew.
The left hand box is close enough to perfect. A sand and lacquer will have it exactly as I envisaged.
I will never publish a photo of the back (into the transept) side of the right hand one. Somewhere during screwing there was about a 6mm shift of the back panel next to the horn exit. At that point given all the baffles screwed to it, and the fact they had been there for 5 hours meant there was no "quick fix".
Even a cup of coffee and a good chance for my OCD to kick in did not have me take - well I don't know how many - screws out to try adjusting it. The adjustment would certainly have involved ripping lots more things out and....
Oh well.
If you ever want to see obsession in a build, check out "Bad Obsession Motorsport" on youtube. They have a project building a mini using a modern turbocharged engine and 4WD. These guys are utter perfectionists, and hilarious to boot. Cups of tea (they are Brits) feature heavily in their work.
Well I have to accept that at the back of the right one is a bit of a lip under the top. At least it is hidden.
I should have got someone to laser cut the panels
So.. here it is getting ready to be hooked up.
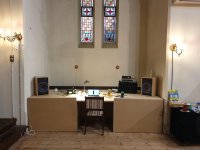
And standing back a bit....
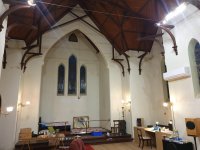
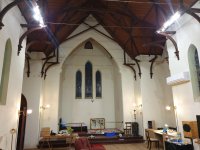
I hooked both subs in series making an 8 ohm box.
I did not bring a DSP XO with me. I have hooked them up to my desk stereo. This has a passive XO at something below 80Hz (LR 24dB). The 18 inch sub hooked to it is a reasonably typical driver. IT used to sit next to my desk, so while I can't remember where I set the frequency, it wont be anything above 80Hz.
Just plugging this sub in had the levels totally out of whack - I expect the model is right, there would seem to be easily 10dB more bass from this sub than the good old ported 18.
I ran a sweep from 200Hz down to 10Hz. As you do.
In the crossover region it was a mess. No surprise though.
From about 60Hz-ish (at a guess - I figure the LR XO slopes up there somewhere) down the level leaped to a lot more than I was expecting. I cannot imagine there was even a watt going into them, but the output just continued down - rattling pretty much the whole place.
I couldn't hear much at the end - though I would not expect to. The tin wasn't rattling anymore either - so I guess that by 10Hz things have indeed rolled off a lot. As expected, and probably a good thing.
That said - at 20Hz they are rocking and rolling to use a carefully calibrated term. I am going to have to be very careful with these.
I need to come back with:
- A DSP
- My measurement kit.
- Some self control!
Interestingly the wife seems reasonably comfortable with the way it has come out. I think it is a pretty neat trick to get TWO 880 liter internal volume subs part the spouse with no comment
I have however been warned off of turning them up.
They definitely need a coat or two of something. My inclination is to use dark Shellac, as everything else in this place is covered in it. That siad though, as a workbench they will take a bit of a pounding. Possibly I should use similar in a varnish finish.
The hard bit was adding braces to everything that braces could fit to. More measuring and cutting and glueing and screwing.

The build order was kind of middle out. Middle baffle first.

Then the second baffle and braces.

Shoving them into their approximate location (I put nine giant felt pads on the bottom - a damn fine idea as it turns out.)
They fit pretty well. A gap of about 20mm on the left hand side for the design desk width.

Then bolting the drivers in. I angsted over the driver access hole - and in the end made it 400mm a side. I wish I had made it much taller, as getting the top bolts in was a real hassle. I ended up doing contortions on the floor and getting cramp.
And swearing a lot. But anyone that knows me would kind of expect that anyway.

So, the tops went on.
Both went on fine, and all the screws went into the baffles hidden away inside the box. Phew.
The left hand box is close enough to perfect. A sand and lacquer will have it exactly as I envisaged.
I will never publish a photo of the back (into the transept) side of the right hand one. Somewhere during screwing there was about a 6mm shift of the back panel next to the horn exit. At that point given all the baffles screwed to it, and the fact they had been there for 5 hours meant there was no "quick fix".
Even a cup of coffee and a good chance for my OCD to kick in did not have me take - well I don't know how many - screws out to try adjusting it. The adjustment would certainly have involved ripping lots more things out and....
Oh well.
If you ever want to see obsession in a build, check out "Bad Obsession Motorsport" on youtube. They have a project building a mini using a modern turbocharged engine and 4WD. These guys are utter perfectionists, and hilarious to boot. Cups of tea (they are Brits) feature heavily in their work.
Well I have to accept that at the back of the right one is a bit of a lip under the top. At least it is hidden.
I should have got someone to laser cut the panels
So.. here it is getting ready to be hooked up.

And standing back a bit....


I hooked both subs in series making an 8 ohm box.
I did not bring a DSP XO with me. I have hooked them up to my desk stereo. This has a passive XO at something below 80Hz (LR 24dB). The 18 inch sub hooked to it is a reasonably typical driver. IT used to sit next to my desk, so while I can't remember where I set the frequency, it wont be anything above 80Hz.
Just plugging this sub in had the levels totally out of whack - I expect the model is right, there would seem to be easily 10dB more bass from this sub than the good old ported 18.
I ran a sweep from 200Hz down to 10Hz. As you do.
In the crossover region it was a mess. No surprise though.
From about 60Hz-ish (at a guess - I figure the LR XO slopes up there somewhere) down the level leaped to a lot more than I was expecting. I cannot imagine there was even a watt going into them, but the output just continued down - rattling pretty much the whole place.
I couldn't hear much at the end - though I would not expect to. The tin wasn't rattling anymore either - so I guess that by 10Hz things have indeed rolled off a lot. As expected, and probably a good thing.
That said - at 20Hz they are rocking and rolling to use a carefully calibrated term. I am going to have to be very careful with these.
I need to come back with:
- A DSP
- My measurement kit.
- Some self control!
Interestingly the wife seems reasonably comfortable with the way it has come out. I think it is a pretty neat trick to get TWO 880 liter internal volume subs part the spouse with no comment
I have however been warned off of turning them up.
They definitely need a coat or two of something. My inclination is to use dark Shellac, as everything else in this place is covered in it. That siad though, as a workbench they will take a bit of a pounding. Possibly I should use similar in a varnish finish.
Great work Phil, you'll have fun with these. Funny how those bass horns actually look small in that huge room.
I had the exact same thought. I think they will blend in pretty well, especially considering their size! Well thought out to turn them into a desk/work surface as well.
I think I have set some form of record in foster g support from Anne (The wife)!
I can't wait to get back in the next week or two and finish the exteriors and connect a proper crossover and amp.
I did some manual measurements on the analogue crossover this morning and it has an XO frequency below 50Hz. I am trying to work out what I was thinking when I soldered those resistors into it..
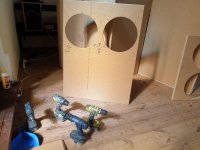
One last thought for the day is how to get 500 screws into boxes in one day....
One to drill, one to pre drill the screw hole into the end train, one to countersink, one to screw ..

- Status
- This old topic is closed. If you want to reopen this topic, contact a moderator using the "Report Post" button.
- Home
- Loudspeakers
- Full Range
- 20Hz Horn Loaded Subwoofer - built into church hall
