I’ve begun a build of Planet 10’s Mar-Ken10pwTT (wide, tall trapezoid) for Alpair 10P. What diameter hole and recess are people using for this driver? Based on the P10 drawings, I’m thinking 6.5” diameter and 3/8” deep recess, and 5.5” diameter for the through hole. All my tools are in inches and the discussions I’ve been able to pull up are in metric.
Thanks,
Jeff
Thanks,
Jeff
The build is complete. Will post pics once the finishing process is done.
Weird question: Does the driver's orientation within the cabinet matter for soundstage? I.e. if the driver is upside down, would the image likewise be inverted?
Today I looked at the drivers in order to think about the wiring, and noticed that the leads on each one have a different orientation to the markings on the bezel cover. To make the bezels looks the same in the finished cabinets, the drivers would have different rotational orientations (referenced to the solder tabs) -- and that made me realize that I have no clue about the physics of soundstaging. All things being equal, does the perceived spatial locus of a sound in a stereo field have anything to do with the rotational orientation of the driver? Does it have an "up" and "down"?
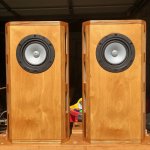
Ok thanks. The holes were drilled a few weeks ago and I followed the drawing exactly, so they are at 12:00, 6:00, etc. and the bezel cover markings will be on a diagonal for that sexy "devil may care" look. ;-)
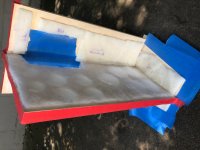
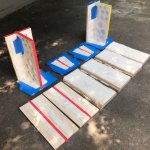
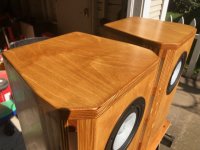
I had an idea to paint the cabinets orange and make sand-filled stands from BB ply stained in golden oak Danish oil. The light blue cone of the A10P would pop really nicely against the orange, with an overall bright splash of color for the whole assembly. But I like to respect the material by showing it, so I used coffee to stain it.
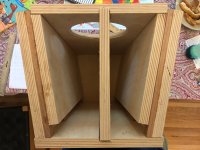
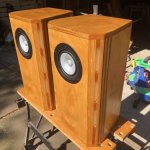
Here are some pics of the build thus far.
I had an idea to paint the cabinets orange and make sand-filled stands from BB ply stained in golden oak Danish oil. The light blue cone of the A10P would pop really nicely against the orange, with an overall bright splash of color for the whole assembly. But I like to respect the material by showing it, so I used coffee to stain it.
Here are some pics of the build thus far.
Attachments
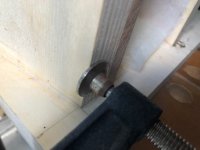
Did you rebate the baffle:
Following the plan, I cut a recess (rebate?) for the driver so that its surface sits flush (well, close to flush) with the front baffle, which you can see in the fourth picture above.
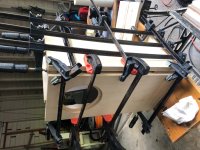
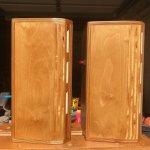
But I did not do any rabbet joints. Everything is butt jointed except for the internal brace, for which I cut 1/4" dadoes top, bottom, front, and back, and accordingly cut the braces larger, to improve stiffness and support. Maybe that was unnecessary, but it seemed like a good idea in my head. I also did that in the CGR and traps for FE103Sol.
What you see in the picture you re-posted is overhang on the sandwiched side walls. When making the side walls, I cut the vent spacers and external wall wider than in the plans, so that they protrude about 1/4"-3/8" beyond the internal wall. This helps to keep everything stable and properly fitted to the baffle during glue-up. I also cut the top and bottom panels about 1/4" longer (but not wider) for a 1/8" overhang on the front and back, so that I can use a router to flush-trim them to the baffle and rear panel for a precise appearance.
Then, once the front is trim, I put the cabinet face-down on the table saw to cut the chamfer down the front sides. That's where the front overhang on the side walls disappears. I've found that I get better results making certain visible surfaces over size and then trimming them with tools, rather than cutting each piece precisely and then gluing up.
For those watching, if you use the table saw to cut the chamfer after assembly is complete, you need to hold a piece of sacrificial scrap on the back to prevent tear-out as it moves past the blade.
Last edited:
But I did not do any rabbet joints. Everything is butt jointed except for the internal brace, for which I cut 1/4" dadoes top, bottom, front, and back, and accordingly cut the braces larger, to improve stiffness and support.
Yes, the dadoes to fit the brace are the ones that are not advised. Only a little deal thou. More for the benefit of the next builder.
dave
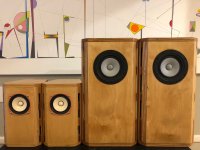
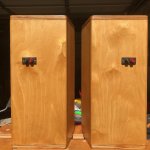
Coffee does nice things with birch.
Indeed. Nice build!

- Status
- This old topic is closed. If you want to reopen this topic, contact a moderator using the "Report Post" button.
- Home
- Loudspeakers
- Full Range
- Mar-Ken10pwTT Build