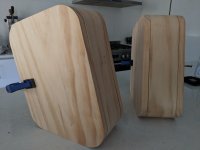
Guys, have a dilemma on how to finish these. Originally I was going to paint the sides black, similar to my t line build, but torn between leaving these grain and putting a radiator (even though suggested elsewhere that a port is free), or just going some conduit in the back and hiding it. Open to suggestions, but all I will be doing in the meantime is putting a round over on the sides. The driver will be the tectonic TEBM65C20F from the previous T Line build and sitting 1/3rd from the top, hopefully recessed depending on the width/round over etc. One will contain the DTA2 amp and volume knob, which might hide down the side somewhere. The box ended up a bit bigger than anticipated, as I had to.increase the kerf radius but forgot.to rejig the dimensions to.inlcude the include the extra arc length, which resulted in an extra 70mm across the entire legth
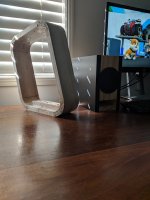
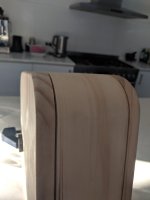
Ignore the gaps, these haven't been glued, sanded or finished in any eay, just held with a clamp at the back.
I quite like the shape of the boenicke w5, but can't do a sub or anything else. I kerfed a piece of timber and not using a router to shape the internals like I mentioned in a previous post (maze inspired).
Attachments
Last edited:
Looks like a soft pine so I wouldn’t recommend staining without using a pre-stain conditioner first as pine is prone to blotching when stained. Actually, I wouldn’t recommend staining at all.
I would prime it first, then paint it. Perhaps choose a solid color for the front/top/bottom/back and then another color or some type of graphic design for the sides.
I would prime it first, then paint it. Perhaps choose a solid color for the front/top/bottom/back and then another color or some type of graphic design for the sides.
Looks like a soft pine so I wouldn’t recommend staining without using a pre-stain conditioner first as pine is prone to blotching when stained. Actually, I wouldn’t recommend staining at all.
I would prime it first, then paint it. Perhaps choose a solid color for the front/top/bottom/back and then another color or some type of graphic design for the sides.
Correct, it is pine, I was going for an inexpensive design that was still funky enough to show some grain. I like the sound of a graphic of some sort. Was almost thinking of trying the trick with a laser jet print and acetone and transfer it to the face
What is really the correct way to sand to get that perfect finish? Recently on my last few projects I've just used 80 or 120 grit on my orbital. Should one be then continuing up to higher grits afterwards?
Yes, work your way up the sandpaper grits 80 - 120 - 180 - 240. After that, if you want, you can finish off with wet and dry grits, maybe 400 - 800, depending on how hard the wood is. Before the final rub down with the last grit, wipe down the surfaces with a clean rag wetted with water. This will drag sawdust out of the pores and raise the nap (wood fibres) and when dry, go over the surface lightly with wet and dry to knock off the fibres. If you want, you can then go over it with naphtha to degrease the wood prior to priming or painting.
I have never used an orbital sander
 ToS
ToS
Hand rubbed boiled linseed oil followed by wax. Sand with fine grit while oil is wet. Let dry 3 days apply and sand again. 2-3 coats. Then let dry a week. Then apply wax with cloth and buff.
Mini Karlsonator (0.53X) with Dual TC9FD's

Mini Karlsonator (0.53X) with Dual TC9FD's
Sanding/finishing tips
Sanding is tedious for most people (although, strangely, I find it rather peaceful and zen-like) but it is the most critical stage as preparation for a proper finish. It is generally accepted that you can skip a grit level as you sand. For example, in the progression of 40, 60, 80, 100, 120, 150, 180, 220, 280, 320, 400, 600, 800, 1000, if you start at say 100 you can usually jump to 150 then to 220, etc. There are always exceptions, of course, so it pays to test sand on a scrap of the wood you are using for your project to be sure.
If you are wanting smooth and are going straight to a clear finish then you should start with sanding sealer and sand it no higher than 320 grit (220 is usually acceptable). Multiple coats of sealer may be required depending on the porosity of your wood. Regardless, as you progress through the grits I recommend wiping the surface with a tack cloth or microfiber cloth after each grit level to remove the sanding residue. This will reduce the load on your sandpaper by preventing it from clogging too soon.
One tip I have used for years is to rely on my sense of touch to determine how smooth the surface is. Scratches or bumps are not always obvious to the eye so I close my eyes and lightly run my fingers over the surface to determine if it's at the level where I can progress to finish coats. It's amazing how quickly your sense of touch will elevate just by closing your eyes,
As you apply finish coats you can progressively sand from 320 up to whatever grit you want depending on the desired sheen/smoothness level. As noted in previous posts, some people prefer to wet sand using water or a spirit-base from 400 grit and above. It does reduce the load on the sandpaper but it is not my preference as I find it rather messy and it introduces drying time that prevents moving on to additional coats. I freely admit, however, that it is an effective methodology.
I do not use traditional sandpaper when sanding between finish coats. Many years ago I discovered a product called Micro-Mesh. They offered just a basic kit of cloth-backed abrasives when I started using it but now they have greatly expanded their offerings and have abrasives for just about every industry. I use the Professional Woodworkers Kit (Micro-Mesh(R) Professional Woodworker's Kit - Hand Kits - Kits - Products by Type -MICRO-SURFACE FINISHING PRODUCTS, INC) and it will last you a very long time. Their abrasive levels are a bit different from standard (I believe they follow a Japanese standard) so what they refer to as 1500 is closer to 400 grit. 3200-3600 will produce a satin sheen and if you work your way up to 12000 you can achieve a high-gloss finish with scratch levels invisible to the naked eye (great for acrylics). Highly recommended.
Some other thoughts on sanding technique:
- Random orbit sanding is fine for getting out the rough stuff but you really want to hand sand your finish coats and you should always make your final sanding pass in the same direction that the grain is running. That way any remaining scratches will not be cutting across the grain of wood thus rendering them more visible.
- As you progress through the grits you should require less pressure and time to advance to the next level. If this is not the case then you are either moving too quickly to the next level or you are using worn out sandpaper.
- Speaking of, don't assume that sandpaper that is worn down can continue to be used as the next grit level. It's designed for cutting at a certain abrasion level and once those cutting edges are used up the sandpaper should be thrown away and replaced with a fresh piece.
Do you hand sand? Or got a.belt sander.
I'm prepared to learn
I do all my sanding work by hand by wrapping the sandpaper around cork blocks, sometimes bits of cardboard cut to size, cardboard tubes, or even rolling up a piece of sandpaper into a cylinder for sanding holes. I happen to really enjoy sanding. Clean up as you go, and if needs be, wear a respirator.
CraigSu has given some very good advice. Don't flog the sandpaper when it's worn out, too much pressure will either friction burn the wood or becomes burnished to such an extent that the pores become sealed. Change the sandpaper as often as necessary, and work with the grain.
If you are going to work through the grits all the way to ultra fine, you can finish off working with your hand inside a crumpled brown paper bag that has the equivalence of around 10,000 grit.
The finish is up to you. My preference is for linseed oil followed by beeswax, but whatever floats your boat.
ToS
Last edited:
tapestryofsound's comments are pretty accurate. Don't use a belt sander. Way too aggressive. A random orbit machine can do most of the work. Even starting at 120 grit works. After that, you're sanding just enough to take out the sanding marks from the next coarser grit. Hand sand for the last pass.
When sanding the BLO wet, the fine wood dust gets mixed with the BLO and fils the grain and pores and the BLO later gardens as the matrix and you have a perfect match in color grain filler. This is part of the reason why the finish looks so smooth and satiny compared to the natural wood grain.
I think I'll keep close to.the look of the t lines with the black painted sides and clear coat over the middle. I'll just have to try the finishing techniques this time prior to painting. I'm going to hide or recess the volume dial on the side as I have an unused black brushed knob just lying around. Bought some nice binding post units before, which I can put.the amp mounted on the back of one of them.
One of the reasons to keep similar is I have a bit of left over 30mm ply about 190wide and 2230mm long, which I'm thinking of building a PC cabinet to look like a bigger version of the speakers, I cant get pine that is basically 400*400 without laminating two together, which the join line would drive me nuts.
One of the reasons to keep similar is I have a bit of left over 30mm ply about 190wide and 2230mm long, which I'm thinking of building a PC cabinet to look like a bigger version of the speakers, I cant get pine that is basically 400*400 without laminating two together, which the join line would drive me nuts.
- Status
- This old topic is closed. If you want to reopen this topic, contact a moderator using the "Report Post" button.
- Home
- Loudspeakers
- Full Range
- Need some suggestions for finishing