The story of how I built my speakers.
I wrote this years ago when I had just finished the speakers. Please note that the original intended audience was not DIY experts on a forum like this but rather the general public. This is why some of the explanations are on a basic level.
This story like so many others, starts in a pub.
Me Dizzey and Sirf were out eating dinner at one of the up and coming places in my home town.
This particular establishment was a rock pub that sometimes featured bands live on a large stage.
We had seats in front of the empty stage. The entrecôte I had ordered was excellent.
Mostly for the sides that I hadn't had before. As we were eating, we spoke about speakers and music. Dizzey had read up on speakers. He was looking to get a proper Hi-Fi system for his apartment. He had been slightly snubbed in one of the local stores and had read up on building his own speakers. Dizzey is like that. Once he gets an idea he will read up on it properly and really dig into it.
When I got home I started browsing the net for DIY Speakers. Many of them featured several drivers and crossovers. The wood working required precision as well. That worried me less since at this point.
One of the speaker designs I started looking at was Jim Holtz's Statements (Statements).
This was one of the designs Dizzey had looked up. What made Dizzey interested in a DIY project was how much better stuff you could get for the same amount of money if you built them yourself.
Despite this, the Bill of Materials for "the Statements" speakers was over 700dollars. Which is a lot of money for an entry-level hobby project (which is what I was looking for). I started looking around a bit more seriously. I used three criteria in my search.
* First, I ignored anything not cost-effective enough. I cared little for things made of Moonstone or martian red stand.
* Secondly, I ignored speakers lacking plans or having bad plans.
* And third, I wanted something people had tested and tried. Preferably less zealous people with well-formed opinions.
Regarding electronics, the crossovers were often quite expensive and fiddly to construct.
I more and more started overlooking designs with complex crossovers since I hadn't held a soldering iron for 20 years.
The number of speaker designs I found was still large. Although many of them were tested and built to a lesser extent.
If you know me (which you probably don't), then you know I want something that stands out a little bit.
Eventually I started going through different horn designs. Full range drivers with fancy cabinets.
Full range drivers aim to play the entire sound spectra whereas regular drivers are targeted for a specific part of the sound spectra. For example tweeters are meant to play the higher frequencies, a bass driver aims to to play the very lowest. One of the main advantages of single driver horn designs (or transmission line speakers) is that such designs have no crossovers whatsoever. They often feature a single driver designed to play the entire spectrum and the cabinet is designed to use the full potential of the driver.
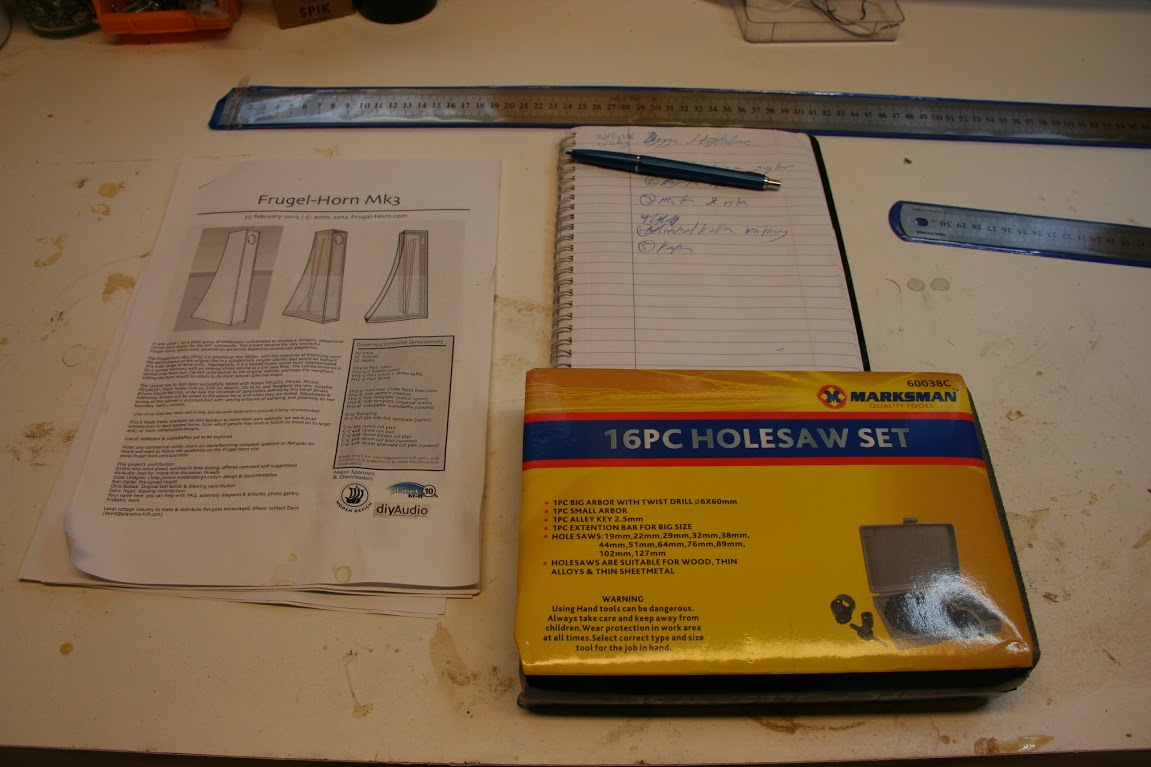
Many of the horn speakers would require a master carpenter. Despite this I kept looking at this type of design. Eventually I found a design that initially looked overly complex. It was called Frugel-Horn. The first images I had seen were of older versions of this design. The latest one was found on a slightly disorganized web page: Frugel-Horn Mk3 (www.p10hifi.net/FH/downloads/frugel-hornMk3-1v0-250212.pdf url is now 404, missing)
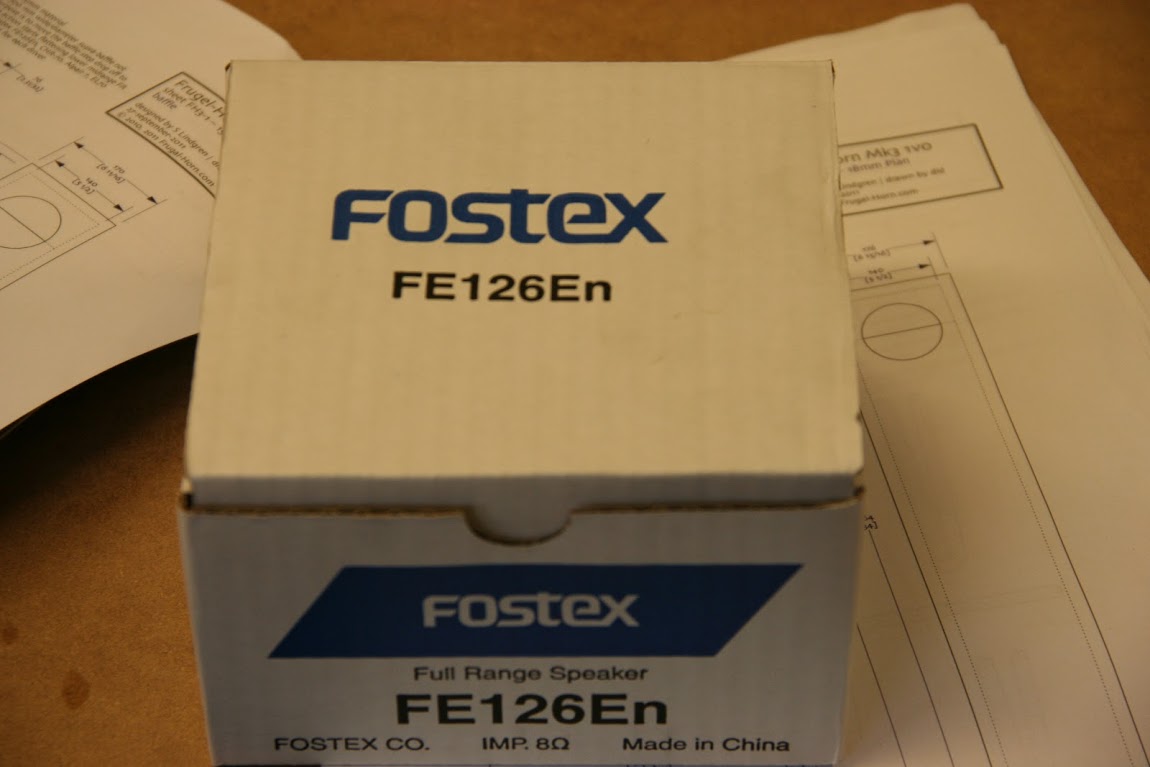
The design was fully open source and one of its goals was to keep it simple and cost effective. It was designed around a 4 inch full range driver. The design seemed old and abandoned at first, but once I started checking around I changed my opinion. The design was 5-10 years old but it was still being built! The plans even had different sound proofing based on which of the recommended drivers you would choose. They looked more and more interesting. Calculations on how low they would go and what the different drivers would be good at were available.
The really interesting thing was the plethora of opinions about this speaker. Since the plans were readily available, many had built their own. Most of the opinions were quite well formed. They inspired confidence in the design. The original design document featured plans for both 15 and 18mm walls, with a few different views on baffle thickness.
My mind was made up! I wanted a pair of these; These really beautiful speakers that wouldn't look out of place in a fancy design studio. I started looking around for the drivers and they weren't that expensive. A pair of drivers were around 140 EUR. in addition I would need terminals, MDF board, sound insulation material, anti-vibration pads, screws, glue, wires, spackle and paint. One of the advantages of this design is that it had been designed to be cut out of a single sheet of MDF. So if you ordered a single sheet of 1220×2440mm MDF that would be enough for a pair.
I placed an order for a pair of drivers and started rifling through the vast amount of forum posts on these speakers. I was looking both for tips on construction as well as practical tips and coloring ideas. I had this idea to paint them with 2 component paint like on cars. I was thinking of either Satin black, Rosso Corsa (Ferrari red) or even white. You see, I wanted something with presence. Most of the people I found had technical questions, some had audio quality discussions. Some discussions focused on the need of thicker baffles (if you went with a thinner material like 15mm).
I had been talking to my dad during this investigation. He is skilled at carpentering and had promised to help me build them. He had advised me away from designs that would be difficult to construct with any finish. He liked the idea of the frugal horn speakers so I ordered a sheet of 19mm MDF 1220×2440mm delivered to his workshop where we would be constructing them. The delivery was almost as expensive as the sheet itself but since I was unable to pick it up myself it turned out to be a decent compromise.
2015-03-07.
We started constructing the speakers on a somewhat cold Saturday in early March. The plan was to work as much as we could during a first weekend and then plan for further work if needed. I could do the sanding, painting and finishing back in town. I had ordered a few extra items before we started: Hole saw, speaker terminals and two metallic rulers.
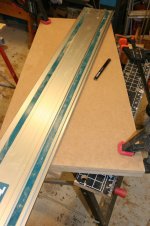
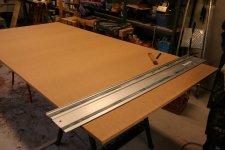
There were several suggested ways of cutting the sheet. We chose the following one.
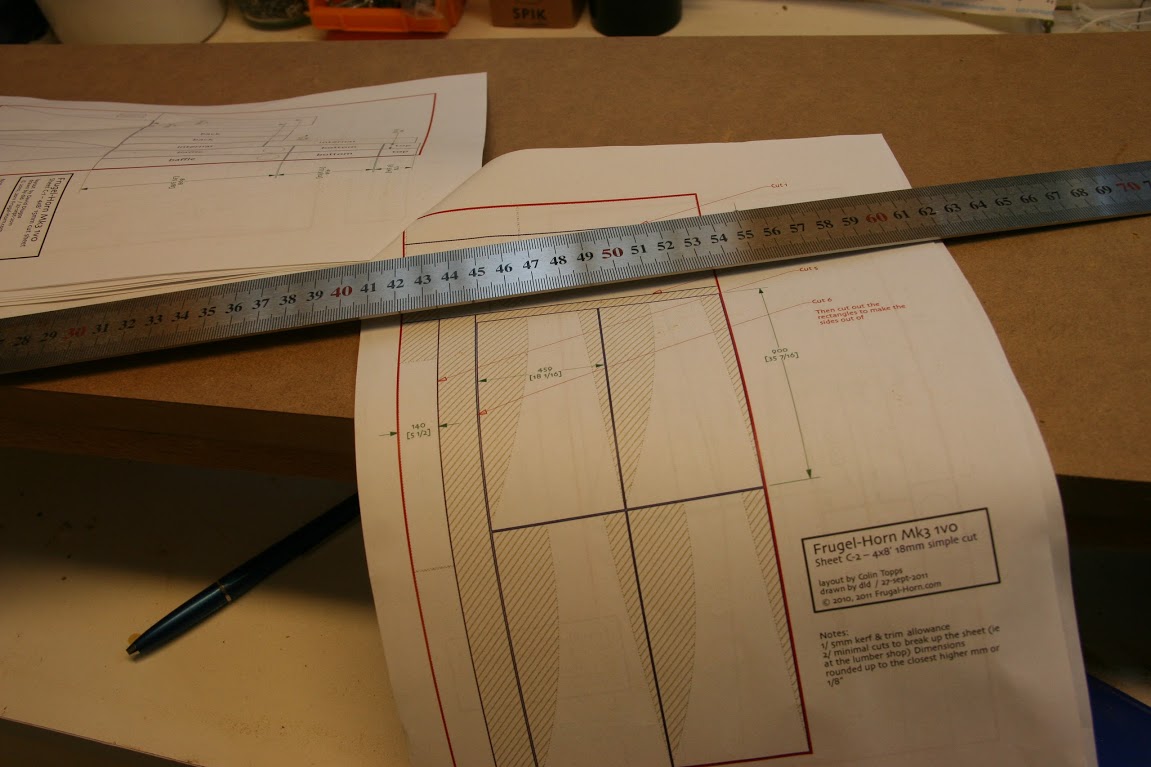
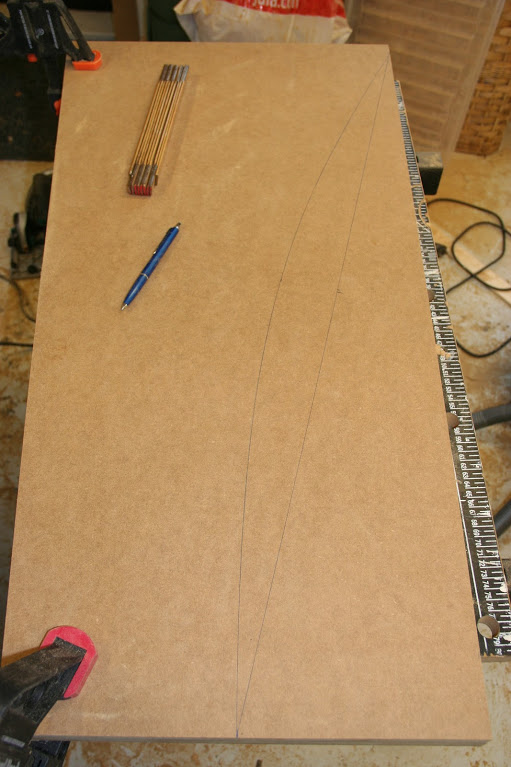
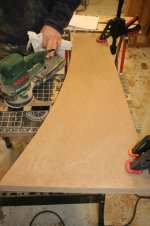
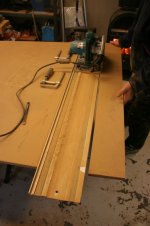
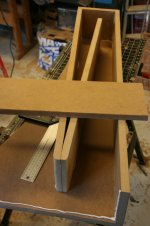
If you are to have any chance of nice cuts you will need a plunge saw. The plunge saw will ride along the ruler or guide and will give really nice cuts. We worked according to "Measure twice, cut once."; A mantra taught to me by Edd China of Discovery's Wheeler Dealers. An erroneous cut could put us out of business since we only had the one sheet of MDF. In fact much of the first day of construction was spent measuring and thinking. The plan is quite simple. Most parts will be 140mm (top, front, bottom and rear). The front of the speaker will lean back about 5degrees. This will affect many of the cuts. The really tricky part will be to create the sides. There is a long curved cut on the edge facing away from the front. This cut cannot be made with a plunge saw. Just drawing this cut will be a bit tricky. Also note that you will need to adapt the length of the parts if you use a non-standard material thickness. This is to keep inside of the horn within tolerance.
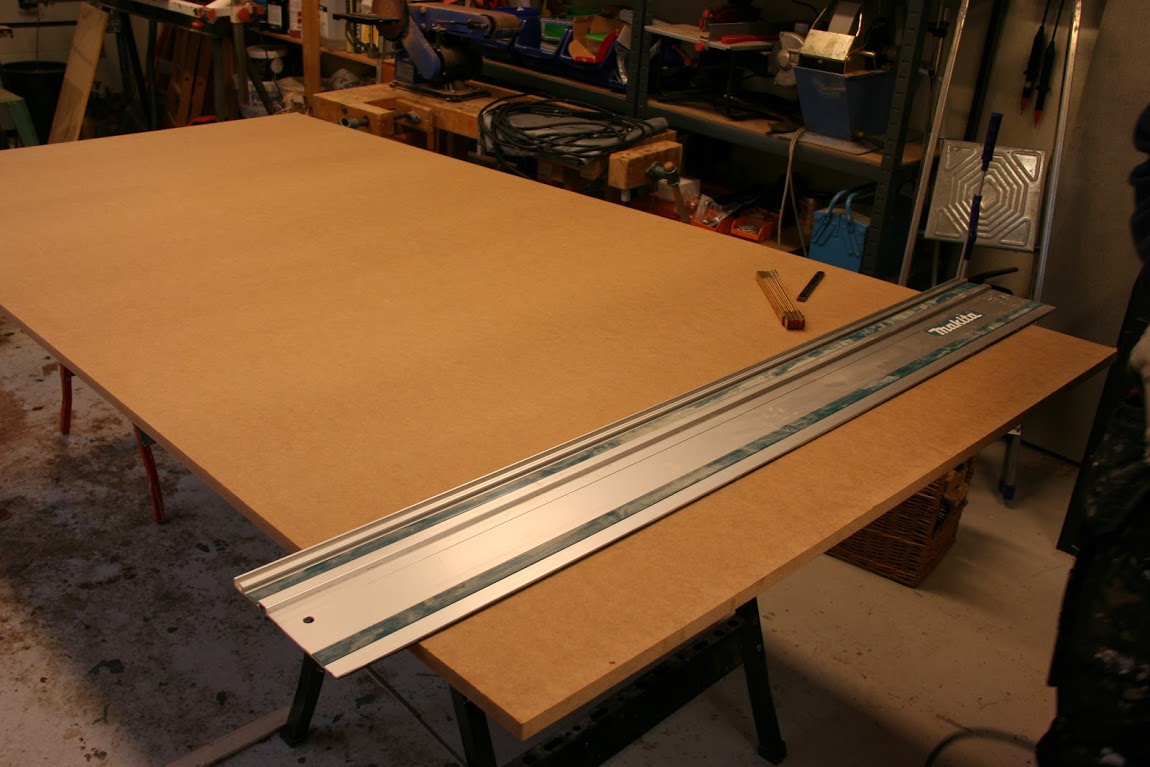
The very first cut:
https://www.diyaudio.com/forums/att...1543044217-frugal-horn-mk3-build-img_1679-jpg
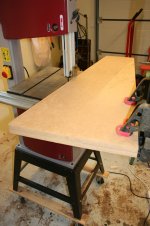
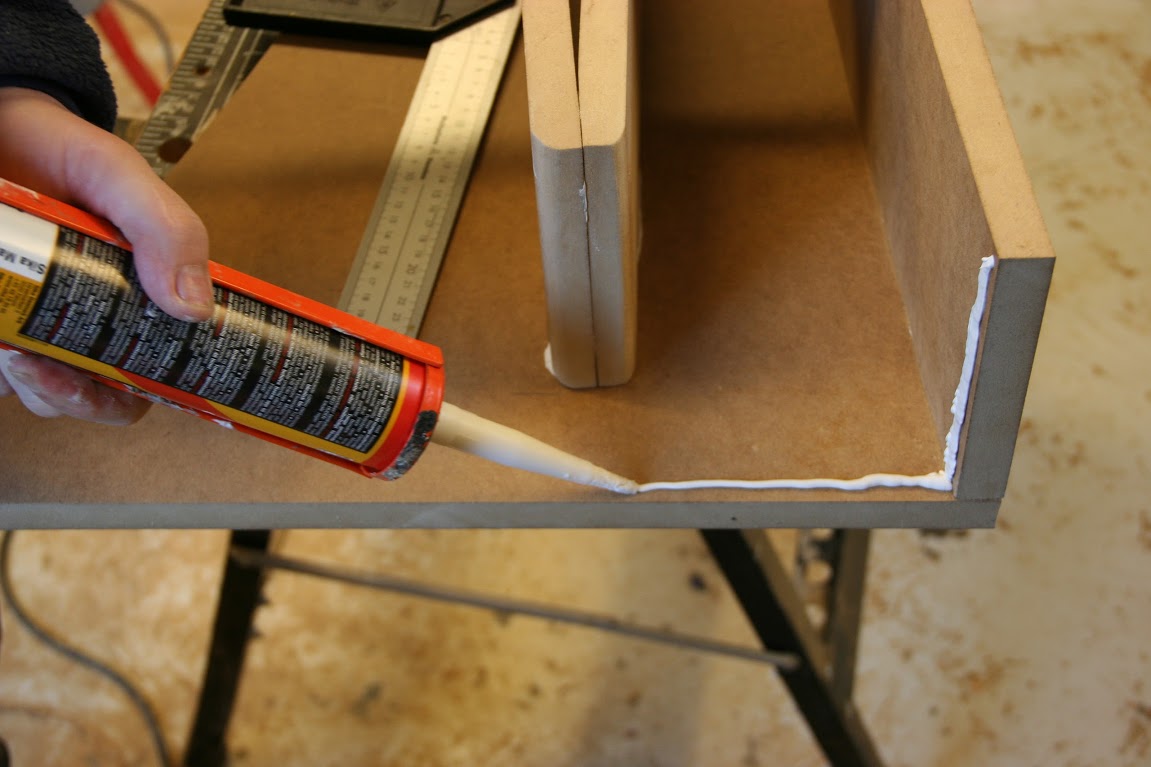
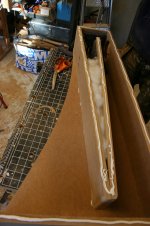
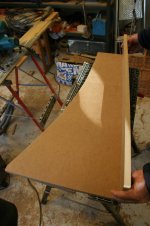
We continued cutting out the side panels from the MDF sheet and eventually ended up with two sides which we clamped together. The idea was to cut them as a pair, thus having two equal sides.
This image shows how the rearwards facing edge will be cut.

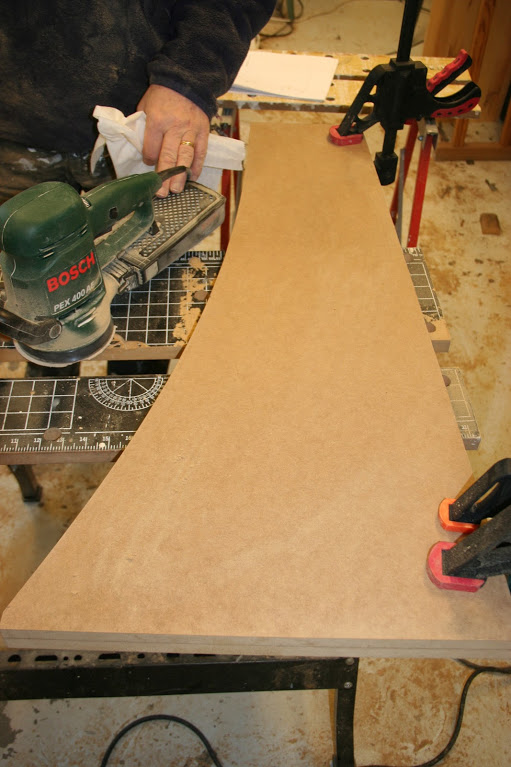
Having done that cut we needed something to draw the curved edge. What we did was we used the long ruler. We held it in place at the edges and moved the mid point inwards. Thus creating a curved line to cut after. My dad had a band-saw in his workshop that would be ideal to to this cut. We followed up with some light sanding with a random orbit sander which left us with a smooth edge.

The second speaker had its side panels cut in the same way. On this speaker we drew the curved line before cutting off the superfluous material.
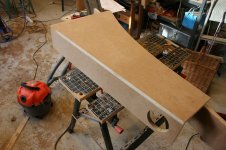
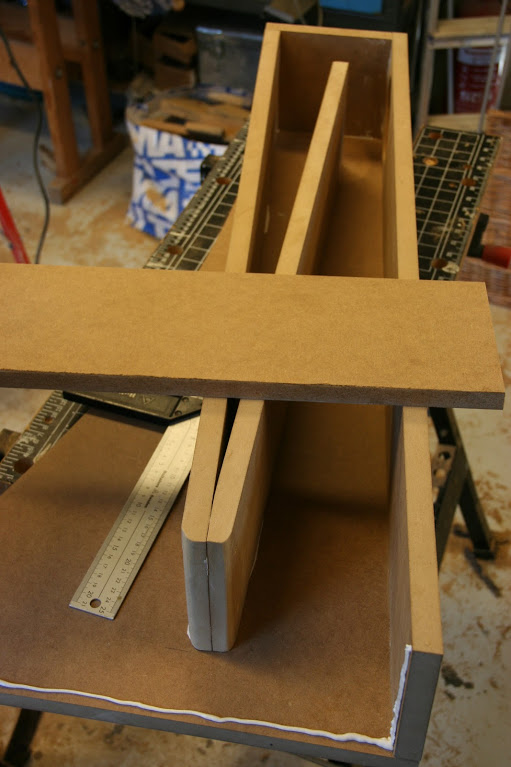
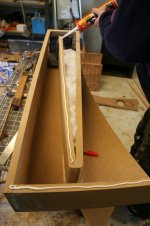
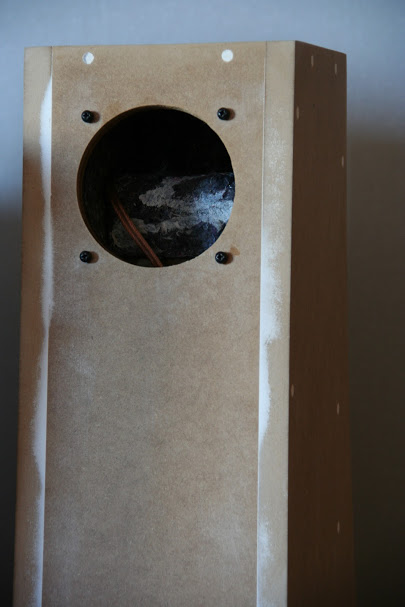
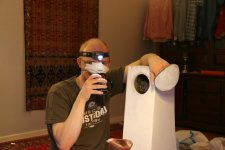
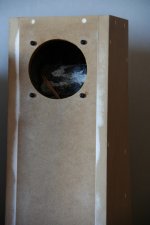
Having both of the sides panels for both of the speakers cut, we started working on the baffles. The MDF was really tough to make holes in using our hole saw. The hole saw we had did not have the exact size needed so we had to sand out the edge of the hole to tolerance. Eventually the driver fit. Having all parts for one speaker ready, we started preparing for gluing and screwing it together.

I wrote this years ago when I had just finished the speakers. Please note that the original intended audience was not DIY experts on a forum like this but rather the general public. This is why some of the explanations are on a basic level.
This story like so many others, starts in a pub.
Me Dizzey and Sirf were out eating dinner at one of the up and coming places in my home town.
This particular establishment was a rock pub that sometimes featured bands live on a large stage.
We had seats in front of the empty stage. The entrecôte I had ordered was excellent.
Mostly for the sides that I hadn't had before. As we were eating, we spoke about speakers and music. Dizzey had read up on speakers. He was looking to get a proper Hi-Fi system for his apartment. He had been slightly snubbed in one of the local stores and had read up on building his own speakers. Dizzey is like that. Once he gets an idea he will read up on it properly and really dig into it.
When I got home I started browsing the net for DIY Speakers. Many of them featured several drivers and crossovers. The wood working required precision as well. That worried me less since at this point.
One of the speaker designs I started looking at was Jim Holtz's Statements (Statements).
This was one of the designs Dizzey had looked up. What made Dizzey interested in a DIY project was how much better stuff you could get for the same amount of money if you built them yourself.
Despite this, the Bill of Materials for "the Statements" speakers was over 700dollars. Which is a lot of money for an entry-level hobby project (which is what I was looking for). I started looking around a bit more seriously. I used three criteria in my search.
* First, I ignored anything not cost-effective enough. I cared little for things made of Moonstone or martian red stand.
* Secondly, I ignored speakers lacking plans or having bad plans.
* And third, I wanted something people had tested and tried. Preferably less zealous people with well-formed opinions.
Regarding electronics, the crossovers were often quite expensive and fiddly to construct.
I more and more started overlooking designs with complex crossovers since I hadn't held a soldering iron for 20 years.
The number of speaker designs I found was still large. Although many of them were tested and built to a lesser extent.
If you know me (which you probably don't), then you know I want something that stands out a little bit.
Eventually I started going through different horn designs. Full range drivers with fancy cabinets.
Full range drivers aim to play the entire sound spectra whereas regular drivers are targeted for a specific part of the sound spectra. For example tweeters are meant to play the higher frequencies, a bass driver aims to to play the very lowest. One of the main advantages of single driver horn designs (or transmission line speakers) is that such designs have no crossovers whatsoever. They often feature a single driver designed to play the entire spectrum and the cabinet is designed to use the full potential of the driver.
Many of the horn speakers would require a master carpenter. Despite this I kept looking at this type of design. Eventually I found a design that initially looked overly complex. It was called Frugel-Horn. The first images I had seen were of older versions of this design. The latest one was found on a slightly disorganized web page: Frugel-Horn Mk3 (www.p10hifi.net/FH/downloads/frugel-hornMk3-1v0-250212.pdf url is now 404, missing)
The design was fully open source and one of its goals was to keep it simple and cost effective. It was designed around a 4 inch full range driver. The design seemed old and abandoned at first, but once I started checking around I changed my opinion. The design was 5-10 years old but it was still being built! The plans even had different sound proofing based on which of the recommended drivers you would choose. They looked more and more interesting. Calculations on how low they would go and what the different drivers would be good at were available.
The really interesting thing was the plethora of opinions about this speaker. Since the plans were readily available, many had built their own. Most of the opinions were quite well formed. They inspired confidence in the design. The original design document featured plans for both 15 and 18mm walls, with a few different views on baffle thickness.
My mind was made up! I wanted a pair of these; These really beautiful speakers that wouldn't look out of place in a fancy design studio. I started looking around for the drivers and they weren't that expensive. A pair of drivers were around 140 EUR. in addition I would need terminals, MDF board, sound insulation material, anti-vibration pads, screws, glue, wires, spackle and paint. One of the advantages of this design is that it had been designed to be cut out of a single sheet of MDF. So if you ordered a single sheet of 1220×2440mm MDF that would be enough for a pair.
I placed an order for a pair of drivers and started rifling through the vast amount of forum posts on these speakers. I was looking both for tips on construction as well as practical tips and coloring ideas. I had this idea to paint them with 2 component paint like on cars. I was thinking of either Satin black, Rosso Corsa (Ferrari red) or even white. You see, I wanted something with presence. Most of the people I found had technical questions, some had audio quality discussions. Some discussions focused on the need of thicker baffles (if you went with a thinner material like 15mm).
I had been talking to my dad during this investigation. He is skilled at carpentering and had promised to help me build them. He had advised me away from designs that would be difficult to construct with any finish. He liked the idea of the frugal horn speakers so I ordered a sheet of 19mm MDF 1220×2440mm delivered to his workshop where we would be constructing them. The delivery was almost as expensive as the sheet itself but since I was unable to pick it up myself it turned out to be a decent compromise.
2015-03-07.
We started constructing the speakers on a somewhat cold Saturday in early March. The plan was to work as much as we could during a first weekend and then plan for further work if needed. I could do the sanding, painting and finishing back in town. I had ordered a few extra items before we started: Hole saw, speaker terminals and two metallic rulers.
There were several suggested ways of cutting the sheet. We chose the following one.
If you are to have any chance of nice cuts you will need a plunge saw. The plunge saw will ride along the ruler or guide and will give really nice cuts. We worked according to "Measure twice, cut once."; A mantra taught to me by Edd China of Discovery's Wheeler Dealers. An erroneous cut could put us out of business since we only had the one sheet of MDF. In fact much of the first day of construction was spent measuring and thinking. The plan is quite simple. Most parts will be 140mm (top, front, bottom and rear). The front of the speaker will lean back about 5degrees. This will affect many of the cuts. The really tricky part will be to create the sides. There is a long curved cut on the edge facing away from the front. This cut cannot be made with a plunge saw. Just drawing this cut will be a bit tricky. Also note that you will need to adapt the length of the parts if you use a non-standard material thickness. This is to keep inside of the horn within tolerance.
The very first cut:
https://www.diyaudio.com/forums/att...1543044217-frugal-horn-mk3-build-img_1679-jpg
We continued cutting out the side panels from the MDF sheet and eventually ended up with two sides which we clamped together. The idea was to cut them as a pair, thus having two equal sides.
This image shows how the rearwards facing edge will be cut.
Having done that cut we needed something to draw the curved edge. What we did was we used the long ruler. We held it in place at the edges and moved the mid point inwards. Thus creating a curved line to cut after. My dad had a band-saw in his workshop that would be ideal to to this cut. We followed up with some light sanding with a random orbit sander which left us with a smooth edge.
The second speaker had its side panels cut in the same way. On this speaker we drew the curved line before cutting off the superfluous material.
Having both of the sides panels for both of the speakers cut, we started working on the baffles. The MDF was really tough to make holes in using our hole saw. The hole saw we had did not have the exact size needed so we had to sand out the edge of the hole to tolerance. Eventually the driver fit. Having all parts for one speaker ready, we started preparing for gluing and screwing it together.
Attachments
-
 IMG_1676.JPG127.8 KB · Views: 2,079
 -
 IMG_1688.JPG197.4 KB · Views: 1,677
 -
 IMG_1687.JPG71.5 KB · Views: 1,665
 -
 IMG_1686.JPG84.4 KB · Views: 1,690
 -
 IMG_1685.JPG95.3 KB · Views: 1,678
 -
 IMG_1684.JPG106.6 KB · Views: 1,913
 -
 IMG_1683.JPG113.2 KB · Views: 2,007
 -
 IMG_1679.JPG76.5 KB · Views: 220
 -
 IMG_1678.JPG132.8 KB · Views: 2,014
 -
 IMG_1681.JPG119.4 KB · Views: 2,070
Part 2 of 3
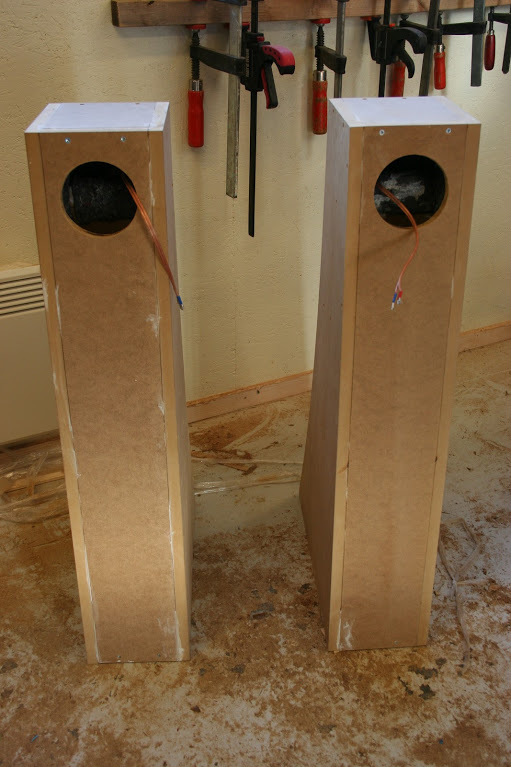
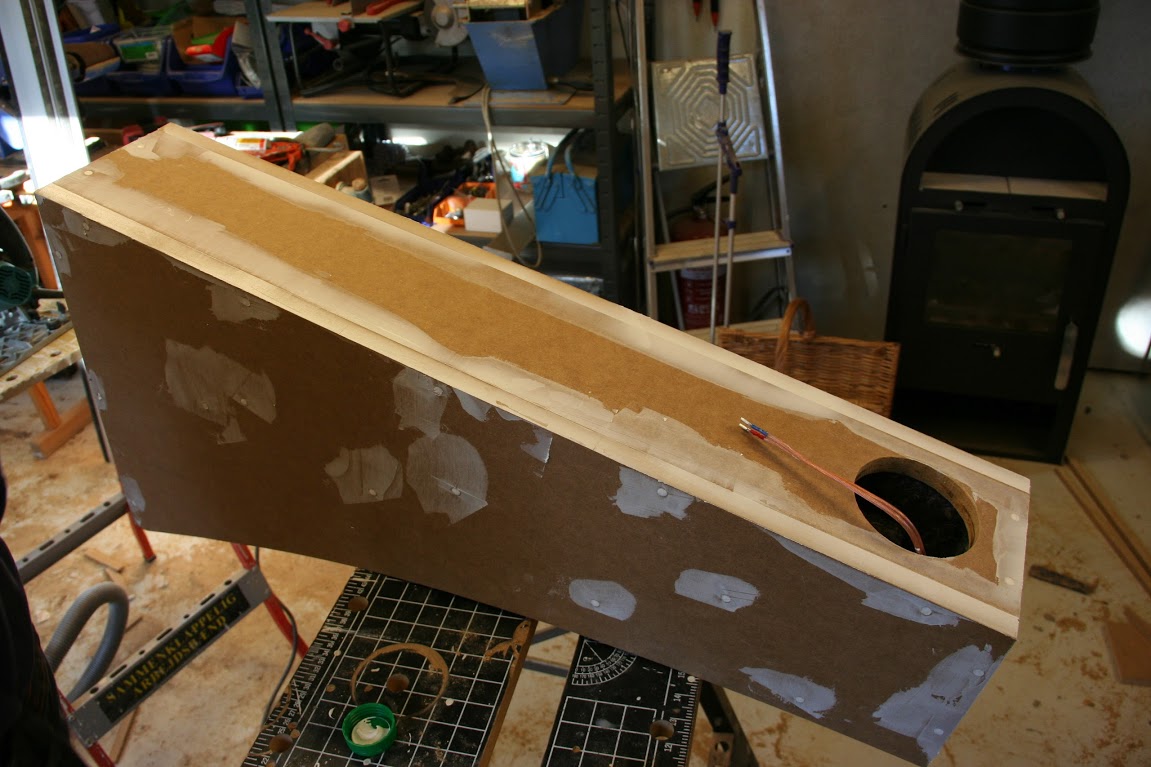
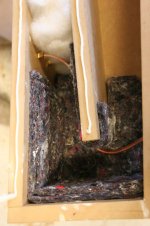
The plan was to glue and screw the different parts together. We glued the front to one of the sides first. Then we kept adding center pieces all the way around. We gave the glue some time to set before we flipped the speaker over and started adding padding for noise control. Loose pillow fluff in the sharp end of the horn and felt mat to minimize reflections (according to specification in the design document). I had real trouble finding felt mat at 12-13mm. so I used 2 layers of 7mm for insulation on the walls with a single layer of 7mm on the middle wall. The sharp end the horn was sanded to be a bit rounder.

2015-03-08
We started the day with one speaker mostly done. The idea for today was to setup wiring and glue and screw on the other side. Thus, concluding the first speaker. We also hoped to do as much as possible on the second speaker as well. I started with the speaker terminals and immediately ran into problems. My terminals were not long enough to reach through the walls of my speakers.
I wanted to anchor the terminal on the inside with a nut. I had to counter-bore the terminals in order to fasten a nut on the inside. Speaker terminals longer than 20mm are quite rare as it turns out.
Eventually:

Final preparations before closing the first cabinet. A layer of glue followed by the panel and a few clamps. Then drilling and screwing.

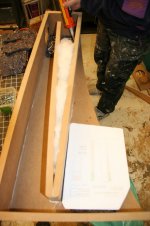
With barely a pause we continued with the second speaker. Starting with the baffle.

We then added the top, followed by the rear and the inner wall in one go.
Since the pieces were pre-cut, our work was pretty straight-forward.

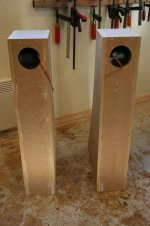
And finally, voila!
The basic construction work had been completed! We weren't finished though. We spackled the speakers before packing up for the day. Unfortunately, the speakers were not to be brought home this day.
The plan was to glue and screw the different parts together. We glued the front to one of the sides first. Then we kept adding center pieces all the way around. We gave the glue some time to set before we flipped the speaker over and started adding padding for noise control. Loose pillow fluff in the sharp end of the horn and felt mat to minimize reflections (according to specification in the design document). I had real trouble finding felt mat at 12-13mm. so I used 2 layers of 7mm for insulation on the walls with a single layer of 7mm on the middle wall. The sharp end the horn was sanded to be a bit rounder.
2015-03-08
We started the day with one speaker mostly done. The idea for today was to setup wiring and glue and screw on the other side. Thus, concluding the first speaker. We also hoped to do as much as possible on the second speaker as well. I started with the speaker terminals and immediately ran into problems. My terminals were not long enough to reach through the walls of my speakers.
I wanted to anchor the terminal on the inside with a nut. I had to counter-bore the terminals in order to fasten a nut on the inside. Speaker terminals longer than 20mm are quite rare as it turns out.
Eventually:
Final preparations before closing the first cabinet. A layer of glue followed by the panel and a few clamps. Then drilling and screwing.
With barely a pause we continued with the second speaker. Starting with the baffle.
We then added the top, followed by the rear and the inner wall in one go.
Since the pieces were pre-cut, our work was pretty straight-forward.
And finally, voila!
The basic construction work had been completed! We weren't finished though. We spackled the speakers before packing up for the day. Unfortunately, the speakers were not to be brought home this day.
Attachments
-
 IMG_1708.JPG143.5 KB · Views: 1,563
 -
 IMG_1707.JPG91.2 KB · Views: 1,599
 -
 IMG_1706.JPG116.6 KB · Views: 1,562
 -
 IMG_1703.JPG81.6 KB · Views: 1,593
 -
 IMG_1702.JPG100.6 KB · Views: 1,548
 -
 IMG_1701.JPG98.7 KB · Views: 1,545
 -
 IMG_1697.JPG64.5 KB · Views: 1,733
 -
 IMG_1698.JPG68.6 KB · Views: 1,571
 -
 IMG_1689.JPG98.5 KB · Views: 1,600
part 3 of 3
2015-03-15
We returned to to do a round of sanding during the next weekend.
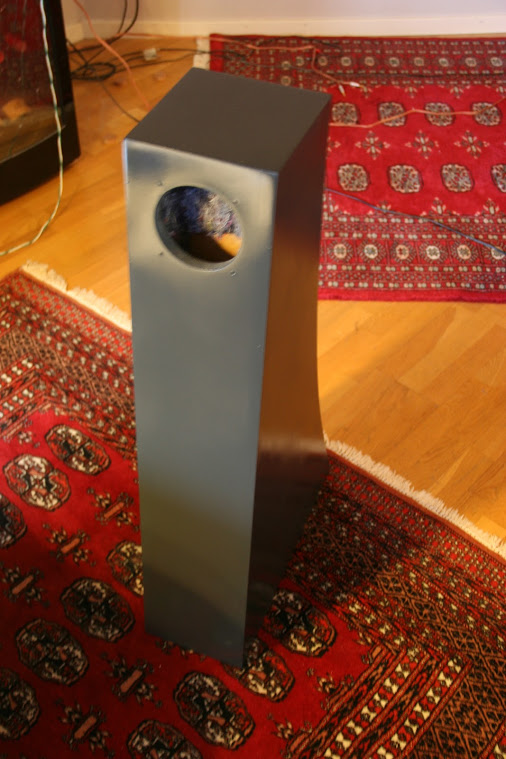
Unfortunately, the spackle had set. A lot. We did a two rounds of sanding and spackling before we packaged the speakers into the car. The idea was that I could do the remaining sanding and painting at home. Before we left we weighed them. Each speaker weighed about 13 kilos including driver.
When I got back home I couldn't resist mounting the drivers and hooking them up to my receiver. The speakers are standing on anti-vibration pads. The distance and the angle from the wall is very important since they are rear-loaded horns. In fact, turning the speakers a few centimeters is enough for most of the bass to fade away.
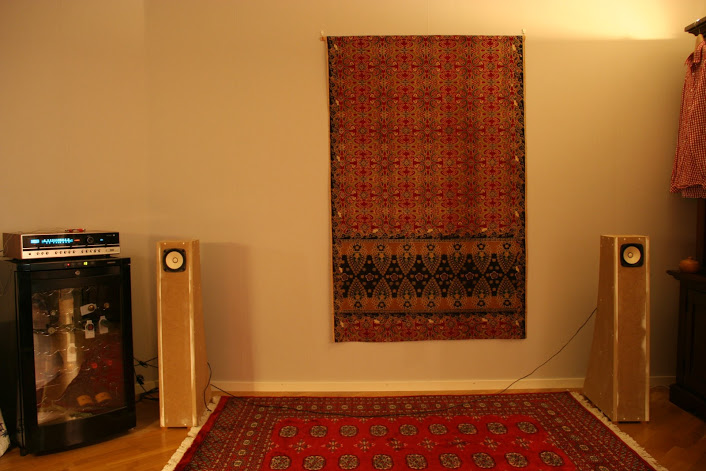
The receiver is a Rank Arena R1020 that I had previously fixed up a bit. I was really tense, the first time I turned the receiver on. How would they sound? Would they work at all?
They did work. Since I had no way of connecting an external audio source to the receiver (it was after all from 1971 and I lacked the proper cables) I had to resort to radio. The radio dial is the back lit long scale seen on the receiver. My first impression was how clear the sound was. Listening to a song I knew, I could hear new notes and I could hear when the arrangement was bad or when the recording was poor. Initially I also thought the bass was rather weak. My receiver was capable of boosting the bass to levels where I thought it was more balanced. The bass did not take over, in part because of how quick it was. the bass would reach rather low but quickly dissipated. I really really liked the sound. Although I still had weeks of painting, sanding, repainting, sanding and painting a top coat before I was done.
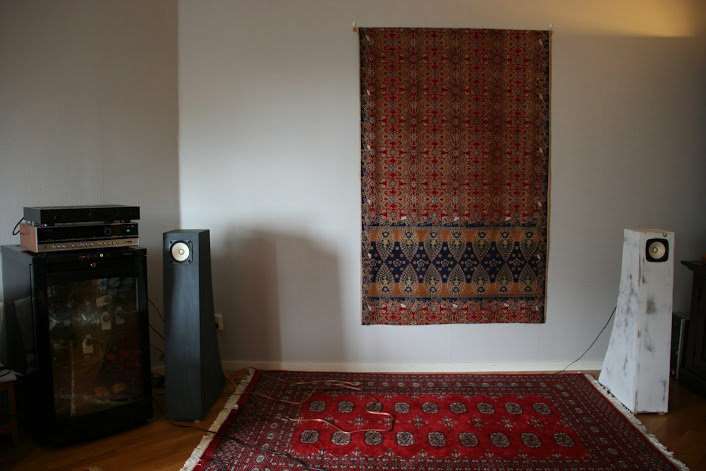
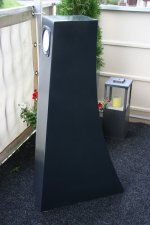
The following week I removed the driver and started painting the speakers with a white base paint.
This turned out to be a bad idea since this paint was incredibly difficult to sand. After weeks of evening work I had painted and sanded both speakers twice, ending up with something like this:
https://www.diyaudio.com/forums/att...1543046821-frugel-horn-mk3-build-img_1718-jpg
This was also the point where I decided that my speakers deserve a much better color than white. These speakers deserve a color that give them presence. I was leaning more and more towards Rosso Corsa (Ferrari red. Ón a sidenote, the spackle kept shrinking which translated to more work for me.
2015-04-19
I was not sure if the white paint was a good base for the 2 component color I was going for so I decided to paint a proper base coat on top the white paint. After doing some research I realized should probably go for a primer filler. That was a paint type that was designed to be easy to sand down. It was also designed to fill out unevenness or scratches. I went to my local paint supplier who sold me a can of Upol High #5 primer filler. On a whim I said I was going to use a black top coat, so he sold me a can of dark Grey primer filler.
I recruited a friend to help me with the painting procedure. He has a good ear and has been working professionally with custom car stereos. He was quite interested in how the speakers would turn out. He volunteered his garage for the painting procedure. I bought a gas mask, a paint overall, tack cloth and some paint cleaner. Remember to use a mask since the solvents will have you dizzy in no time. The following picture is after a first layer of paint.
The observant reader notice that I had borrowed a Rotel RA-02 from a friend of mine who was not using it. When I first hooked it up I thought I had managed to reverse the polarity.
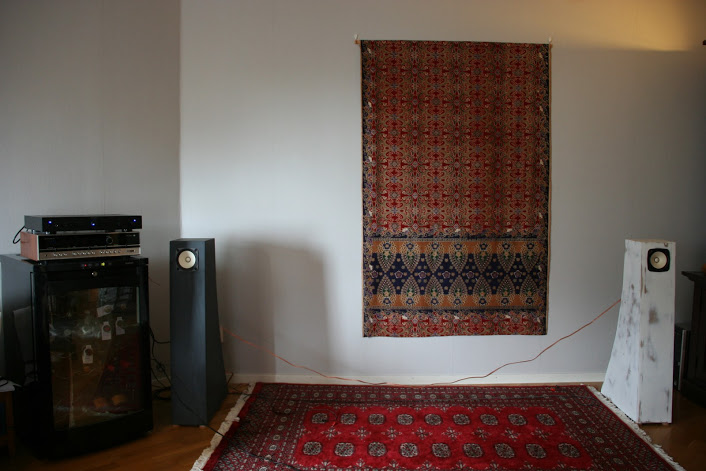
There was almost no bass at all. I tripplechecked the cables before restorting to a quick look in the internet. The internet informed me that Rotel's amplifiers often had weaker bass. I took it back to my mate the following day. Yet another friend lent me his aged NAD 710 receiver. The speakers worked very well with the 710. It was able to properly compensate for the weaker bass.Returning to the color, the base coat really gave the speaker presence! It still looked like a bit unfinished though.
2015-05-01
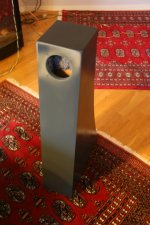
I was really sold on the color of the base paint. So much so that I decided to add a layer of varnish and keep the color. I compared both matte and clear varnish. The clear varnish was a lot better. Here's a first fuzzy image
.
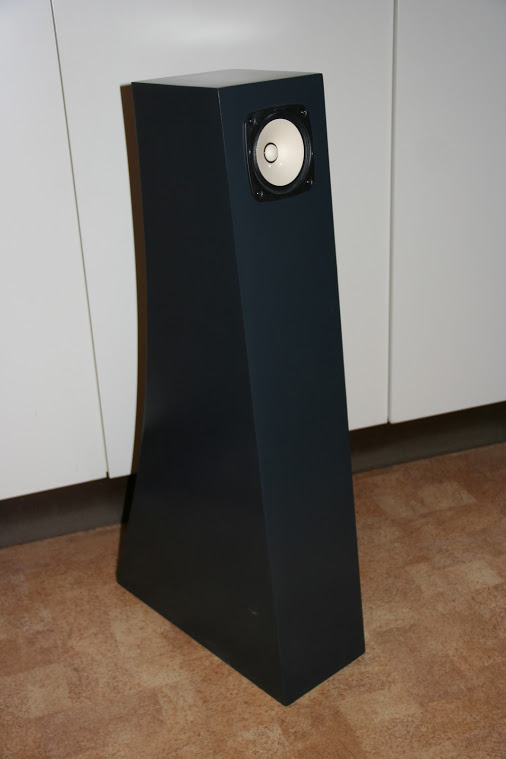
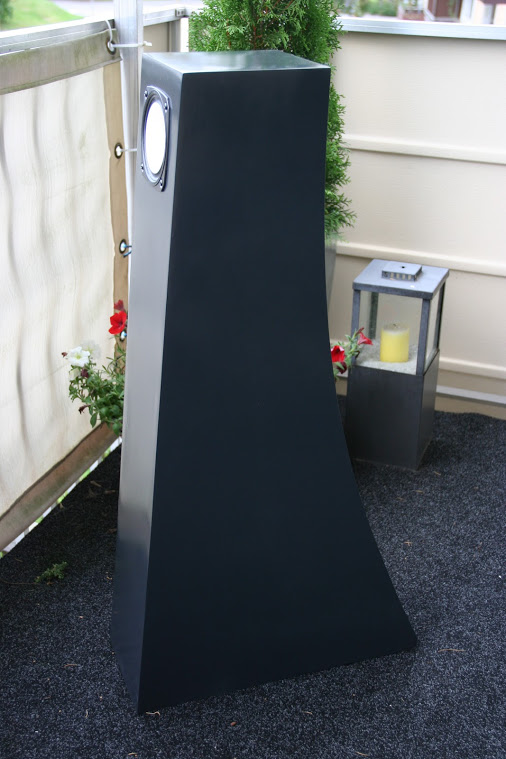
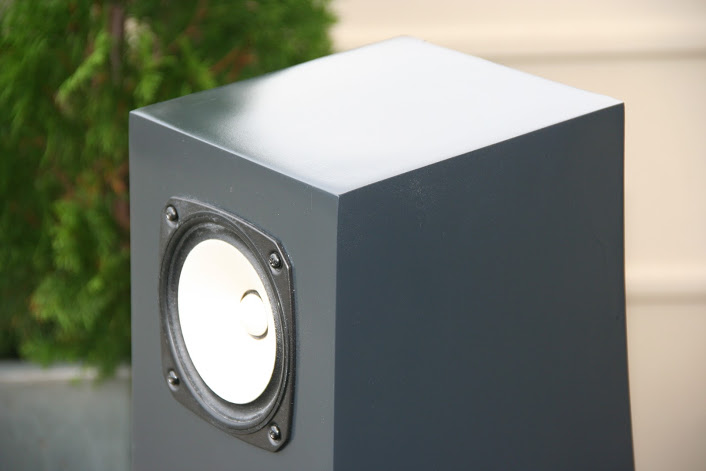
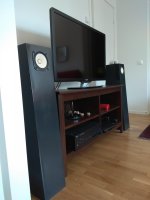
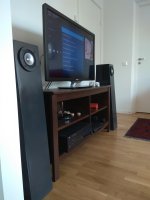
After a lot of work, I was nearing completion. The varnish also made the speakers catch light. This made the edge seem really sharp. They now had the presence I wanted. The color is very close to NAD gray but slightly glossy.
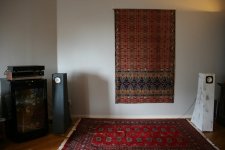
The following pictures are taken rather recently. It most likely represents the finished product
So what did I learn?
* The most important part of the entire process was deciding on the right design. As always, research and planning should a very big part of the work.
* Do not skimp on spackle. Use expensive 2-component spackle that does not set (as much).
* I used this opportunity to learn how to sand by hand. What grit to use and so forth. This way I got a feel for evenness and how different materials behave when sanded.
With what I've learned I will use a random orbit sander. (I've had my eye on a Makita BO5030k or an air driven one that runs off of an air compressor).
* Paint. This is really important. I'll use filler primer as base coat the next time. Based on how easy it is to sand down and how well most 2-component colors stick on them. Just make sure it works in your raw material.
* Top coat. I had considered getting the speakers professionally painted but I estimated it would be very expensive due to the size of them. An alternative is your own paint gun and mixed to order paint. Both options are of course still open. This also opens up for some interesting colors. Yellow metallic anyone?
* Horn Speakers are more complex to construct but mostly do not use expensive crossovers. They do have limiting factors. They can be very sensitive to positioning but when positioned correctly they will sound very good.
Would I do it again?
Oh yes. There's a version called Frugel-Horn XL for a 6 inch speaker.
There are also other designs. Many of them with well done plans.
The thing is, I don't really need another pair for myself.
@blompa 2015-10-18
2018-11-24:
The reason for posting this is that a friend of mine was recently inspired by my speakers. So he might be building himself something...
We returned to to do a round of sanding during the next weekend.
Unfortunately, the spackle had set. A lot. We did a two rounds of sanding and spackling before we packaged the speakers into the car. The idea was that I could do the remaining sanding and painting at home. Before we left we weighed them. Each speaker weighed about 13 kilos including driver.
When I got back home I couldn't resist mounting the drivers and hooking them up to my receiver. The speakers are standing on anti-vibration pads. The distance and the angle from the wall is very important since they are rear-loaded horns. In fact, turning the speakers a few centimeters is enough for most of the bass to fade away.
The receiver is a Rank Arena R1020 that I had previously fixed up a bit. I was really tense, the first time I turned the receiver on. How would they sound? Would they work at all?
They did work. Since I had no way of connecting an external audio source to the receiver (it was after all from 1971 and I lacked the proper cables) I had to resort to radio. The radio dial is the back lit long scale seen on the receiver. My first impression was how clear the sound was. Listening to a song I knew, I could hear new notes and I could hear when the arrangement was bad or when the recording was poor. Initially I also thought the bass was rather weak. My receiver was capable of boosting the bass to levels where I thought it was more balanced. The bass did not take over, in part because of how quick it was. the bass would reach rather low but quickly dissipated. I really really liked the sound. Although I still had weeks of painting, sanding, repainting, sanding and painting a top coat before I was done.
The following week I removed the driver and started painting the speakers with a white base paint.
This turned out to be a bad idea since this paint was incredibly difficult to sand. After weeks of evening work I had painted and sanded both speakers twice, ending up with something like this:
https://www.diyaudio.com/forums/att...1543046821-frugel-horn-mk3-build-img_1718-jpg
This was also the point where I decided that my speakers deserve a much better color than white. These speakers deserve a color that give them presence. I was leaning more and more towards Rosso Corsa (Ferrari red. Ón a sidenote, the spackle kept shrinking which translated to more work for me.
2015-04-19
I was not sure if the white paint was a good base for the 2 component color I was going for so I decided to paint a proper base coat on top the white paint. After doing some research I realized should probably go for a primer filler. That was a paint type that was designed to be easy to sand down. It was also designed to fill out unevenness or scratches. I went to my local paint supplier who sold me a can of Upol High #5 primer filler. On a whim I said I was going to use a black top coat, so he sold me a can of dark Grey primer filler.
I recruited a friend to help me with the painting procedure. He has a good ear and has been working professionally with custom car stereos. He was quite interested in how the speakers would turn out. He volunteered his garage for the painting procedure. I bought a gas mask, a paint overall, tack cloth and some paint cleaner. Remember to use a mask since the solvents will have you dizzy in no time. The following picture is after a first layer of paint.
The observant reader notice that I had borrowed a Rotel RA-02 from a friend of mine who was not using it. When I first hooked it up I thought I had managed to reverse the polarity.
There was almost no bass at all. I tripplechecked the cables before restorting to a quick look in the internet. The internet informed me that Rotel's amplifiers often had weaker bass. I took it back to my mate the following day. Yet another friend lent me his aged NAD 710 receiver. The speakers worked very well with the 710. It was able to properly compensate for the weaker bass.Returning to the color, the base coat really gave the speaker presence! It still looked like a bit unfinished though.
2015-05-01
I was really sold on the color of the base paint. So much so that I decided to add a layer of varnish and keep the color. I compared both matte and clear varnish. The clear varnish was a lot better. Here's a first fuzzy image
.
After a lot of work, I was nearing completion. The varnish also made the speakers catch light. This made the edge seem really sharp. They now had the presence I wanted. The color is very close to NAD gray but slightly glossy.
The following pictures are taken rather recently. It most likely represents the finished product
So what did I learn?
* The most important part of the entire process was deciding on the right design. As always, research and planning should a very big part of the work.
* Do not skimp on spackle. Use expensive 2-component spackle that does not set (as much).
* I used this opportunity to learn how to sand by hand. What grit to use and so forth. This way I got a feel for evenness and how different materials behave when sanded.
With what I've learned I will use a random orbit sander. (I've had my eye on a Makita BO5030k or an air driven one that runs off of an air compressor).
* Paint. This is really important. I'll use filler primer as base coat the next time. Based on how easy it is to sand down and how well most 2-component colors stick on them. Just make sure it works in your raw material.
* Top coat. I had considered getting the speakers professionally painted but I estimated it would be very expensive due to the size of them. An alternative is your own paint gun and mixed to order paint. Both options are of course still open. This also opens up for some interesting colors. Yellow metallic anyone?
* Horn Speakers are more complex to construct but mostly do not use expensive crossovers. They do have limiting factors. They can be very sensitive to positioning but when positioned correctly they will sound very good.
Would I do it again?
Oh yes. There's a version called Frugel-Horn XL for a 6 inch speaker.
There are also other designs. Many of them with well done plans.
The thing is, I don't really need another pair for myself.
@blompa 2015-10-18
2018-11-24:
The reason for posting this is that a friend of mine was recently inspired by my speakers. So he might be building himself something...
Attachments
-
 IMG_3294.JPG37.3 KB · Views: 1,567
 -
 IMG_3292.JPG89.8 KB · Views: 1,554
 -
 IMG_3283.JPG44.9 KB · Views: 1,540
 -
 IMG_1740.JPG116.3 KB · Views: 1,517
 -
 IMG_1728.JPG80.3 KB · Views: 1,538
 -
 IMG_1724.JPG83.7 KB · Views: 1,625
 -
 IMG_1718.JPG65.9 KB · Views: 300
 -
 IMG_1712.JPG94.6 KB · Views: 1,534
 -
 IMG_1710.JPG40.4 KB · Views: 1,537
Thanx for putting this together. Very nice looking. I am sure many will appreciate it. Some comments:
1/ quality plywood is recommended over MDF. Baltic Birch or better
2/ damping pads usually not required.
3/ everytime the plans are revised or updated the date on the end changes and the old URL breaks. Current URL is https://frugal-horn.com/downloads/frugel-hornMk3-1v0-060518.pdf
4/ the document has a easy to use scheme for a router to get the curve on the back done. Do note that the curve has a real purpose, but people have built and been happy with straight cut instead of a curve and even with no back part (after the choke point).
5/ 2 layers of 7mm felt should be fine… it should be (or mistly be) a natural material (ie wool or cotton). Yours looks good.
6/ removable terminals are recommened — it makes fixing or changing wire way easier. We use a cup that requires only a 2” D hole. Terminals with minimal metal in them are recommended… ie plastic nuts, not metal.
7/ speaking of wire, skinny solid is recommended. We use 24g solid strands pulled from a CAT5/6 cable (exotic versions of similar wire are available). Looks like you used 18 or 16g “rope”. We also recommend soldering the wire, no crimp connectors.
8/ the FE126 driver has the least capable bass and room loading (ie in the corner preferably) is critical to getting bass
dave
Very nice! You should be proud. Enjoy them for many moons to come.
I am doing a small project with MDF. Your work inspires me to do it carefully and to make it look good.
Thank you for your kind words. Good luck with your project. I was lucky and had help.
Thanx for putting this together. Very nice looking. I am sure many will appreciate it. Some comments:
1/ quality plywood is recommended over MDF. Baltic Birch or better
2/ damping pads usually not required.
3/ everytime the plans are revised or updated the date on the end changes and the old URL breaks. Current URL is https://frugal-horn.com/downloads/frugel-hornMk3-1v0-060518.pdf
4/ the document has a easy to use scheme for a router to get the curve on the back done. Do note that the curve has a real purpose, but people have built and been happy with straight cut instead of a curve and even with no back part (after the choke point).
5/ 2 layers of 7mm felt should be fine… it should be (or mistly be) a natural material (ie wool or cotton). Yours looks good.
6/ removable terminals are recommened — it makes fixing or changing wire way easier. We use a cup that requires only a 2” D hole. Terminals with minimal metal in them are recommended… ie plastic nuts, not metal.
7/ speaking of wire, skinny solid is recommended. We use 24g solid strands pulled from a CAT5/6 cable (exotic versions of similar wire are available). Looks like you used 18 or 16g “rope”. We also recommend soldering the wire, no crimp connectors.
8/ the FE126 driver has the least capable bass and room loading (ie in the corner preferably) is critical to getting bass
dave
1: I cannot remember if I hadn't read that yet or if I chose mdf because it was easier to source. One upside to using plywood (except the improved sound from a living material) is that you don't have to paint them. Although I really the way they stand out. with only a little bit of light you can see the edges of them
2: Right. They also don't add stability. Don't ask me how I know

3: Aha. Probably wize. I just left the old link in the post.
4: We followed the guide for drawing the lines but used a bandsaw and then sanded them. We made sure to do this for 2 sheet at once to keep both sides of a speaker identical.
5: Good. It was pretty cheap and readily available at a store in sweden called biltema. Cheap imported stuff mostly. Originally only a car parts store.
6: This was a poor decision on my part. I was a bit impatient and decided to install the ones I had rather than wait and do the research. I was also unsure of how the audio properties would change if at all. if I did this over then I would probably ask for help or a link to an easy to use plastic terminal holder like the one you describe.
7: I assume that is because it is 0% oxygen copper?
on a side note they started taking down the old phone wires around where my mom and dad lives (where the garage we worked in is located) and they actually collected the wires. I asked why and it was because the price for 0%oxygen copper was 10x the price of other copper at the junk yard or whoever handles it.
8: I'll read around a bit for alternatives and hopefully that will make them a little bit easier to push base through.
---------
Thanks for editing the posts. I was fiddling with how I could have the images in text without having them full size. That is exactly what I was going for.
Thank you, Dave for your hard work on the design and how your support people on this forum
I few lines about my setup at home:
The old Rank Arena R1020 has been replaced by a Nad 356bee. I did see someone mention the "volt + D" and it looked pretty nice. head-fi seems to like them as well
I converted my CD collection to FLAC last year and have a HRT Music Streamer II as my DAC. My reference headphones that I wear when listening to music at the computer are some 17 year old Sennheiser HD570.
7: I assume that is because it is 0% oxygen copper?
It is very pure copper (ie riding on the backs of the trillions of miles of the stuff made), but the primamry reasons are solid & skinny.
8: I'll read around a bit for alternatives and hopefully that will make them a little bit easier to push base through.
The Mark Audio Alpair 7.3 is leading candidate at the moment (A7.3eN or A7 MAOP if you can afford the $ & time). The new A7ms will be interesting.
dave
a Nad 356bee
Probably not be a good synergy with the FE126 which prefers a high output impedance amplifier.
dave
Thanks for taking the time to read it!blompa,
Thank you for sharing your build story. Congratulations on successful completion, and may you enjoy the music!
It is very pure copper (ie riding on the backs of the trillions of miles of the stuff made), but the primamry reasons are solid & skinny.
The Mark Audio Alpair 7.3 is leading candidate at the moment (A7.3eN or A7 MAOP if you can afford the $ & time). The new A7ms will be interesting.
The alpair 7.3 was about the same as a fostex fe126en pricewize. Tempting.
Probably not be a good synergy with the FE126 which prefers a high output impedance amplifier.
Right, how would that affect the sound?
Probably not be a good synergy with the FE126 which prefers a high output impedance amplifier.
dave
Right, how would that affect the sound?
blompa,
My understanding is that higher output imedance amplifiers with (typically) lower damping factor give the perception of more bass with low Xmax, low qts drivers like the Fostex FE126en.
But saying that, do not expect a bass monster to come out of nowhere...
Last edited:
blompa,
My understanding is that higher output imedance amplifiers with (typically) lower damping factor give the perception of more bass with low Xmax, low qts drivers like the Fostex FE126en.
But saying that, do not expect a bass monster to come out of nowhere...
I really like the sound of them and with the music streamer II as my DAC I've had the bass a bit deeper with the balance I wanted so it is most likely positioning needed(I moved away from the apartment you can see in the pictures above and have yet to fine tune the positioning in the new apartment. I've been so damn busy at work).
To expand a bit on Zia and Dave’s replies, a very popular type of combination with the FH3/ FE126 - a class I’ve used myself many times- is a low(er) powered tube amp of Single End topology. Compared to when I started playing with DIY tube builds approx 20(?) yrs ago, there is a very decent range of complete kit offerings available with power ranging from 2 to 8 WPC, by established folks like Bottlehead, Decware, and DIY audio member Elekit. The TU 8200 looks particularly interesting and flexible in terms of output tube rolling and operation modes.
エレキット | 株式会社イーケイジャパン (note the USB DAC custom plug module PS3249)
https://bottlehead.com/?page_id=188
Audiophile Tube Amplifiers and Loudspeakers by DECWARE
I’ve owned /built /heard several products from both of the latter - when product range offerings and pricing was more modest. They definitely satisfied - expectation / confirmation bias is very powerful- but I’ve moved on since then. Human nature being what it is, be prepared for as much spiked koolaid fan-boy euphoria at their sites and forums as here .
Best for last? - certainly not to be overlooked is the wonderful little ACA - a kit of which is available here
Amp Camp Amp – diyAudio Store. A very easy build, but as a basic power amp with not a ton of gain, it needs / deserves a decent front end - not just the output from a smart phone - to shine.
There is definitely a synergy that occurs with the combination of such amps and full range driver systems in back loaded horns that can be missing with higher powered SS amps of all class types - i.e. AB/D/T. etc.
- Status
- This old topic is closed. If you want to reopen this topic, contact a moderator using the "Report Post" button.
- Home
- Loudspeakers
- Full Range
- Frugel-Horn MK3 build