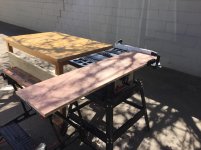
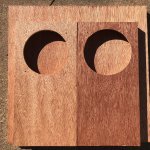
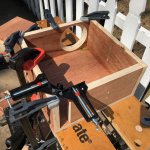
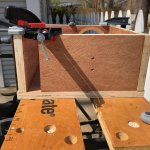
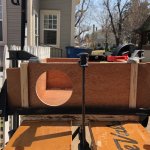
I wasn’t planning on any wood projects but came across some 3/4” Lauan multi-ply at Lowe’s that had purplish color and interesting grain patterns. It struck me that it would look good with the milky grey cones of a pair of FF105WK I have lying around, so I bought a 2x4 panel and made the cuts today.
I had debated whether to make a pair of l’Stylo 105s, but the low driver height and desire to improve upon the questionably made Woden Shrikes I knocked out a couple years ago prompted the decision to cement the woodworking skills I’ve developed since then.
These will be stand mounted at one end (short wall) of my home office, which is 18’L x 7.5’W x 9.17’H. Signal wire will be 24awg solid CAT5. Amplification is Apple Lossless files ripped from CD, played from my iMac into a breadboarded SET amp (depending on where whimsy takes me, will either be a 300B or 6CU6 next week).
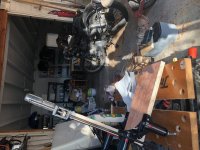
I’m getting better with my dinky table saw. The old ikea table that was my desk for 17 years until I made one last Fall is now doing outflow duty on rip cuts, while a board in the Black & Dekker Workmate supports long planks during cross cuts. Not to worry about the scorch marks. I always make exterior pieces a little large so as to perfect them with the flush trim bit in the router.
Tomorrow I’ll cut and chamfer the driver holes, drill the binding post holes, and cut the biscuit slots.
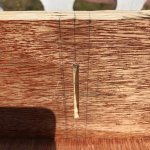
Finishing will be interesting. The grain is so open and deep that I think sanding would probably ruin it. At most I’d apply some natural Danish oil, but my guess is that simply applying some polyurethane to the unsanded bare wood will look best. We’ll see what the test scraps look like.
Anyone had good results finishing “purple” Lauan ply?
I had debated whether to make a pair of l’Stylo 105s, but the low driver height and desire to improve upon the questionably made Woden Shrikes I knocked out a couple years ago prompted the decision to cement the woodworking skills I’ve developed since then.
These will be stand mounted at one end (short wall) of my home office, which is 18’L x 7.5’W x 9.17’H. Signal wire will be 24awg solid CAT5. Amplification is Apple Lossless files ripped from CD, played from my iMac into a breadboarded SET amp (depending on where whimsy takes me, will either be a 300B or 6CU6 next week).
I’m getting better with my dinky table saw. The old ikea table that was my desk for 17 years until I made one last Fall is now doing outflow duty on rip cuts, while a board in the Black & Dekker Workmate supports long planks during cross cuts. Not to worry about the scorch marks. I always make exterior pieces a little large so as to perfect them with the flush trim bit in the router.
Tomorrow I’ll cut and chamfer the driver holes, drill the binding post holes, and cut the biscuit slots.
Finishing will be interesting. The grain is so open and deep that I think sanding would probably ruin it. At most I’d apply some natural Danish oil, but my guess is that simply applying some polyurethane to the unsanded bare wood will look best. We’ll see what the test scraps look like.
Anyone had good results finishing “purple” Lauan ply?
Attachments
Last edited:
If you can get your hands on some real veneer or edgebanding tape (unglued), and band the exposed edges before assembly, I think you'd get a very tidy job.
As for finishing the Meranti plywood - yup, I'd not get too crazy trying to sand out the depth of grain, and a few coats of spar varnish applied with foam brush would be probably your best bet. It doesn't take oil finishes such as Watco, etc particularly well.
As for finishing the Meranti plywood - yup, I'd not get too crazy trying to sand out the depth of grain, and a few coats of spar varnish applied with foam brush would be probably your best bet. It doesn't take oil finishes such as Watco, etc particularly well.
The 3/4" is one of several options we have here for "shop/ core" ply. Let's just say that when buying budget import plywood, you get what you pay for. Our sawyer has a list of defects, including foreign objects found impeded within the layers:
- sheets delaminated after cutting
- gravel
- zipper
no kidding about the last two.
The main / scoring blade for the production beam saw cost approx $500 per set, and either of those last two can wreak havoc on the carbide.
- sheets delaminated after cutting
- gravel
- zipper
no kidding about the last two.
The main / scoring blade for the production beam saw cost approx $500 per set, and either of those last two can wreak havoc on the carbide.
Thanks for all these finishing suggestions. The previous owners of our house were sailors and left some spar varnish in the garage. Tomorrow I'll have time to cut the biscuit slots and will do up some test scrap as well.
A question just occurred to me: Since this build uses material that is 1/4" thicker than spec'd in Scott's original design, might it be worthwhile to chamfer or flare the vent opening at the back? Say, if I used the 45* chamfer bit or the miter saw for an even shallower angle at the top of the vent, or both top and bottom, keeping a 1/2" depth through the straight part? Wonder if that would help to spread or disperse the bass image and improve soundstage.
I imagine such a change would be negligible to inaudible, but the mind starts thinking about all the little details...
PS -- Paul: I enjoyed looking at the speaker builds at your website. Really beautiful work. Now you've got me interested in doing an A10P or A12P build after this one. Are those drivers actually useful down to 45hz?
A question just occurred to me: Since this build uses material that is 1/4" thicker than spec'd in Scott's original design, might it be worthwhile to chamfer or flare the vent opening at the back?
Not really.
I have converted a couple of these kind of Scott boxes from one thickness to another and am quite anal about it, but Scott is much less caring… you’ll be fine.
dave
The grain is so open and deep that I think sanding would probably ruin it.
Rustins Grainfiller | Stainable Grain Filler | Wood Grain Filler
Thanks for the grainfiller suggestion, scottjoplin. I will try to find that locally.
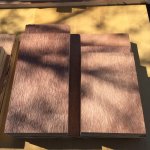
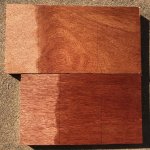
The material I'm working with has two different colors/grain patterns that I like for different reasons, so I made two pair of front baffles just to see how they'd look. One is lighter in color with better grain clarity and interesting patterns (as well as figures), the other is darker and redder with thicker and straighter grain. So I did a couple schedule boards with Watco Natural Danish Oil to see how that would affect the appearance. The boards are unsanded and divided into three sections: unfinished, Danish oil with no pre-stain (middle), and Danish oil with two coats of pre-stain (to see if it would even up the color contrast for a more consistent tone).
In the attached pics they are placed next to the driver to get a sense of how the box would look either way.
Attachments
Last edited:
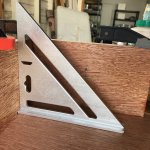
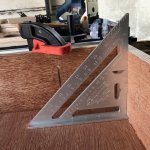
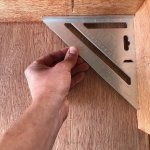
Started gluing today with the top and rear panels of speaker A, using right angle guides to try and keep everything square. The risk with this approach is that the side edges of the two pieces don't match up, which could throw off the seal when gluing on the final side. It took some finess with the right angle guides and bar clamps to make sure they didn't wander under pressure. I also used biscuits at that joint to keep things stable.
Testing revealed that the depth/angle guide on my cheap Ryobi biscuit jointer is very difficult to get square. It's far more accurate to measure, draw lines with a pencil, and use the guide marks on the side and bottom.
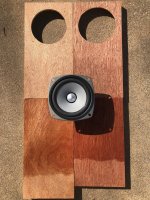
I think I'm going to go with the lighter/clearer grain on the visible sides in order to let the material show itself to best effect. Also, since most FF-series builds seem to use dark red/brown colors, this would be a little different.
Testing revealed that the depth/angle guide on my cheap Ryobi biscuit jointer is very difficult to get square. It's far more accurate to measure, draw lines with a pencil, and use the guide marks on the side and bottom.
I think I'm going to go with the lighter/clearer grain on the visible sides in order to let the material show itself to best effect. Also, since most FF-series builds seem to use dark red/brown colors, this would be a little different.
Attachments
Last edited:
")
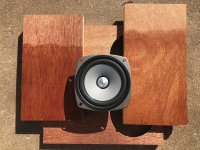
I’ve got a question that could affect how I construct the front baffle. If I chamfer the side edges along the front, is there an optimum baffle width to aim for?
Looking at everything pieced together for a dry fit, since I’m using nominal 3/4” (18mm) material, the external width is increased by 1/2” for a total of about 6 1/2”. It looks substantial enough that it might warrant attention for matching frequency response with the bass waves emanating from the rear or for proper dispersion from the front.
Looking at everything pieced together for a dry fit, since I’m using nominal 3/4” (18mm) material, the external width is increased by 1/2” for a total of about 6 1/2”. It looks substantial enough that it might warrant attention for matching frequency response with the bass waves emanating from the rear or for proper dispersion from the front.
OK, thanks. Decision will be cosmetic -- either a 45* chamfer down the front side edges or a 3/8" roundover of all edges. Will see how it looks when sealed and flush-trimmed.
Coming along slowly but accurately. Exterior sides are square. Using biscuits to keep the manifolds square and properly spaced.
Coming along slowly but accurately. Exterior sides are square. Using biscuits to keep the manifolds square and properly spaced.
Attachments
- Status
- This old topic is closed. If you want to reopen this topic, contact a moderator using the "Report Post" button.
- Home
- Loudspeakers
- Full Range
- Woden Falcon Build