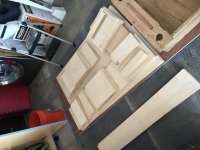
Ok. So I made all the angle cuts over the weekend. It was a 6 hour job with a sliding miter. For the most part I just did my best to round to the nearest angle. This was definitely not for the faint of heart and if you don’t have the right tools I’m sure it’s a pain. I had the right tools and it was still a pain.
Next is gluing. I’m sure the angles aren’t perfect so there will be some massaging involved to get everything looking right. I’m considering temporarily holding things in place with wood screws in lieu of trying to create odd angle clamps. Any tips or pointers are appreciated.
Pictures below. You can also see an old high school desk from the thirties I am stripping and putting back together.
Attachments
Thanx… i have been prepping a minor update to the drawing, i’ll sort that — done. Now just need to tidy the ancillary drawings
dave
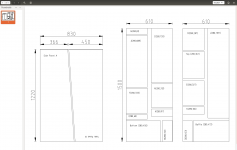
Hi Dave, if you are taking care of the plans, please feel free to include this cutting plan as well, if you think they'll be useful to someone. I have made it for my own needs more than one year ago (and yeah, I am using a different username now)... I hope they are error free.
I do have somewhere the original CAD file for this, if you would like a different rendering for paging purposes just let me know...
Attachments
(and yeah, I am using a different username now)
As a moderator, i have to ask about that as you aren’t supposed to have 2 member registrations. What is your old one, we can merge the 2 accounts.
dave/diyA mod

dave
Hi Dave, regarding your question, I have finally decided to buy them precut (not much extra cost, as they could use leftovers for the small parts), but yeah, I tried fitting them on a standard piece they had in the local shop.
I have double-triple checked everything, but there could still be mistakes in there, please let me know if you find any.
Regarding the username, I used to write as fb2017, but got a bit annoyed by other (unrelated) discussions and decided to ask for an account freeze. Y. As I wanted to contribute, after a while, I asked for an unfreeze, but your moderator colleagues could not unfreeze it (although I tried with "Elena"), I created this new username (fbbf), with the intention of strongly limiting my contributions... It would be nice to be able to use the fb2017, but not really critical for me...
I am the author of this post:
Dallas II SPL measurement
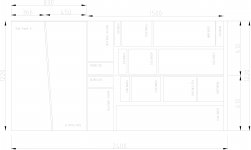
I have arranged the cutting plans on a 2400x1220 board, if it helps. By removing the common cut edges (in order to increase cut precision) it became a bit busy, but still possible to read. Dave, thank you for clearing the username issue.
Attachments
Last edited:
The cutting plans worked fine for the 5x5 Baltic birch panels. I used three total panels cut into pairs. One was cut in half and two were cut at a closer to 60/40 split to accommodate the sides. The cutting pattern was efficient and I had enough left over for some minor screwups. The way I did it was to clamp the matching panel halves together and do the rip cuts once with the track saw through both panel sets. So both sets of speaker pieces came from a single set of cuts. Hope that makes sense. Then I trued up all the interior widths with the table saw and did the bevel cuts with a sliding miter.
Today I started gluing things up starting with the outer walls. I figure I can use those as support and start building inwards from that. I test fit everything before gluing and had to use the miter to take off an extra 16th here or there. For most of my cuts I try to err on the side of too big so I have room to adjust if needed.
The plans are missing a 4 degree angle cut on the back panel to fit properly but it was easy enough to correct. A few questions.
- to run the speaker wire - do I just cut small holes from the speaker chamber through the panels to the back? Do I need some kind of sound dampening-filler in the speaker wire holes as they go through the panels?
- what is the best material to use to fill the voids in the speaker?
- do I have to put felt in the bottom opening? Where? Just floor? Or sides and top as well?
The plans are missing a 4 degree angle cut on the back panel to fit properly
That is complentary to th eone on the bottom which i shown. I might add a detail sheet like in di in the trapezoidal miniOnkens thou.
- to run the speaker wire - do I just cut small holes from the speaker chamber through the panels to the back? Do I need some kind of sound dampening-filler in the speaker wire holes as they go through the panels?
You need to plug the holw after running the wire. We recommend skinny and solid wire. We use a pair of strands pulled from a Cat 5/6/7 cable.
- what is the best material to use to fill the voids in the speaker?
I like sand (it has to be dry. Playgtround sand, sand blast sand, but kitty litter and lead shot also work (but it is lead and from experience with a set of Tannoys, can be a real disaster if any gets away on you)
- do I have to put felt in the bottom opening? Where? Just floor? Or sides and top as well?
I believe Ron suggested just some rolled up poly batting in the air cavity. I’d line it and then add poly to taste.
dave
I believe Ron suggested just some rolled up poly batting in the air cavity. I’d line it and then add poly to taste.
dave
Do I put any stuffing in the space behind the driver?
Also. I read another thread where someone used felt on the outside of all the bends. I’m assuming he meant on the inside where the sound travels.
Also Dave. I didn’t mean the 4 degree comment as a criticism. Without your plans the build would have been impossible for me. So thanks for the time and effort putting them together.
Last edited:
I am using my dallas II set without any damping material whatsoever, so far. I think at lower volumes the mids shout (due through reflection towards the frontfrom the sound cavity, though the driver) is not at all disturbing. So maybe you can wait until it is all nicely broken in (200 hours or so), and then try to play with some felt behind the driver, to adjust to your taste. The space left is quite limited, so you need to pay attention to the felt thickness when choosing it.
I am pretty sure the rest of the horn does not need any additional damping.
Regarding the speaker cable, as an alternative solution I have chosen to route them directly to the side walls, and avoid drilling holes and the need to plug them afterwards.
As advantage, you can use a very short cable (15 cm) to the plug, and the cable is replaceable.
As disadvantage, you will see the plugs on the side, so you have to like it, once it's done. Next, I would not install the plugs vertically, but horizontally, it is better for strain relief.
Do I put any stuffing in the space behind the driver?
Also. I read another thread where someone used felt on the outside of all the bends.
Attachments
Last edited:
As disadvantage, you will see the plugs on the side, so you have to like it, once it's done. Next, I would not install the plugs vertically, but horizontally, it is better for strain relief.
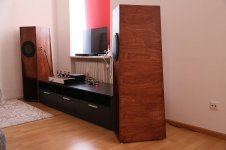
Lol. I always planned on making these but I just did a remodel and I’m tired. The only reason I went ahead and started is that my wife haaaates the existing fostex cabinets. The Dallas II is less bulky, thinner and not as deep. Though much taller. So we will see.
Anyway I went off on that tangent to say the wire idea is good but she’s gonna hate to see wires sticking out so I’ll have to go the traditional way out the back.
What drivers are you running? Where did you get those speaker grills?
I've collected almost every posting from Ron on DIY Audio, AA and FR forum and he was against any filling apart from some felt on the panels in the coupling chamber ( behind the driver ) . He did even discuss using 'wavy wood' or some other options on the panel surfaces to break up HF standing waves in there, to avoid using any absorbent materials.
I've collected almost every posting from Ron on DIY Audio, AA and FR forum and he was against any filling apart from some felt on the panels in the coupling chamber ( behind the driver ) . He did even discuss using 'wavy wood' or some other options on the panel surfaces to break up HF standing waves in there, to avoid using any absorbent materials.
Cheers. Thanks. The felt behind the driver should be fairly modifiable after I’m all closed up. So I guess just sand for the voids.
- Home
- Loudspeakers
- Full Range
- Dallas II Build