Is this the right time to confess I like ordinary mineral oil on pine? Non-drying to be sure, but these things are relative; it's perfectly dry, just doesn't cure. A coat of inexpensive beeswax balsam (beeswax, turpentine & cold pressed linseed oil) over that. Granted, not a professional finish, but it's not bad for orang-utans like me who can bring up a piece of inexpensive furniture to quite a nice finish for very little cost / minimal effort.
Last edited:

 What was it the [former] Top Gear lads thought it should be called -'The Badger of Death'?
  Good handle.
Pass DIY Addict
Joined 2000
Paid Member
Thanks for the additional suggestions on wood finishings. I have more experimentation to do now.
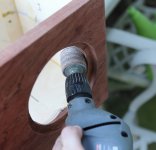
Before I forget, I wanted to share a few more details about creating the driver chamfering on the rear side of the baffle. A sanding drum in an electric drill works wonders, even if you've already sealed up the cabinet! Just stick it in through the driver hole, watch for the mounting screws, and let the sawdust fly! I've attached a few images.
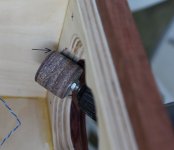
So now I'm at the point where I think I'm "ready to close." I wired up the speaker terminals with some 24g cat5 wire that I glued to the rear panel of the speaker to keep it from rattling inside. Felt and stuffing have been added - man it takes forever to properly tease the acoustastuff apart and make it fluffy! If there are no criticisms or suggestions to what I've done, I'll finish gluing up the cabinets tomorrow and then get ready to apply the veneer. Almost ready for an audition with the drivers mounted...
Before I forget, I wanted to share a few more details about creating the driver chamfering on the rear side of the baffle. A sanding drum in an electric drill works wonders, even if you've already sealed up the cabinet! Just stick it in through the driver hole, watch for the mounting screws, and let the sawdust fly! I've attached a few images.
So now I'm at the point where I think I'm "ready to close." I wired up the speaker terminals with some 24g cat5 wire that I glued to the rear panel of the speaker to keep it from rattling inside. Felt and stuffing have been added - man it takes forever to properly tease the acoustastuff apart and make it fluffy! If there are no criticisms or suggestions to what I've done, I'll finish gluing up the cabinets tomorrow and then get ready to apply the veneer. Almost ready for an audition with the drivers mounted...
Attachments
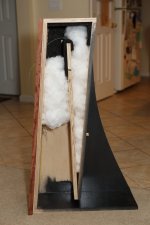
man it takes forever to properly tease the acoustastuff apart and make it fluffy!
It does.
dave
Pass DIY Addict
Joined 2000
Paid Member
After gluing up my test strip of veneer, I noticed that I have a minor ripple across part of the surface. The ripples are about an inch or so wide and difficult to see, but easy to feel. I put two thin coats of glue on each surface and hit it with the iron with a piece of kraft paper between the veneer and iron.
Anyone run into this before and know if it is the result of too much or too little heat? When you iron it on, is it just a "one pass" slowly across the veneer to melt the glue? Is there any reason to come back and hit an area that has already received heat?
I'm thinking I should pick up some cheap veneer locally and play some more before I go to work with the expensive stuff... Any advice would be appreciated!
Hi Eric,
Wise move to do a test run on the veneer (don't ask me how I know!). I've had wrinkles appear when ironing veneer with a "sweeping" motion. Apparently the pressure and motion of the iron can squeeze the uncured glue along a front, which creates the wrinkle.
I begin by setting my iron to a low to medium heat, but no more. The reason is (and I'm assuming you're using a yellow glue such as Titebond) is that you're not "melting" the glue so much as curing it. High heat can cure any glue puddles before they're sufficienrly spread out, causing wrinkles. Also, too high a heat can scorch the wood, leaving marks that can be doggedly diffucult to remove (the kraft paper helps - another wise move on your part).
Next I simply press the iron lightly in the center of the veneer and work my way out from there. This does three things: it "tacks" the veneer in place to keep it from creeping on a layer of wet glue, it prevents trapping air bubbles beneath the veneer, and it also prevents the squeezing of wet glue along the edge of the iron as described above. Once it's secured you can finish by sweeping the iron over the veneer for a couple of passes. Take your hand and rub the veneer periodically to gauge flatness.
Remember also that veneer - even the paper-backed variety - shrinks somewhat while you're pressing it because it loses moisture.
And one last idea: you might consider using cabinet scrapers for finishing instead of sandpaper (before applying your finish, of course). They're cheap, readily available at most of the chain woodworking stores, and they'll leave behind a surface that's as smooth as glass. They require a little skill to use and sharpen, but that's easy to acquire - and an extremely small price to pay for the results you'll get, not to mention the savings on sandpaper!
Last edited:
I take the opposite approach with temperature - set the iron to highest temperature (linen), and don't worry about any scorching - at least with unfinished veneers. In fact, I use them to outline areas for recessed driver cut-outs, vents etc, and they sand out easily enough.
Roll the glue on both surfaces with a short nap roller - leaving a very light eggshell surface, and let tack dry (time will vary on ambient temperature - in our current warm spell, it's often over 30 C at the end of the afternoon.)
Roll the glue on both surfaces with a short nap roller - leaving a very light eggshell surface, and let tack dry (time will vary on ambient temperature - in our current warm spell, it's often over 30 C at the end of the afternoon.)
considering the pictures I've seen of your builds I'll have to say that your approach definitely works
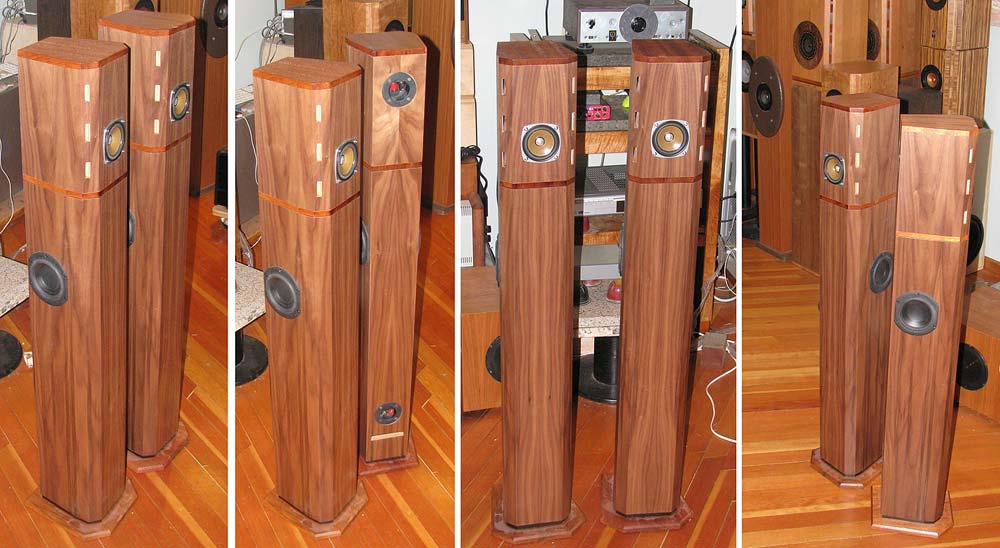
This is the one i think is the most deserving of praise (there are 4 boxes in the picture):
dave
Definitely! That picture rather speaks for itself, doesn't it? I especially appreciate the care in bookmatching the panels, which is neither easy or cheap. And the horizontal accents are a perfect match for the walnut. Simply stunning.
I'll admit that the majority of my veneering experience stems from my days restoring antique radio sets like the ones the OP referred to in post 30. Most of the earlier sets were housed in relatively complex cabinets held together with hide glue, which softens with moisture and heat - exactly the environment created with a big veneer job using a water-based glue. Even the cabinets glued with urea-formaldehyde adhesive weren't immune, especially those with a curved plywood substrate. An oafish approach could reduce a prized collectors' item to a delaminated mess fairly quickly.
chrisb: I do have a question more related to Eric's situation. Does your technique also work with unbacked veneer? I ask because that may open an opportunity for the OP, and also because I'm able to cut my own veneer.
Thanks!
I've only ever used unbacked veneer on very small pieces, such as turntable tone-arm mounting boards, and either cold press or vacuum bag those, then cut to size
The little towers in Dave's photo was a lucky break-out - that all come out of one very carefully selected sheet of veneer, and took one full day to complete. A lot of careful trimming of the rebated driver and terminal cup cut-outs and vent slots.
The solid accent end caps on the FF85 boxes was partly due to running of out material to continue the figure matching around all 8 faces - but I honestly can't remember what I did with the tops of the woofer towers.
I forgot to ask earlier; what's the device with the round dial on top of the audio rack in the third picture? It looks like some sort of radio tuner, but I don't recognize it, and the curiosity is killing me!
I guess you are asking me. That is an FM5 chassis striped of its front bezel, with a 6922 CC->CF preamp built inside. The big bezeled volume control is a dial from somw WW II era piece of radio kit.
dave
Pass DIY Addict
Joined 2000
Paid Member
I made some progress with veneer over the weekend. I started playing around with some scraps left over from cutting out my panels. I'll upload some images tonight, but I found success with only a single layer of glue on the veneer and two layers of glue on the plywood, then letting the glue dry more thoroughly before ironing. I think part of my learning curve may be the subjective differences between what Chris and I each call a "thin" layer of glue and perhaps our selection of a roller to apply glue with.
Hi Eric, glad to hear you're starting to enjoy some success with the veneering. After reading chrisb's response I found several good videos showing that very process, and it does appear to have become somewhat mainstream.
I will say that applying the glue with a roller does make sense. One of the videos I saw advocated using a brush - and although the end result looked okay, the glue looked a bit thick and the coverage was uneven. Now that I think about it it was kind of painful watching the guy brush it on.
Anyway, it sounds like you're making headway. Looking forward to seeing the finished product for sure!
The rollers I use are a cheapie short nap 3" paint / trim roller. The first time you use for glue, you'll get a bit of lint pull out, so that's the best time to practice, but once you've done that, it's pretty easy to get a uniform light coat per surface with a very light eggshell texture. Seal up when done in a zip-lock bag, and they can last for weeks without needing to wash and dry after each use.
I find them much easier to control than foam rollers.
I find them much easier to control than foam rollers.
Attachments
- Status
- This old topic is closed. If you want to reopen this topic, contact a moderator using the "Report Post" button.
- Home
- Loudspeakers
- Full Range
- Another FHXL Build