Moderator's note: this thread was split off another to avoid a hijack
How I built my towers
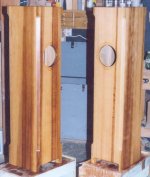
This is the process I went through when I designing my tower cabinets. I had all kinds of things that were critical to getting a great project. The solution I came up with is a bit complicated but I think it worked quite well. I had some a beautiful Douglas fir lumber I wanted to use yet I also wanted to have high density and a internally a non-reflective cabinet. I also wanted to have non-parallel surfaces on the inside to reduce the effect of standing wave resonance. As these are tower cabinets there was going to be large areas that would be hard to keep rigid. I wanted to incorporate a stone base to provide stability and mass. This is a lot of difficulties to take on in a first speaker project.
After consulting with planet10 Dave I came up with the following design. The design it self is a little complicated. The trick was figuring out the critical path for production. I will get Dave to post the construction photographs and I will try to describe the process and some of the pit-falls to watch out for.
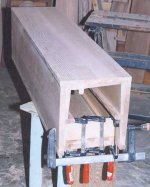
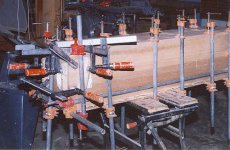
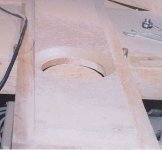
I chose to have the front and rear baffles overlay the side panels as the lumber has some real nice natural stain pattern that I wanted to wrap around the top of box. I started with a pair of 1x12x120” planks of vertical grain Douglas fir this became the sides and top. Another pair of 1x12x100” planks became the front and rear baffles. I squared up and planed the lumber, then cut ¾” MDF to the same width and laminated the MDF to the Fir with Tightbond 2 glue (you need a lot of clamps to do this). To reduce the working weight I then cut one of the 45’ inside angles for top corner joint on each cabinet. I left the top attached to one side panel to be cut latter. I then routed ¾” bracing channels into the side and rear pieces. I then rabbit cut the front and rear baffles to allow the MDF to be inset into the cabinet side panels.
So to summarize the side and top panels of each cabinet are from a single length of laminated fir and MDF with routed channels for bracing. The front and rear panels are the same yet the MDF has been rabbit cut so the MDF is inset by ¾” I did not put a vertical brace on the front panel (could be done).
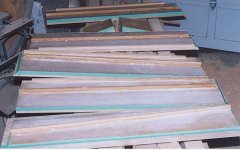
Next I made an angled sled for my thickness planer. I took a piece of ¾” MDF that the same width as the table of the planer and about 2 feet long finished it with varathane sanded to 300 grit and applied 4 coats of carnuba wax (to reduce friction). I put a 1”x3/4” runner lengthwise on the bottom side of the sled on one extreme edge. This created a ¾’ in 12” slope across the bed of the planer. I put stop feet on the bottom to keep the sled in place on the planer bed. I then ran the side/top and rear panels through the planer on the sled to remove the MDF side of the panels. I stopped planing when the MDF was ~ 1/8” on one side and not planed at all on the other side.
Next I completed the 45’ inside cut and removed the top from the side panels. I then glued and screwed the vertical bracing into the side and rear panels. Then I taped off the edges and painted on three coats of slightly thinned glue on the inside of all the pieces. ( I could have used epoxy resin but I did not want to open a new can for this small project. As the glue absorbs in it has a similar effect to stiffening and hardening the panel). Then I dry fit the entire cabinet to make sure I did not make any mistakes. Yeah! it fits together. Next drill out the holes for the binding posts and screw in cup hooks to hold a piece of grill clothe to act as a support for the dacron stuffing at the correct location. Then glue up the sides and be real careful to keep it square with grain wrapping around the top and sides. Drill and route out the front baffle to accept the driver. Flare the MDF to the inside and set the driver into the front baffle by 1/8”. Glue the front and rear baffles to the sides. Flip over the cabinets and glue in the port vent baffle. Route the edges flush and chamfer to reduce bulky appearance. Sand to 220 grit with a random orbital sander. Finish with three coats of Varathane natural oil sanding to 220 grit between coats, then three coats of Varathane Satin Urethane sanding to 320 between coats. Use a sprayer if you can, thin the first coat with ten % lacquer thinner to help finish penetrate and flow. Wire and install binding posts, put in grill cloth stuffing holder.
Next I had a couple of pieces of granite cut to the cabinet width and length plus a 1” shoulder all around and 1” thick. I drilled the bottom of the stone to accept a ¾” x 3/8” plug for a screw in leg. Then through drill 3/16” holes to allow anchoring screws to pull the cabinet and base together. Epoxy the plastic leg plug into the drilled holes. Finish the stone with three coats of Websheen (Xylene based concrete floor sealer, finish). Flip cabinets onto top put a bead of silicone on bottom of edge side panels and use 3” #8 screws to pull the base and cabinet together. Allow the silicone to ooze out and dry. Razor knife the excess silicone off after it dries. Flip the cabinets over and line driver inset with felt (real skinny piece, use silicone as the adhesive) Install the drivers.
One final coate of floor paste wax with Carnuba to finish.
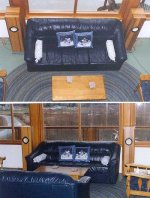
Tah dah
Enjoy
The pathway I described worked for me. There may be other ways to do this but I know this one worked.
The stone base was a nice touch but is not really needed.
How I built my towers
This is the process I went through when I designing my tower cabinets. I had all kinds of things that were critical to getting a great project. The solution I came up with is a bit complicated but I think it worked quite well. I had some a beautiful Douglas fir lumber I wanted to use yet I also wanted to have high density and a internally a non-reflective cabinet. I also wanted to have non-parallel surfaces on the inside to reduce the effect of standing wave resonance. As these are tower cabinets there was going to be large areas that would be hard to keep rigid. I wanted to incorporate a stone base to provide stability and mass. This is a lot of difficulties to take on in a first speaker project.
After consulting with planet10 Dave I came up with the following design. The design it self is a little complicated. The trick was figuring out the critical path for production. I will get Dave to post the construction photographs and I will try to describe the process and some of the pit-falls to watch out for.
I chose to have the front and rear baffles overlay the side panels as the lumber has some real nice natural stain pattern that I wanted to wrap around the top of box. I started with a pair of 1x12x120” planks of vertical grain Douglas fir this became the sides and top. Another pair of 1x12x100” planks became the front and rear baffles. I squared up and planed the lumber, then cut ¾” MDF to the same width and laminated the MDF to the Fir with Tightbond 2 glue (you need a lot of clamps to do this). To reduce the working weight I then cut one of the 45’ inside angles for top corner joint on each cabinet. I left the top attached to one side panel to be cut latter. I then routed ¾” bracing channels into the side and rear pieces. I then rabbit cut the front and rear baffles to allow the MDF to be inset into the cabinet side panels.
So to summarize the side and top panels of each cabinet are from a single length of laminated fir and MDF with routed channels for bracing. The front and rear panels are the same yet the MDF has been rabbit cut so the MDF is inset by ¾” I did not put a vertical brace on the front panel (could be done).
Next I made an angled sled for my thickness planer. I took a piece of ¾” MDF that the same width as the table of the planer and about 2 feet long finished it with varathane sanded to 300 grit and applied 4 coats of carnuba wax (to reduce friction). I put a 1”x3/4” runner lengthwise on the bottom side of the sled on one extreme edge. This created a ¾’ in 12” slope across the bed of the planer. I put stop feet on the bottom to keep the sled in place on the planer bed. I then ran the side/top and rear panels through the planer on the sled to remove the MDF side of the panels. I stopped planing when the MDF was ~ 1/8” on one side and not planed at all on the other side.
Next I completed the 45’ inside cut and removed the top from the side panels. I then glued and screwed the vertical bracing into the side and rear panels. Then I taped off the edges and painted on three coats of slightly thinned glue on the inside of all the pieces. ( I could have used epoxy resin but I did not want to open a new can for this small project. As the glue absorbs in it has a similar effect to stiffening and hardening the panel). Then I dry fit the entire cabinet to make sure I did not make any mistakes. Yeah! it fits together. Next drill out the holes for the binding posts and screw in cup hooks to hold a piece of grill clothe to act as a support for the dacron stuffing at the correct location. Then glue up the sides and be real careful to keep it square with grain wrapping around the top and sides. Drill and route out the front baffle to accept the driver. Flare the MDF to the inside and set the driver into the front baffle by 1/8”. Glue the front and rear baffles to the sides. Flip over the cabinets and glue in the port vent baffle. Route the edges flush and chamfer to reduce bulky appearance. Sand to 220 grit with a random orbital sander. Finish with three coats of Varathane natural oil sanding to 220 grit between coats, then three coats of Varathane Satin Urethane sanding to 320 between coats. Use a sprayer if you can, thin the first coat with ten % lacquer thinner to help finish penetrate and flow. Wire and install binding posts, put in grill cloth stuffing holder.
Next I had a couple of pieces of granite cut to the cabinet width and length plus a 1” shoulder all around and 1” thick. I drilled the bottom of the stone to accept a ¾” x 3/8” plug for a screw in leg. Then through drill 3/16” holes to allow anchoring screws to pull the cabinet and base together. Epoxy the plastic leg plug into the drilled holes. Finish the stone with three coats of Websheen (Xylene based concrete floor sealer, finish). Flip cabinets onto top put a bead of silicone on bottom of edge side panels and use 3” #8 screws to pull the base and cabinet together. Allow the silicone to ooze out and dry. Razor knife the excess silicone off after it dries. Flip the cabinets over and line driver inset with felt (real skinny piece, use silicone as the adhesive) Install the drivers.
One final coate of floor paste wax with Carnuba to finish.
Tah dah
Enjoy
The pathway I described worked for me. There may be other ways to do this but I know this one worked.
The stone base was a nice touch but is not really needed.
Very, very nice Scott. You can be proud, both of your woodworking, and I'm sure, the inspiration you've given to others. I'll bet the sound you'll enjoy, will be better than your friend's who ended up buying the Sttaf speakers.
Ands thanks for posting a well written description of your construction process. I like the final shape of the speakers. They remind me of classic columns. I wonder if with pedestals and capitols the classic taper could be faked with the bevel corner cut.
Am I to assume, in respect to the commercial efforts of Mr. Brines and Mr. King, that you won't be posting the dimensions of your cabinet?
If I may, I'd like to add some ideas for others concerning the nonparallel inside wall treatment:
If you don't have a planer, you can use tapered clapboard siding, laminated to the insides of the cabinet. This can be purchased in cedar, redwood, and composite materials including a cement-board.
Also, a dish cut can be made on a tablesaw. Clamp a board (for the fence) running diagonally across your saw table, and with repeated passes, raising the blade just a little each time, the tapered, laminated MDF that Scott describes above can be shaped to a rounded interior. Something like what others have described with CNC cut, stack-built boxes. Get down at eye level to the saw table, change the angle of the fence, the angle of the blade, move the blade up and down, and you'll see many concave cut shapes are possible.
Kind words
x. onasis
Thanks for the kind words
This was an interesting project. As I indicated in my somewhat lengthy description, the trick was in deciding the critical path for production. I hope to post a few pictures of the finished product shortly. This posting was a bit premature as I still had a few photo's in the camera. I thought my experience would add to the discussion on cabinet resonance.
The column presentation is quite puposeful as it mirrors the design of my house. It really helped with the Wife Appreciation Factor. The cabinets seems to blend into the timbers on the window nicely.
I want to publically thank both Bob and Martin for making information available about Transmission Line design. THe work these fine gentleman have done and made available is a wonderful expression of altruistic behaior. The Do It Yourself loudspeaker comunity has benifited enormously from their efforts. These are not a commerial design so I have no problem with discussing the dimensions. I based the design on the published information from B.Brine's site with a few modifications. I do not have a lot of equipment so I can not tell if I optimized the potential of the driver with my design. I think I came pretty close assuming the drivers are consistent and the dimensions Bob used are applicable to my drivers. If you were to achieve ~ 81in2 for the cross section (based on mid point panel measurements) and 45in for the internal length with the stuffing and vent as per Bob's recommendation I think you would be doing pretty good.
I can not stress enough the need to use very dry wood if a laminated panel is planned. MDf does not shrink, real wood does, this is a challenging combination. The lumber I used had been drying inside my house for more than five years. It was very old lumber to start with. If someone is planning on following this technique I suggest buying the lumber from a supplier that stores lumber indoors and ensures it is kiln dried. This will reduce the risk of a split in the exterior of the cabinet. Sealing all sides will also slow the rate of moisture equalization between the room and the wood. The cabinets will equalize you want to try and manage it as you can not eliminate it.
I like the idea of skewing the fence on a table saw and making multiple passes to achieve non-parralel surfaces. I have used this technique on other projects to create a cove. It is a little scarry and you have to be careful to not take too much wood off on each pass. You are using the blade in a dimension it was not really designed for, so be thoughtfull of what you are doing.
Anyway thanks again for the nice thoughts.
Re: Kind words
IIRC Scott told me a story about someone selling him a bridge")
dave
SCD said:The lumber I used had been drying inside my house for more than five years. It was very old lumber to start with.
IIRC Scott told me a story about someone selling him a bridge
dave
- Status
- This old topic is closed. If you want to reopen this topic, contact a moderator using the "Report Post" button.
- Home
- Loudspeakers
- Full Range
- Scott's FE167 ML-TLs