
Member
Joined 2009
Paid Member
Member
Joined 2009
Paid Member
I got the new wood from the store - two panels of good solid 18mm Baltic Birch so I can start over with the good stuff! I've been unable to work on it though, just too busy.
However, this weekend looks promising in terms of having some time to spend on it. I have a strong desire to see some sawdust flying !
However, this weekend looks promising in terms of having some time to spend on it. I have a strong desire to see some sawdust flying !
Member
Joined 2009
Paid Member
Member
Joined 2009
Paid Member
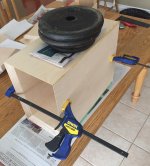
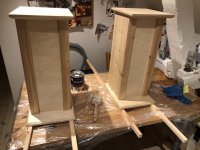
I did use tape, green masking tape, but it was not very good at sticking to the dry wood and I wasn't able to fully trust it. Nevertheless, with a bit of fiddling around I was able to glue up the two boxes except for the top and bottom pieces which I'll put on later.
I'm thinking about cutting facets on the front baffle, to add a bit of character to the plan box.
I'm thinking about cutting facets on the front baffle, to add a bit of character to the plan box.
Attachments
Member
Joined 2009
Paid Member
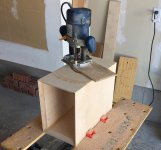
Another weekend came around and the sun is out today. During the week it was just too cold. Today I fetched out the Router. It hasn't seen duty since last winter when I was making up a pair of guitar amplifier cabs (not finished). Today I made copious amounts of sawdust 
Attachments
Last edited:
Member
Joined 2009
Paid Member
Member
Joined 2009
Paid Member
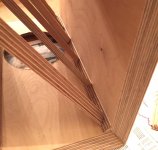
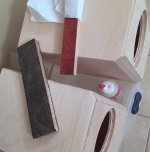
Just adding some fillets - mitre joints aren't the strongest type of joint and I may want to chamfer the outside corner which will reduce the glued area, plus I had the right shaped bits left over from cutting them.
Hey Silas - I may have to send you my boxes for the lacquer treatment
Hey Silas - I may have to send you my boxes for the lacquer treatment
Attachments

Member
Joined 2009
Paid Member
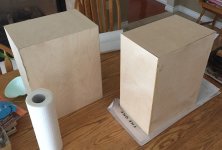
well the glue up wasn't perfect due to the lack of clamps. It means there's one or maybe two joints that are not tight enough to be fully pleased with so I'll have to assume the potential for leaks and seal them from inside if necessary (more wood glue). Nevertheless, it's been awhile since I've built anything, being so satisfied with my AN 15" speaker that I'll count this as a victory so far. And since I was home today sorting out some things and put some chamfers on the edges of the boxes, with larger chamfers on the front vertical edges - mostly for cosmetic reasons if I'm honest about it.
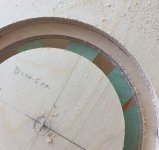
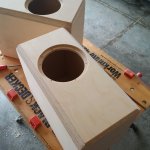
I wanted a different cabinet shape than the Woden design so I worked up a design that would nicely fit onto the 2' x 4' handy panels I had bought. The internal volume is around 93% of the Woden box (raw, no driver or port installed) so I might get away with a similar length port. I don't have a drill suitable for the Port hole yet though. The port will be on the rear, as Scott originally intended.
I wanted a different cabinet shape than the Woden design so I worked up a design that would nicely fit onto the 2' x 4' handy panels I had bought. The internal volume is around 93% of the Woden box (raw, no driver or port installed) so I might get away with a similar length port. I don't have a drill suitable for the Port hole yet though. The port will be on the rear, as Scott originally intended.
Attachments
Last edited:
Member
Joined 2009
Paid Member
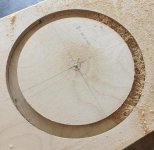
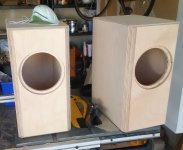
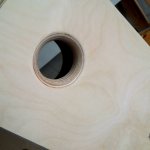
I've now added the screw holes to mount the drivers to the front baffles and added a port hole on the back, rounding it as this seems to be a popular thing
I have some 2" plastic tube to make the ports the proper length of course.
I have some 2" plastic tube to make the ports the proper length of course.
Attachments
Member
Joined 2009
Paid Member
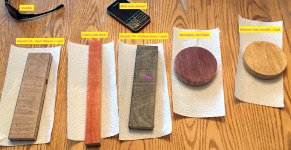
Birch ply isn’t known for taking stain well. If you’re determined to go that route then I strongly recommend you put a finish coat on your samples before you make a final decision. You might even try overlaying different stain colors to achieve a more unique look.
Edit: Just looked closer at your samples. Gel stain is definitely your friend. Much easier to control, especially when dealing with woods that don’t ordinarily stain well.
Edit: Just looked closer at your samples. Gel stain is definitely your friend. Much easier to control, especially when dealing with woods that don’t ordinarily stain well.
Last edited:
Member
Joined 2009
Paid Member
Yup - that Birch is a splotchy wood and given how the veneer is shaved off the tree it's going to look a bit different. I've used Gel stains on this kind of wood before and the results were good.
I've mixed a bit of mahogany (1 application) with the cherry (2 applications) to get a richer colour - not a bad option. And I added another coating of Danish oil to that sample (4 in total) which gives it a richer tone. Close up they are both a bit splotchy but I consider it part of the character of this wood.
I've mixed a bit of mahogany (1 application) with the cherry (2 applications) to get a richer colour - not a bad option. And I added another coating of Danish oil to that sample (4 in total) which gives it a richer tone. Close up they are both a bit splotchy but I consider it part of the character of this wood.
Attachments


Gareth - it’s the nature of both Birch & Maple -whether veneer or solid - to be “fun to get an even stain finish on. As long as there’s no objectionable mineral stains or patched knot holes, I’d be inclined to a clear oil or varnish finish, or a thin seal coat of shellac before adding stain & top coats.
- Home
- Loudspeakers
- Full Range
- Bass reflex standmounts 10.3 / 10P