building for the process of tuning...
I have two general questions about how one builds for tuning. 1). Do you leave say the top plate loose and alter the stuffing until I like it then glue it in place? 2). Does one fit the (Alpair 10.3) speaker flush with the surface (front baffle) or does it sit proud upon it?
I have two general questions about how one builds for tuning. 1). Do you leave say the top plate loose and alter the stuffing until I like it then glue it in place? 2). Does one fit the (Alpair 10.3) speaker flush with the surface (front baffle) or does it sit proud upon it?
I have two general questions about how one builds for tuning. 1). Do you leave say the top plate loose and alter the stuffing until I like it then glue it in place? 2). Does one fit the (Alpair 10.3) speaker flush with the surface (front baffle) or does it sit proud upon it?
1- You can stick your hand through the driver hole to adjust stuffing
2- Yes, it goes flush.
Pass DIY Addict
Joined 2000
Paid Member
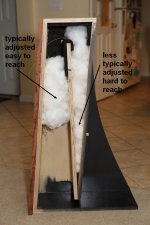
Typically, it is the stuffing "below" the driver that is adjusted. This is easy to reach through the driver hole and is just on the other side of the front baffle. You'll need a "net" of some sort to keep the stuffing from falling down where it doesn't belong. This is what most typically gets adjusted.
The construction advice for stuffing the top of the horn "above" the driver (the folded part behind the driver that is on the other side of the rear baffle) is to stuff equal amounts into the tapered length of the space. Thus, stuffing is most dense at the "point" - the farthest distance from the driver and stuffing is least dense closest to the driver. This spot is not typically adjusted and is harder to get to once the cabinet is sealed.
The construction advice for stuffing the top of the horn "above" the driver (the folded part behind the driver that is on the other side of the rear baffle) is to stuff equal amounts into the tapered length of the space. Thus, stuffing is most dense at the "point" - the farthest distance from the driver and stuffing is least dense closest to the driver. This spot is not typically adjusted and is harder to get to once the cabinet is sealed.
Pass DIY Addict
Joined 2000
Paid Member
Thank you for a good explanation here Eric.Typically, it is the stuffing "below" the driver that is adjusted. This is easy to reach through the driver hole and is just on the other side of the front baffle. You'll need a "net" of some sort to keep the stuffing from falling down where it doesn't belong. This is what most typically gets adjusted.
I am also busy planning for FHXLs with Alpair 10.3s. The wood and drivers have been ordered. But just some more questions come to mind:
1. If the box is all glued up - how do you remove the drivers? I.e. what screws are used? Surely one cannot use bolts and nuts, which is what I had in mind.
2. I assume one needs to make the internal wires long enough to actually pull out the drivers for the stuffing process? And how to prevent those wires from vibrating inside the box?
3. Has anyone made grill covers for the Frugel-Horns? Google does not give any results here and I need some ideas. It will be essential to cover those fragile aluminium cones in my case.
Incredible how even thousands of miles away we are doing the same setup, twocents! lol
1- Box is all glued up, driver screws directly in the wood. A pilot hole is a great idea. On the behind of the driver hole, you chamfer for breathing all around, except where the screws go, so you have more meat there.
2- Use solid 22ga wire. It won't make noise against the wool padding
3- Covers aren't sold by MarkAudio. I'd go custom made with an acoustically transparent fabric on a thin frame. Magnetically held in place would be nice...
Pass DIY Addict
Joined 2000
Paid Member
Each driver comes with a set of six wood screws. They are hex-head screws that are finished in black and fit perfectly in the driver's mounting ring for a flush finish. Use these to mount the drivers. Pre-drilling the screw holes with a drill press helps make sure the holes are perpendicular to the wood and eases the effort of driving the screws so you don't damage the driver. No nuts necessary.
Your internal wire should be long enough to allow you to remove the driver and rest it on the top of the enclosure. This helps for soldering and for adjusting the stuffing. You'll only need a few extra inches. My wire was glued down to the internal divider all of the way to the top of the piece. Hot glue to tack in place, then a long bead of wood glue along the entire length. Once you get to the top, everything is covered in felt. No vibrations to worry about.
Haven't done the grill thing, but having had 3 kids and lots of kid-visitors, I understand this need. Somewhere in either this thread or the "pictures" thread, there are a few examples of some nice speaker covers...
Pass DIY Addict
Joined 2000
Paid Member
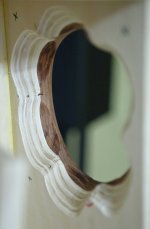
Here is an image of chamfering to open up some space for the rear of the driver. My front baffle is 1.5" thick, so this was a necessity. You can see where I left more wood intact (and the holes that were drilled) for where the screws will attach.
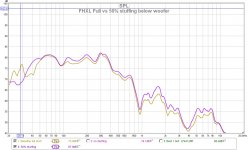
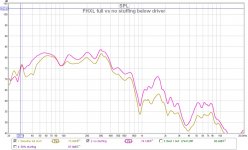
While we are on the topic of stuffing, here is what I measured from my FHXL in my room. 100% stuffing (gold line in both images), 50% stuffing, and no stuffing "below" the driver. These measurements were made with the mic at the bottom rear of the cabinet. I get more bass with less stuffing, but I also get a larger peak around 1-2kHz and again from 5-8kHz... everything is a tradeoff. Pick the one that best suits you.
While we are on the topic of stuffing, here is what I measured from my FHXL in my room. 100% stuffing (gold line in both images), 50% stuffing, and no stuffing "below" the driver. These measurements were made with the mic at the bottom rear of the cabinet. I get more bass with less stuffing, but I also get a larger peak around 1-2kHz and again from 5-8kHz... everything is a tradeoff. Pick the one that best suits you.
Attachments
Last edited:
Just use the supplied screws (and gasket — stick it to the driver)
We do not use the decorative bezel cover, but if you do you will need a larger/deeper rebate. Alternative to a rebate is to add an appropriate thickness of something like cork to make the front of the bezels flush.
We use 24g solid (pulled from CAT5/6 cable), it can sometimes rattle against the wood, a dab of hot glue wouldn’t hurt.
dave
Gents,
Here's a build (FH Mk3) with a removable top:
http://www.diyaudio.com/forums/full-range/172605-frugel-horn-mk3-72.html#post2766380
In case you want to have the option to do more adjustments to the stuffing.
Here's a build (FH Mk3) with a removable top:
http://www.diyaudio.com/forums/full-range/172605-frugel-horn-mk3-72.html#post2766380
In case you want to have the option to do more adjustments to the stuffing.
Thank you everyone for your generous advice and pictures.
Hey GASCo - yes, it is great to know one is not alone here. Is your Aksa Lender preamp working yet? I've got my Lender working last week and it sounds fantastic with my ACA driving Tannoys. Cannot wait to hook it up to the FHXLs. It won't happen fast - still need to break in the drivers and build the boxes. Wish I had someone like chrisb around.
Incredible how even thousands of miles away we are doing the same setup, twocents! lol
Hey GASCo - yes, it is great to know one is not alone here. Is your Aksa Lender preamp working yet? I've got my Lender working last week and it sounds fantastic with my ACA driving Tannoys. Cannot wait to hook it up to the FHXLs. It won't happen fast - still need to break in the drivers and build the boxes. Wish I had someone like chrisb around.
Thank you everyone for your generous advice and pictures.
Hey GASCo - yes, it is great to know one is not alone here. Is your Aksa Lender preamp working yet? I've got my Lender working last week and it sounds fantastic with my ACA driving Tannoys. Cannot wait to hook it up to the FHXLs. It won't happen fast - still need to break in the drivers and build the boxes. Wish I had someone like chrisb around.
I cut down most of the material for the FH. I'm waiting on the 90 degree connectors I bought wrong initially for the AKSA. Wanted to save shipping from Mouser and got on ebay. It's taking forever.... The ACA case is not ready yet. I'm installing on a computer CPU cooler so there will be nothing like the store one... I have everything half complete and a house in renovation (being done by me)... Unfortunately not enough time or hobbies right now
Last edited:
Pass DIY Addict
Joined 2000
Paid Member
You’ll always be working on your house, so why not finish the speakers and listen to them while your working on the house!!!?
OK - I almost soaked my keyboard with my morning drink
Truer words have never been spoken! There is ALWAYS something (large or small) to add, change, fix, or replace...Totally true!
It's just that the situation was too chaotic even to have a nice set of speakers around. But I made some advance over the labor day weekend. I now have a legit flat pack, just pending cutting the whole for the speakers on the front baffle. I'm traveling this weekend so hopefully in a couple weekends I'll have it finished.
It's just that the situation was too chaotic even to have a nice set of speakers around. But I made some advance over the labor day weekend. I now have a legit flat pack, just pending cutting the whole for the speakers on the front baffle. I'm traveling this weekend so hopefully in a couple weekends I'll have it finished.
FHXL
I know you want to make a nice pair of speakers and I agree with your situation . I use the best plywood I could find 3/4 / 18mm marine grade Baltic birch 13 ply no void boards, big plus . So didn’t back chamfer the driver hole didn’t flush mount the driver . Used good 1/2 inch felt. Used sheet poly fill in the V with a 3 inch stagger up the V top took about 3 to 4 sheets one inch thick and biscuted all the glue joints. have not sanded or finish the cabinets . Frankly they sound so good in the position I put them in now maybe a little over a year I’m afraid to touch them . They do need help in the upper frequencies , But not going to bitch about that because everything else is just so good . The other things I mention in the beginning are just tweaks that can be done at any time. So get it done and enjoy ,it’s well worth it!!!
I know you want to make a nice pair of speakers and I agree with your situation . I use the best plywood I could find 3/4 / 18mm marine grade Baltic birch 13 ply no void boards, big plus . So didn’t back chamfer the driver hole didn’t flush mount the driver . Used good 1/2 inch felt. Used sheet poly fill in the V with a 3 inch stagger up the V top took about 3 to 4 sheets one inch thick and biscuted all the glue joints. have not sanded or finish the cabinets . Frankly they sound so good in the position I put them in now maybe a little over a year I’m afraid to touch them . They do need help in the upper frequencies , But not going to bitch about that because everything else is just so good . The other things I mention in the beginning are just tweaks that can be done at any time. So get it done and enjoy ,it’s well worth it!!!
So didn’t back chamfer the driver hole didn’t flush mount the driver
I am doing/trying it this weekend, and I am sh$t scared to mess up the rosewood veneered baffles. Drivers have been breaking in for more than 200 hours now. Getting there..
Hi folks,
2 cents from me. With regard to any iteration of FH, is there any advantage to adding a small radius to the inside of the baffle at the bottom? May help smooth or increase the air flow speed. The sharp 'corner' as designed may muddy the airflow by creating a vortex, particularly since it's less than 90 degrees.
I have a similar situation in my front yard with one inside corner of a small wall. All the neighbours crap ends up in a small pile right in that corner; grass, leaves, burger boxes, newspapers, all manner of rubbish. Clean it away, next day there's another pile.
Vortex, null, dead spot. I just dunno, but wondering if the physics of air movement in speaker boxes suffers from similar phenomenon....
Cheers from Australia. Martin
Last edited:
If you are talking about the bottom of the partition that defines the choke point, Scott did a bunch of sims and it makes little difference.
If you are using a CNC (or manually) create dados in one side panel to set the back and inner partition into, a radius at the bottom makes the CNCing easier.
dave
If you are using a CNC (or manually) create dados in one side panel to set the back and inner partition into, a radius at the bottom makes the CNCing easier.
dave
- Home
- Loudspeakers
- Full Range
- Frugel-Horn XL for Alpair 10.3/10p, Fostex FF165wk, more