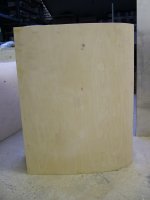
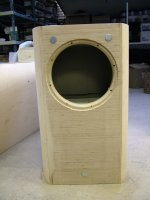
Oil based polyurethane floor finish. (a one part varnish).
I applied it with a small lacquer roller. Sanded with 400 grit between coats.
The pre lacquer sanding was with 150 grit. But I sanded the mid parts smoother than the front radius and the back:

I wanted those parts to get a bit darker stain...
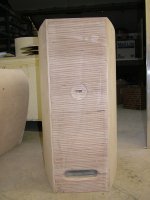
I applied it with a small lacquer roller. Sanded with 400 grit between coats.
The pre lacquer sanding was with 150 grit. But I sanded the mid parts smoother than the front radius and the back:
I wanted those parts to get a bit darker stain...
Last edited:
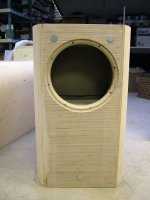
Covering the inside and outside is smart, for something that large. What are you planning to use for the front baffle? Will it be something relatively stable?
2 layers of aluminum sandwiched with two layers of mass loaded vinyl;

The most stable I could think off
") .
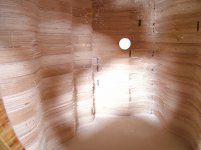
.Have you been sanding between the layers?
Regarding the CAD you have been using, is it easy to use? I am new to CAD software, using sketchup and Cinema 4D, but I find it cumbersome...
Wet sanding with 400 grit paper, gets it real smooth.
I love using Autodesk Inventor. I've been playing with it since 2000 and gave courses at work. It is expensive though. But you can always try it for 30 days, it's a free download.
That's a hard one to answer. Lots of little things that add up like router bits etc.
Just bought some new adjusting feet to replace the simple nut I used up till now etc.
I've been buying components since 2011, hard to keep track of all prices. Maybe I don't want to know. The big figures are of coarse the wood, the drivers, the needed equalizer and machined templates used. But sometimes I am amazed how all those little things add up with a project this size.
Just bought some new adjusting feet to replace the simple nut I used up till now etc.
I've been buying components since 2011, hard to keep track of all prices. Maybe I don't want to know
. The big figures are of coarse the wood, the drivers, the needed equalizer and machined templates used. But sometimes I am amazed how all those little things add up with a project this size.Great construction method
Hi Wesayso,
Congratulations on a great build!
If I were building another pair of free standing loudspeakers I would stick with Birch Ply laminated top to bottom.
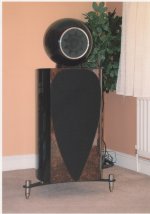
Back in 2005 I built these:
The good news was the looked fab and sounded stunning....
The bad news was 135Kg per cabinet, and that was just the bass section....!
But one important lesson regarding weight, the ratio of driver Mms to cabinet weight is important.
There were noticeable sonic improvements going up from 40Kg to 100Kg and then subtle improvements up to about 120Kg.
The short story is make sure your cabinet weight is at least 80 times that of the total Mms of all 25 drivers combined.
In my case a 12 inch Beyma 12LX60 Mms was around 100g after I added cone treatments, so anything above 100Kg cabinet weight was "Slamming!"
Although acoustic bass was the best way to test, bowed upright bass and low Cello just kept getting clearer and more textured as the cabinet weight increased...
The external looks were...
Hi Wesayso,
Congratulations on a great build!
If I were building another pair of free standing loudspeakers I would stick with Birch Ply laminated top to bottom.
Back in 2005 I built these:
The good news was the looked fab and sounded stunning....
The bad news was 135Kg per cabinet, and that was just the bass section....!
But one important lesson regarding weight, the ratio of driver Mms to cabinet weight is important.
There were noticeable sonic improvements going up from 40Kg to 100Kg and then subtle improvements up to about 120Kg.
The short story is make sure your cabinet weight is at least 80 times that of the total Mms of all 25 drivers combined.
In my case a 12 inch Beyma 12LX60 Mms was around 100g after I added cone treatments, so anything above 100Kg cabinet weight was "Slamming!"
Although acoustic bass was the best way to test, bowed upright bass and low Cello just kept getting clearer and more textured as the cabinet weight increased...
The external looks were...
Attachments
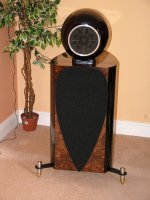
But after finishing....
Its amazing what good veneer and Polyester piano black can do...
We did have clad the stack in 8mm ply to avoid the lines showing through the piano black sides.
Cheers
Derek.
Its amazing what good veneer and Polyester piano black can do...
We did have clad the stack in 8mm ply to avoid the lines showing through the piano black sides.
Cheers
Derek.
Attachments

 Very nice work.
I was working on a large array a little more involved a few years ago with similar construction.
The method of glueing up small sections and tightening and leveling as you go very smart.
The large arrays I had were glued up then outside in a covered area.But they did absorb some moisture and they checked cracked all over.At that point I got the job to fix them all.What a chore I tell you.
Again nice work.GREAT job ..
I did all I could think of to prevent moisture problems. I read a lot of horror stories with stacked constructions. So far, so good for me though.
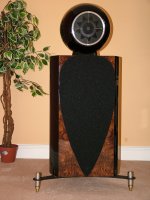
Preliminary paint results:


Still have to work on some small spots and sand and polish. But I'm quite pleased so far!
6 coats in total...
Preliminary paint results:
Still have to work on some small spots and sand and polish. But I'm quite pleased so far!
6 coats in total...

- Home
- Loudspeakers
- Full Range
- The making of: The Two Towers (a 25 driver Full Range line array)