No truer words.Very fun and surprising speaker.
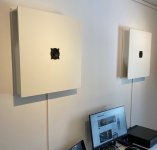
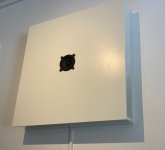
Finished a pair a while ago, 54cm x 9cm, 10mm MDF sides & 7cm x 6mm foamcore channels. And the FaitalPro 3FE22. Actually used MDF for the ends /visible sides of the channels so I also had something to screw everything together when closing them up with all the caulk and for better stability. The construction is very heavy, stiff and non-resonating.
Bought a 90s top FM Tuner and a small T20 (hybrid ******) Tube amp which sounds sublime with them. Tried some alternative tubes as well and fun to tinker.
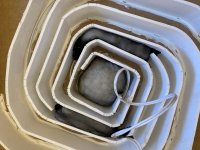
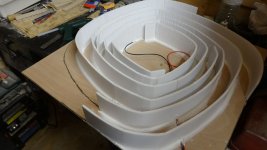
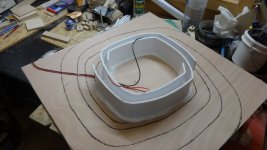
Actually played around alot with different ways to fill the center chamber and the area where the four horns start before closing these up. And this tinkering makes for huge differences. From the picture only the two stockings with polyester (from old pillows) on the sides stayed in. The center chamber were instead first clad with 1mm sheet of wool/viscose glued on all surfaces, the back wall also got with a 10mm stiff Wool-pad and the whole chamber filled with loose wool fiber. Played around with different absorbing materials like foam, bitumen and polyfill for back wall and some materials totally kills the groove.. I tried some different materials in the channels too, but found that polyester in those stockings worked best for only letting the bass through.
All in all a very fun and versatile speaker indeed for close monitor listening of all kinds of music, and although the FaitalPro is quite energetic at the upper registers the tonality is good when the bass is raised just a bit on the Tube amp. Incredibly clear on voices and fast thumpy upper bass. The lower bass is subjective at 45hz, beginning to be heard at around 60hz and loud at 85.. First Hump comes @ 240-250hz. My living room system certainly has more nuances and body, better mids and of course deeper bass etc. But for the size (made them only 9cm deep in total) these are incredible.
Actually tried to hook up my main gear to them for a day but only the streamer could better the tube amps bluetooth streaming. My pre/power combo sounded quite worse then the tube amp. Now I want to try with a better (true) tube amp at something like 4-5w of power.
Anyone think I could get a more balanced freq.response and fuller mids without having to raise the bass slightly if I try a different driver then faital pro? Would many drivers even be good alternatives in the exact same size as existing mounting hole?
Bought a 90s top FM Tuner and a small T20 (hybrid ******) Tube amp which sounds sublime with them. Tried some alternative tubes as well and fun to tinker.
Actually played around alot with different ways to fill the center chamber and the area where the four horns start before closing these up. And this tinkering makes for huge differences. From the picture only the two stockings with polyester (from old pillows) on the sides stayed in. The center chamber were instead first clad with 1mm sheet of wool/viscose glued on all surfaces, the back wall also got with a 10mm stiff Wool-pad and the whole chamber filled with loose wool fiber. Played around with different absorbing materials like foam, bitumen and polyfill for back wall and some materials totally kills the groove.. I tried some different materials in the channels too, but found that polyester in those stockings worked best for only letting the bass through.
All in all a very fun and versatile speaker indeed for close monitor listening of all kinds of music, and although the FaitalPro is quite energetic at the upper registers the tonality is good when the bass is raised just a bit on the Tube amp. Incredibly clear on voices and fast thumpy upper bass. The lower bass is subjective at 45hz, beginning to be heard at around 60hz and loud at 85.. First Hump comes @ 240-250hz. My living room system certainly has more nuances and body, better mids and of course deeper bass etc. But for the size (made them only 9cm deep in total) these are incredible.
Actually tried to hook up my main gear to them for a day but only the streamer could better the tube amps bluetooth streaming. My pre/power combo sounded quite worse then the tube amp. Now I want to try with a better (true) tube amp at something like 4-5w of power.
Anyone think I could get a more balanced freq.response and fuller mids without having to raise the bass slightly if I try a different driver then faital pro? Would many drivers even be good alternatives in the exact same size as existing mounting hole?
Attachments
Beautiful build Henkerino! Thanks for sharing your tweaks in the stuffing and damping. It’s a fun speaker and glad you are enjoying it.
One way to get fuller mids is to attach a small front loaded horn. If you search this thread, you may find a 4-panel design in foam core that I came up with. It will boost the mids from 600Hz to 8kHz or higher by maybe 5-6dB.
To give you an idea, here is design from original Cornu designer:

One way to get fuller mids is to attach a small front loaded horn. If you search this thread, you may find a 4-panel design in foam core that I came up with. It will boost the mids from 600Hz to 8kHz or higher by maybe 5-6dB.
To give you an idea, here is design from original Cornu designer:
Last edited:
Beautiful build Henkerino! Thanks for sharing your tweaks in the stuffing and damping. It’s a fun speaker and glad you are enjoying it.
One way to get fuller mids is to attach a small front loaded horn. If you search this thread, you may find a 4-panel design in foam core that I came up with. It will boost the mids from 600Hz to 8kHz or higher by maybe 5-6dB.
To give you an idea, here is design from original Cornu designer:
Interesting. I was actually thinking of something quite the opposite. To place a ball of some material infront of the cone to break up the highs. Wouldnt a front horn make the highs even higher? If anything I would like some more bass. As of now the tonality is ok, albeit a bit on the dark side, when I turn the bass up ever so slightly on the tube amp (+15-20%). Without tone controls the speaker sounds a bit thin, Im thinking maybe its this driver..
Without the wool pad the bass is less prominent. reflections come in to play so the timing goes off and more treble.
With acoustic foam its just not enough dampening of these reflections aswell.
Guessing I Would have to reduce the polyester in those stockings and replace it with loose wool or strands of polyester, letting more bass through. But thats not an easy job without taking out holes from the back of the speaker at this stage. Didnt tie strings to the stockings and it would probably be too tight of a space to wiggle them back to the center chamber through those tight channel beginnings.
All in all I guess Im pretty satisfied leaving them like this. Dont think I can improve them very much and getting new tube amps with tone controls can't be too much of a problem anyway.
I like the wall of sound character these have. Not the most dynamic but still sounds great with everything from heavy metal to classical music. Currently enjoying Black Sabbath.
With the center chamber empty or just some stuffing/too light or to heavy materials they didn't sound remotely this coherent.
With the fronts still not glued on they had that livid midrange and richer, fuller sound briefly. Guess they worked more similar to a guitar instrument, letting the front baffle ride along with the music. Now the baffle is hardly affected even at really loud levels. Sadly that effect made the top end sound rubbish though, no clarity or details came through, so it wasn't really an alternative to consider.
So a little progress on my Modified Spiral/Large Cavity Cornucopyas…
The starting point was – Thinking about various improvements mentioned in past 2797 posts... One, on increasing cavity area to improve mid-range, didn't seem to get much traction. Back in Feb 2014 when Mr X broached the idea Don Hills in post 1308 suggested "If building from scratch, just make it a bit bigger. Maintain the same path lengths, and make the central chamber larger diameter."
No one seemed to think it a bad idea…
So first step was to print out a tiled 50 x 50cm version of the standard Cornucopya spiral PDF (using “Foxit Reader” which offers a zoom and tile feature, a zoom factor of 2.857 gave me a 50cm spiral where each grid square was 7x7mm).
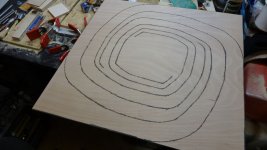
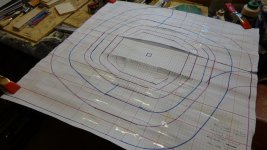
This set of tiles was then glued together then cut into four quarters. A second print of the tiles was then cut up to provide clean-ish 150mm segments to glue in between and under the quarters to extend the spiral by 100mm to 60 x 60cm (the 150mm gives some glue overlap). The middle was filled in with a blank paper and the grid pencilled in. The spirals were then joined up with straight lines to produce the spiral in the attached image.
A quick count-of-squares gave a cavity volume increase from 617,400 cubic-mm to 2,853,750 cubic-mm, which with a nominal throat area of 15 x 70 x 2 or 2100 sq-mm drops the horn cut off from approx. 186hz to approx. 40hz – a factor of 4.6.
So far on target. A side issue is that the horn lengths increase from approx 153 / 110 cm to 231 / 180 cm. We will have to see what effect that has.
I used the awl to transfer the print out curves to the 3mm ply backs and drew in the curves with a marker pen to smooth things out a bit. Amazon provided some A3 5mm foam board (we are still in lock down here so getting supplies is “interesting”).
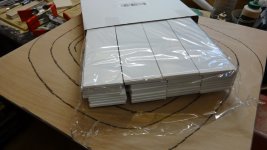
Half way through making a craft knife cutting jig I got bored and tried cutting a spare piece of the foam board on my table saw – it’s got a 48 tpi carbide blade, and surprise, surprise it cut perfectly, so the cutting jig went back on the wood pile and all the foam board was cut on the saw, much faster and seems pretty accurate and clean (see pic where the strips are back in the carton for storage).
Next out with the glue gun… Pre-bending was accomplished just by folding the strips over the corner of the desk in my workshop (bend with palm of hand, move strip forward a bit, bend, etc. etc.) It seems to have allowed me to follow the curves Ok and as there are no cuts through the paper it could/ should be stronger. The picture shows the initial curves around the cavity for comparison against standard builds. Foam is glue-gunned down then the joints are sealed with a “no-more-nails” type adhesive.
The first box is just about ready to have the stuffing added and the top glued on. For stuffing I have acquired some sheep’s wool (it was the insulation wrapped around a delivery of some fresh-on-ice seafood from Cornwall – The wool sealed inside plastic covers so it should just smell of sheep not fish – finally the eco movement comes up trumps, and the seafood was delicious!).
That’s progress so far, its slow but I too have a better-half with a long wish list to keep happy along with regular visits from the grand-children adding disruption, so shop time is limited.
At least it’s been fun so far.
Thanks for all the advice here.
DonJ
The starting point was – Thinking about various improvements mentioned in past 2797 posts... One, on increasing cavity area to improve mid-range, didn't seem to get much traction. Back in Feb 2014 when Mr X broached the idea Don Hills in post 1308 suggested "If building from scratch, just make it a bit bigger. Maintain the same path lengths, and make the central chamber larger diameter."
No one seemed to think it a bad idea…
So first step was to print out a tiled 50 x 50cm version of the standard Cornucopya spiral PDF (using “Foxit Reader” which offers a zoom and tile feature, a zoom factor of 2.857 gave me a 50cm spiral where each grid square was 7x7mm).
This set of tiles was then glued together then cut into four quarters. A second print of the tiles was then cut up to provide clean-ish 150mm segments to glue in between and under the quarters to extend the spiral by 100mm to 60 x 60cm (the 150mm gives some glue overlap). The middle was filled in with a blank paper and the grid pencilled in. The spirals were then joined up with straight lines to produce the spiral in the attached image.
A quick count-of-squares gave a cavity volume increase from 617,400 cubic-mm to 2,853,750 cubic-mm, which with a nominal throat area of 15 x 70 x 2 or 2100 sq-mm drops the horn cut off from approx. 186hz to approx. 40hz – a factor of 4.6.
So far on target. A side issue is that the horn lengths increase from approx 153 / 110 cm to 231 / 180 cm. We will have to see what effect that has.
I used the awl to transfer the print out curves to the 3mm ply backs and drew in the curves with a marker pen to smooth things out a bit. Amazon provided some A3 5mm foam board (we are still in lock down here so getting supplies is “interesting”).
Half way through making a craft knife cutting jig I got bored and tried cutting a spare piece of the foam board on my table saw – it’s got a 48 tpi carbide blade, and surprise, surprise it cut perfectly, so the cutting jig went back on the wood pile and all the foam board was cut on the saw, much faster and seems pretty accurate and clean (see pic where the strips are back in the carton for storage).
Next out with the glue gun… Pre-bending was accomplished just by folding the strips over the corner of the desk in my workshop (bend with palm of hand, move strip forward a bit, bend, etc. etc.) It seems to have allowed me to follow the curves Ok and as there are no cuts through the paper it could/ should be stronger. The picture shows the initial curves around the cavity for comparison against standard builds. Foam is glue-gunned down then the joints are sealed with a “no-more-nails” type adhesive.
The first box is just about ready to have the stuffing added and the top glued on. For stuffing I have acquired some sheep’s wool (it was the insulation wrapped around a delivery of some fresh-on-ice seafood from Cornwall – The wool sealed inside plastic covers so it should just smell of sheep not fish – finally the eco movement comes up trumps, and the seafood was delicious!).
That’s progress so far, its slow but I too have a better-half with a long wish list to keep happy along with regular visits from the grand-children adding disruption, so shop time is limited.
At least it’s been fun so far.
Thanks for all the advice here.
DonJ
Attachments
Ok, so sorry, progress is very slow, the list of "Other" jobs has grown substantially as we have decided to move house and are knocking our current dwelling into saleable shape...
However...
speaker two now has its lid - glue is drying...
So some pictures.
1. Speaker two went together much faster than number one, practice does make... (oh sh*t) imperfect.
2. The speakers holes were reinforced with some spare 12mm ply
3. Those Vifa's look very small....
4. Glued the tops on with solvent free Grip-stick stuff a big thick bead on all surfaces but after drying not much sign of squeeze out - wonder where it all went? - paint pots, etc seemed a good source of weight to "clamp" the tops down. The scotch cans sadly now only contain nails..
5 Argh.. A disaster... string in horns seems to have too much friction - plus that small speaker hole - proved impossible to feed the wool stuffing (encased in knee high tights) into the throats. Ended up with string cutting through foamboard and also breaking the glue on the entrance strip. Solution - cut out a (much) bigger hole to access and fix glue and build a support ring to eventually accept the bit cut out and the speaker. This picture show the ring being glued in.
First speaker has large hole on front as all sorts or wiring and stuffing already installed. second speaker will have hole in back (preferred) as it was still open and wiring etc, could be removed easily.
So next step is to add stuffing connect it up and see what its like.. then amend stuffing etc etc...
Could take a while as, in addition to house stuff, Granddaughter has decided I have to engineer/make a "Princess Fairy Castle Birthday cake" with/for her. Twin towers, flags, figures, flowers growing all over, the works..
And you thought Cornu's were challenging..
Ain't this fun...
Don J
So, finally some sounds to report:
So I stuffed speaker-1 quite heavily with around 12 inches of ~10mm thick sheep's wool matt inside a "knee high tight" in each horn throat, two layers of 20mm thick sheep's wool mat on the bottom of the cavity and three layers of 20mm thick sheep's wool mat around the sides of the cavity.
Speaker - 2 was left unstuffed but closed up.
First impressions were that speaker-1 was very muffled and not much deep bass and not much coming out of the horn mouths. Speaker-2 was very tinny sounding with a wider range sound coming from the horn mouths. between them it was not a great sound.
Speaker-2 was then stuffed with around 12 inches of teased out wool in tights in each throat and a single layer of 20mm of wool mat in the cavity bottom and a single layer around the side of the cavity.
The sound from speaker-2 now improved considerably with a reduction in the high frequencies and a more measured bass from the horn mouths.
I then removed most of the cavity stuffing from speaker-1 leaving one 20mm layer of wool mat in the bottom and one around the sides of the cavity.
Speaker-1 now opened up and began to sound much closer to speaker-2.
My idea now is to let the speakers burn in for a while and see what happens. Then maybe try some more changes to the stuffing.
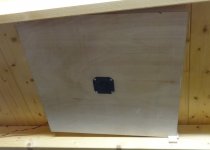
Attached is a picture of speaker-2 in its temporary home up in the roof of the workshop/shed Speaker-1 is on the other side of the ridge in the same place as there is not a lot of wall space in the shed.
Also for those interested is a picture of "The Fairy Princess Castle" cake, duly made, decorated, pronounced wow! by Princess and consumed (that's a full size bubbly bottle for scale) the thing weighed in about 6kg and the decoration went all the way round.
Any hints on how to measure the speaker performance would be welcomed.
(For comparison, main system is vintage meridian M2's, bedroom set are B&W bookshelfs, HT set are wharfdale diamonds all round, Office PC drives Soundcakes.)
Thanks for all the inspiration
DonJ
So I stuffed speaker-1 quite heavily with around 12 inches of ~10mm thick sheep's wool matt inside a "knee high tight" in each horn throat, two layers of 20mm thick sheep's wool mat on the bottom of the cavity and three layers of 20mm thick sheep's wool mat around the sides of the cavity.
Speaker - 2 was left unstuffed but closed up.
First impressions were that speaker-1 was very muffled and not much deep bass and not much coming out of the horn mouths. Speaker-2 was very tinny sounding with a wider range sound coming from the horn mouths. between them it was not a great sound.
Speaker-2 was then stuffed with around 12 inches of teased out wool in tights in each throat and a single layer of 20mm of wool mat in the cavity bottom and a single layer around the side of the cavity.
The sound from speaker-2 now improved considerably with a reduction in the high frequencies and a more measured bass from the horn mouths.
I then removed most of the cavity stuffing from speaker-1 leaving one 20mm layer of wool mat in the bottom and one around the sides of the cavity.
Speaker-1 now opened up and began to sound much closer to speaker-2.
My idea now is to let the speakers burn in for a while and see what happens. Then maybe try some more changes to the stuffing.
Attached is a picture of speaker-2 in its temporary home up in the roof of the workshop/shed Speaker-1 is on the other side of the ridge in the same place as there is not a lot of wall space in the shed.
Also for those interested is a picture of "The Fairy Princess Castle" cake, duly made, decorated, pronounced wow! by Princess and consumed (that's a full size bubbly bottle for scale) the thing weighed in about 6kg and the decoration went all the way round.
Any hints on how to measure the speaker performance would be welcomed.
(For comparison, main system is vintage meridian M2's, bedroom set are B&W bookshelfs, HT set are wharfdale diamonds all round, Office PC drives Soundcakes.)
Thanks for all the inspiration
DonJ
Attachments

A speaker builder and pastry chef! ")
Regarding stuffing. You have to adjust it but generally not too tight or nothing comes out in terms of bass as you see. The horn is an aero acoustic waveguide and tight stuffing stops the sound wave from establishing itself in the horn. Very loosely stuffed teased out stuffing along first third of the horn if needed. Some stuffing in the rear chamber. Piece of felt or melamine foam on back wall of rear chamber. That should do it.
This horn doesn’t measure well. Most BLH’s don’t measure well in general. They do have e prodigious bass though given the expansion ratio.
Use a calibrated mic (UMIK-1 is good) as REW software if you are curious. Your smart phone may have an app that does rough measurements (not calibrated) and not usable in a speaker simulator.
DonJKaos said
Most impressive. And I too always like to include a bottle of something for, um, scale,
Also for those interested is a picture of "The Fairy Princess Castle" cake, duly made, decorated, pronounced wow! by Princess and consumed (that's a full size bubbly bottle for scale) the thing weighed in about 6kg and the decoration went all the way round.
Most impressive. And I too always like to include a bottle of something for, um, scale,
- Home
- Loudspeakers
- Full Range
- Ever think of building a Cornu Spiral horn? Now you can!