I just finished a pair of Mar-Ken7.3 cabinets and I must say that I really like the sound so far.
It is very clear and precise at the suggested low levels, just what I am after with the music I mainly play (classical guitar etc). The bass in somewhat less than my jr149 speakers and not as warm, but I guess it is too early to compare. I do already prefer the clarity of the MA7.3.
My only question with these cabinets is, why is the vent to the rear and not the front. I almost prefer the sound of these speakers from behind. Just a newby question, sorry in advance. Maybe I need to play with room placement some more. Currently I am just playing them in.
Jeremy
I just finished a pair of Mar-Ken7.3 cabinets and I must say that I really like the sound so far.
It is very clear and precise at the suggested low levels, just what I am after with the music I mainly play (classical guitar etc). The bass in somewhat less than my jr149 speakers and not as warm, but I guess it is too early to compare. I do already prefer the clarity of the MA7.3.
My only question with these cabinets is, why is the vent to the rear and not the front. I almost prefer the sound of these speakers from behind. Just a newby question, sorry in advance. Maybe I need to play with room placement some more. Currently I am just playing them in.
Jeremy
I realize that Dave has drafted many more versions of "Ken" family than I've seen, or certainly built, but out of curiosity which design has vents to the rear?
As Zia has already suggested, run them in per Mark's recommendations hours before final assessment:
Small to medium sized speakers are usually lower power designs. The power rating is given in the technical data for each audio driver. For a reliable long service life, please operate your new speakers with care. For the first 100 hours, operate them at very low volumes. After this period, gradually increase the volume to a normal listening level. If you see the cone of the speakers making large movements, immediately turn the volume down. This will protect the speaker and your human hearing from damage. Factory mechanical defects for a period of 1 year.
Excessive hard use (over-driving) and other damage caused during customer use is excluded from our warranty.
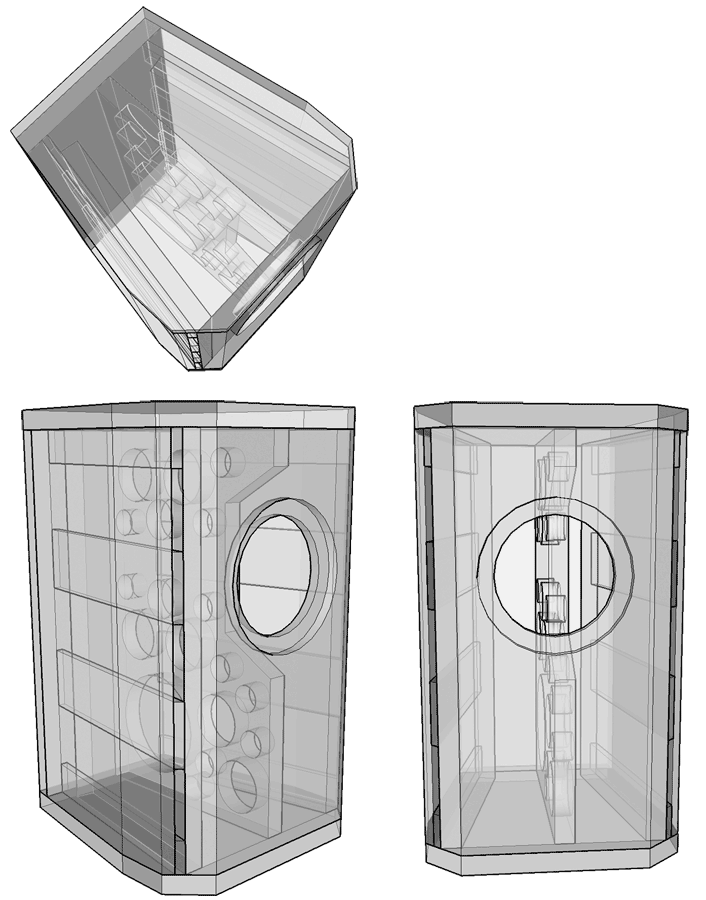
The only dMK7.3 that vents out the back is the narrow CGR, and they can be vented out the front, back, top or bottom. The current (free) drawing has 4 versions with wide vented out the side or front, and the narrow venting out the front or back.
THis drawing did go thu a significant number of revisions.
dave
THis drawing did go thu a significant number of revisions.
dave
I have only put <10 hours on the speakers so far.
The plan I have is the Slim classic GR dMar-Ken7.3 2v1 as pictured below. Is this not the best design for these speakers?
The plan I have is the Slim classic GR dMar-Ken7.3 2v1 as pictured below. Is this not the best design for these speakers?
An externally hosted image should be here but it was not working when we last tested it.
Last edited:
You have a lot of breakin to go.
That is 1 of the 4 CGRs in the free planset. Choice of wide or narrow and where the vent goes are both aesthetic & room related. The harder to build rectangular & trapezoidal enclosures in the paid planset have an edge -- same tuning but lower diffraction signature & with the trapezoid, the non-parallel sidewalls help with side-to-side standing waves. The CGRs will have a bit fatter bass because the vent is not as constricted.
dave
You have a lot of breakin to go.
That is 1 of the 4 CGRs in the free planset. Choice of wide or narrow and where the vent goes are both aesthetic & room related. The harder to build rectangular & trapezoidal enclosures in the paid planset have an edge -- same tuning but lower diffraction signature & with the trapezoid, the non-parallel sidewalls help with side-to-side standing waves. The CGRs will have a bit fatter bass because the vent is not as constricted.
An externally hosted image should be here but it was not working when we last tested it.
dave
the traps for any driver (ie Fostex FF125WK as well) would definitely be my choice sonically and aesthetically, but they're not the easiest of builds, particularly for a newbie.
Still enjoying listening to the CG dMar-Ken73 but I have a set of the trap plans now and today went and got the 18mm ply. The joints are not a problem, I make guitars for a living and there is not one square joint anywhere.
It will be interesting to compare the two designs side by side when I finish them.
One question, the rubber seal under the 7.3 (where they are screwed into the baffle), is it sufficient, it appears very thin and am I looking for a perfect seal at this point.
If I need to make the rebate with a perfect base then I will use something other than a router or at least finish the joint better.
Thanks
Last edited:
Still enjoying listening to the CG dMar-Ken73 but I have a set of the trap plans now and today went and got the 18mm ply. The joins are not a problem, I make guitars for a living and there is not one square joint in any of them.
It will be interesting to compare the two designs side by side.
One question, the rubber seal under the 7.3 (where they are screwed into the baffle), is is sufficient, it appears very thin and am I looking for a perfect seal at this point.
If I need to make the rebate with a perfect base then I will use something other than a router.
Thanks
FWIW, while the cutting is not easier, I like to inset the back panel and stop the beveled port spacer blocks short by that depth - I think it makes for a more reinforced joint.
Mark's integral super-gaskets are thicker than they first appear and are more than sufficient
How exactly would you cleanly mortise the rebate if not by hand-held router/ CNC? Clearly I'm spoiled by having access to the latter for most of my machining, but occasionally ( after hours or on weekends) I'll need to do one by hand. For those I use a router with large diameter top bearing mortising bit and MDF pattern. It takes longer to jig up and align/ clamp the pattern in place than it does to actually route the rebate.
Mark's integral super-gaskets are thicker than they first appear and are more than sufficient
If you have ever seen the back of a Mark Audio drier without the super-gasket, imagine an additional injection molding step that fills the web and leaves an external gasket. The 2 raised rings are the same concept as those used in the solid rocket boosters of the shuttle.
dave
If you have ever seen the back of a Mark Audio drier without the super-gasket, imagine an additional injection molding step that fills the web and leaves an external gasket.
in other words, thicker than they look
The 2 raised rings are the same concept as those used in the solid rocket boosters of the shuttle.
dave
post Challenger, that is
They worked well pre-Challenger too, they just didn't work well when they froze.
dave
not going to be an issue here I think - the Alpair's metal cones would probably run into grief under those conditions as well?
and yes, rather bad form to make jest by recalling the preventable tragedy
How exactly would you cleanly mortise the rebate if not by hand-held router/ CNC? Clearly I'm spoiled by having access to the latter for most of my machining, but occasionally ( after hours or on weekends) I'll need to do one by hand. For those I use a router with large diameter top bearing mortising bit and MDF pattern.
I have a circular plane that fits in a drill press. That would flatten the base after the router (15mm bit, but still does not leave a perfect surface). This plane would be difficult to control because the cutting bit also protrudes out from the edge and this would be a problem with chatter on the vertical surface.
I will probably just make a thick circular wooden disc that is a couple of mm less in diameter than the rebate I have already cut, stick sandpaper on the base of the disc, put a shaft in the middle and stick that in the drill press and lower it to sand the horizontal surface. If I start doing a lot of this I will go to the trouble of making an aluminum disc and velcro the sandpaper pads.
Jeremy
Last edited:
I have a circular plane that fits in a drill press. That would flatten the base after the router (15mm bit, but still does not leave a perfect surface). This plane would be difficult to control because the cutting bit also protrudes out from the edge and this would be a problem with chatter on the vertical surface.
I will probably just make a thick circular wooden disc that is a couple of mm less in diameter than the rebate I have already cut, stick sandpaper on the base of the disc, put a shaft in the middle and stick that in the drill press and lower it to sand the horizontal surface. If I start doing a lot of this I will go to the trouble of making an aluminum disc and velcro the sandpaper pads.
Jeremy
Franky it sounds like you're be making far too much work for yourself, with questionable benefit.
I've built dozens of pairs of enclosures for various MA drivers in plywood, and haven't had any issues with gaskets properly seating in rebates machined by hand held router with a mortising bit as described.
FWIW, I always do all the machining to driver baffles before final assembly, as the Alpairs in particular benefit from chamfering the rear side of through hole. If you cut the through hole first, then carefully install the driver, you can easily align a pattern template for the outer flange - I've even done that for Fostex pincushion flanges.
Of course a CNC can make pretty darn quick work of a perfect rebated cutout and pilot holes for mounting screws. The scalloped bevels to rear side of through hole can be a bit trickier depending on whether the CNC's vacuum hold down is a rail/ pod or full bed system - some aren't particularly well designed for machining both sides of smaller parts. It can take longer to fabricate a hold down jig than to just machine a few parts by hand . ... .
The reason I asked about the gasket and the need for a quality surface is that the first speaker I tried had a nasty high frequency buzz that was alleviated by loosening off the screws that held the speaker down. I have chamfered the rear of the hole behind the rebate. Maybe I screwed the speaker down too tight and squashed the gasket causing the frame to vibrate against the wood, who knows.
I don't have a cnc machine, I do all my work by hand. Making a jig the right size and gluing on some sandpaper and bolting on a central shaft is not a big job. It will not take more than half an hour and will ensure a smooth surface. I am just unsure of construction elements like the necessity for a good seal at this juncture.
Jeremy
The reason I asked about the gasket and the need for a quality surface is that the first speaker I tried had a nasty high frequency buzz that was alleviated by loosening off the screws that held the speaker down. I have chamfered the rear of the hole behind the rebate. Maybe I screwed the speaker down too tight and squashed the gasket causing the frame to vibrate against the wood, who knows.
I don't have a cnc machine, I do all my work by hand. Making a jig the right size and gluing on some sandpaper and bolting on a central shaft is not a big job. It will not take more than half an hour and will ensure a smooth surface. I am just unsure of construction elements like the necessity for a good seal at this juncture.
Jeremy
I don't always have access to the CNC myself (but after probably hundreds of pairs of enclosures over the past 20 years, I certainly try to take advantage of it)
all I'm trying to say is that if you are happy enough to make jigs for sanding etc, I'd be surprised if a sharp mortising bit and router wouldn't make for just as clean, much faster and repeatable a job of the rebates in question than sanding, but I certainly shouldn't second guess methods with which you're comfortable- so however you go about it, as long as the surface of the rebate is clean and smooth you should be fine
the composite resin frames of the the Alpairs are resilient (read 'flexible') enough that over/ unevenly tightening the mounting screws can certainly deform the basket frame and misalign the drive train - not a good thing - if you see the plastic flange bending it's time to back off
Chris, I would not use the sanding disc to create the rebate, I will continue to do that with the router. I just am not happy with the surface finish on the bottom and it is for that purpose that I would use the sanding disc. I cannot imagine the sanding disc actually taking more than 5 - 10 seconds at the most to "finish" the bottom surface. Sorry if I have misled you as to my intended usage.
Jeremy
Jeremy
Chris, I would not use the sanding disc to create the rebate, I will continue to do that with the router. I just am not happy with the surface finish on the bottom and it is for that purpose that I would use the sanding disc. I cannot imagine the sanding disc actually taking more than 5 - 10 seconds at the most to "finish" the bottom surface. Sorry if I have misled you as to my intended usage.
Jeremy
no worries - as noted in previously, my second-guessing your skills, methods or reasoning is pointless - it's the results that count.
- Status
- This old topic is closed. If you want to reopen this topic, contact a moderator using the "Report Post" button.
- Home
- Loudspeakers
- Full Range
- MA7.3 first impression