that... is beautiful...
if i like fh3 (which i'm sure i will) i can see myself going for the mtm version.
the mtm must've sounded amazing in the right setup.
no crossover changes required? if other mtm designs can be plugged into the canbinet with only damping material to adjust, this would open up so much possibilities for me.
Well, the MTM version took some special gyrations to get the tweeter installed at the vertical exact centre, as well as fit the XO, which IIRC was unchanged from Bob Reimer's kit.
The siamese FH3 was different from the Maeshowe / Valiant design in that the former consisted of an isolated line for each of two drivers with a separating bulkhead - wasn't originally intended as an MTM - while the latter was a bifurcated pair of lines sharing a central chamber for a single driver. Actually, Dr Scott might describe the Maeshowe differently.
The siamese FH3 was different from the Maeshowe / Valiant design in that the former consisted of an isolated line for each of two drivers with a separating bulkhead - wasn't originally intended as an MTM - while the latter was a bifurcated pair of lines sharing a central chamber for a single driver. Actually, Dr Scott might describe the Maeshowe differently.

wow, i am sold on fh design.
even from this noname driver im getting the best bass i've ever heard from my own creations- and i've made quite a few of them.
the bass is impossible to fault- it's pronounced like a br bass yet not boomy (i adjusted the stuffing to that effect, i like it a little pronounced, heh). it rolls off naturally like a tl bass but not 'slow'.
crisp, powerful and smooth, it really is amazing. and it can go loud enough to shake the walls without losing those qualities. wow...
the noname driver is really not bad but the high is etched and the sound has a shouty quality to it that carried over to the enclosure from when i noticed it comparing to vifa tc9fd freestanding them in open air. vifa was noticeably better sounding.
i'll let the nonames burn in for the weekend and take pics meanwhile.
i can't imagine how much better it would be with alpair but i'm already thinking of XL design or something for 8inchers.
how would i go about making the 8inch enclosure? get the XL plan and scale it?
scale XL to 8" driver? not really
try them with the Alpair10.3 or P - those work
if you really need a BLH / labyrinth for an 8" driver, take a look at the larger enclosures by the same designer - such as Avebury for the A12P
I hope I never hear or get commissioned to build a pair of those
try them with the Alpair10.3 or P - those work
if you really need a BLH / labyrinth for an 8" driver, take a look at the larger enclosures by the same designer - such as Avebury for the A12P
I hope I never hear or get commissioned to build a pair of those
haha no.. i can't build those.
my plan is to get an mt design and fit it into the xl or 8" enclosure- with the baffle probably popping out like a rabbit's ear supporting the tweeter while keeping the woofer where it needs to be, essentially turning the fh into an woofer enclosure.
if it was done with the mtm, i'm sure more great results can be had.
Hi
Just wanted to know if there is a FH design for 2x4" 4ohm drivers in one cabinet.Loose 8ohm drivers is quite expensive where I stay.Wanted to take Pioneer 4" dual cone speakers(2 per cabinet in series to get 8ohm).Average price of the 4" Pioneers are 12 to 15 dollars a pair.If my reasoning is right,two spkrs in series should be able to handle a little bit more power.
I have started reading the thread,but still a long way to go.If there is such a plan in the thread,I would appreciate it if someone can point me to it.
Regards
phunk
I'm not exactly sure what you're getting at, but suspect the answer would be - so far, no.
What drivers are you contemplating? Their size and T/S parameters would best determine the type of enclosure most suitable - rather than trying to shoehorn something you have available, or like the sound of from other systems, into an enclosure design you like.
What drivers are you contemplating? Their size and T/S parameters would best determine the type of enclosure most suitable - rather than trying to shoehorn something you have available, or like the sound of from other systems, into an enclosure design you like.
I use a Shanling MC30 - a 3 watt tube SET setup all in one. Considering that I had a low power tube amp I chose the Mark Audio Alpair 7p with the paper cone as the SPLs were slightly higher as against the 7.3s ( though unsure if the 87.5 db of the 7p is sufficient for my tubes...there seem to be so few builds with the 7p )
Build was with 17mm MDF. For the side padding I just used a thick cotton foot mat. Damping filling is currently optimised to 30 g at the back and 20 g in the front. More filling in the front really puts down the bass while taking them fully out seems to introduce a boom in some lower frequencies. Have them about 8 inches from the side walls and 15 inches from the rear in the room corner (11 x 15 ft) well toed in.
Its still got less than 100 h but I really love the sound signature. Its clean precise sounding and more importantly enjoyable sound quality. More importantly I feel that I can enjoy music even at lower volumes not missing out the important nuances. The bass does not hit in the chest - not sure if it is the low power amp or the speaker itself - however the lows are very clean and not overpowering (I have had this problem before with conventional speakers in my small room).
Dave and team - Many many thanks for this wonderful design. The build was most satisfying - now need to wait for the burn in to complete and worry on the finish for the FH3..
Attachments

If we want to make FH3 with a removable baffle so that if needed we may change the speaker drivers in future, which is recommended way to do it:
1. cut front baffle piece into 2 parts, bottom part fixed and have to top part removable and cut to fit a particular driver as shown below:
http://www.diyaudio.com/forums/full-range/172605-frugel-horn-mk3-72.html#post2766380
2. cut the from baffle with a hole at the top and over lap a piece having driver fitted on to it a
http://www.diyaudio.com/forums/full...k3-builds-build-questions-66.html#post3087469
Hi sarathssca,
My build featured a removal smaller baffle (supra-baffle) - the main front baffle had a cut-out around the driver area, and the removable baffle was fixed on the main baffle. The builder in the other post you linked went one step further and made a removable "top" also - which I am assuming is for accessing the stuffing from the top.
http://www.diyaudio.com/forums/full-range/172605-frugel-horn-mk3-72.html#post2766380
FWIW, I approached this by fabricating the front panel with a large rectangular opening, fitted with threaded insert fittings in the corners, and attached the removable driver mounting plates with machine thread screws. The driver plates were sealed with thin closed cell foam weatherstripping. I tried to come up with something that would sit the driver plate flush, but my limited pea-brain couldn't come up with an easy method that would allow for quick field changes that didn't require a redesign of the whole product.
Attached is a sketch from my flat pack kit files. We use a 5mm dado on the external panels, and 15mm material for the sides, hence the dimensions.
Attached is a sketch from my flat pack kit files. We use a 5mm dado on the external panels, and 15mm material for the sides, hence the dimensions.
Attachments
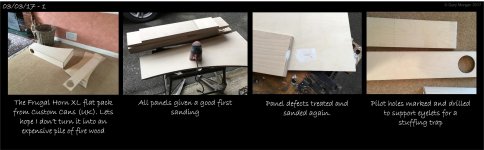
After lurking for a while I finally bit the bullet. On Friday I picked up my flat pack from Custom Cans.
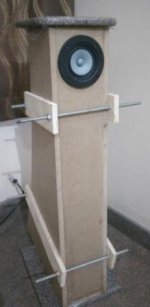
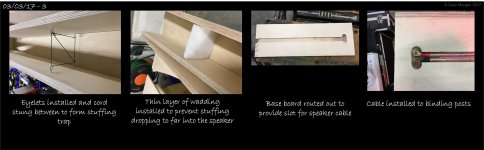
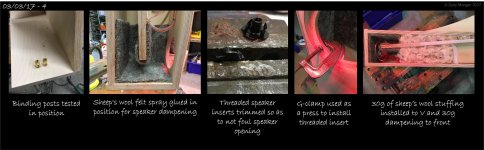
So I thought it time I ask my first stupid question... Speaker terminals. I'm not keen with the cable dropping down the back of the speaker given that it is a floor stander. I'm thinking of fitting a pair of binding posts on the deck behind the exit throat about 1 1/2 inches from the back. So they would be mounted vertically with the hardwired connections on the underside. The speaker cable would travel underneath the deck and then enter the cab and run up the inside. Foaming glue will be used at the entry point to ensure it is all sealed.
Will the terminals affect the port in anyway?
As there was no answer I bit the bullet and deceided to mount the speaker binding posts on the base plate.
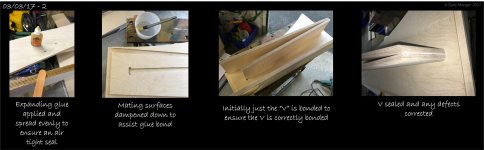
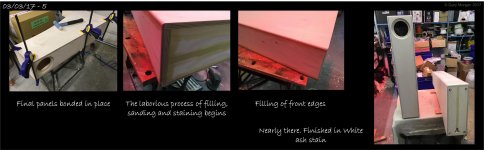
I have storyboarded my build so far. I wanted the natural look but also wanted the ply to appear whiter so opted for a white ash stain. This mean't loads of coats, sanding back and coating again.
Just need to finish that and the speakers can be installed.
I have storyboarded my build so far. I wanted the natural look but also wanted the ply to appear whiter so opted for a white ash stain. This mean't loads of coats, sanding back and coating again.
Just need to finish that and the speakers can be installed.
Attachments
-
 Gary Morgans Frugal Horn Build - Storyboard 1.jpg296.7 KB · Views: 463
 -
 Gary Morgans Frugal Horn Build - Storyboard 2.jpg253.9 KB · Views: 452
 -
 Gary Morgans Frugal Horn Build - Storyboard 3.jpg240 KB · Views: 443
 -
 Gary Morgans Frugal Horn Build - Storyboard 4.jpg327.5 KB · Views: 246
 -
 Gary Morgans Frugal Horn Build - Storyboard 5.jpg272 KB · Views: 266
- Home
- Loudspeakers
- Full Range
- Frugel-Horn Mk3 Builds & Build Questions