I'll have to try pointing them straight out. Right now they point in towards me and I find that I can't move around without losing the balance between L & R. I've heard the expression "head in a vice" to describe this and now I know what they're talking about.
My main speakers have ScanSpeak 9500 tweeters which are wide dispersion and I have no problem with imaging.
My main speakers have ScanSpeak 9500 tweeters which are wide dispersion and I have no problem with imaging.
Last edited:
try toeing the hell out of them so they cross well in front of you.
Hmm, for a first [and usually 'close enough'] well proven way for rising on axis [RoX] speakers is to aim the LH speaker at the far RH listening position [LP] and vice versa. Toeing more in/out from this point is a function of how much perceived treble boost ['hot'] the speaker sounds.
Historically, toeing speakers out was for filling large rooms, but the trade-off is the need for a proportionately longer LP to keep from having a 'hole in the middle' of the sound-stage without a CC.
Many of today's recordings [or at least many of the CDs I've had the misfortune to audition/own] are overly 'hot'/'forward', apparently to have high vocals intelligibility in mobile audio/ear bud apps, so combined with a typical RoX speaker, toeing them 'dead ahead'-to-out can help more overall than using excessive over-toeing' at the LP 'sweet spot'.
FWIW, the last pair of MLTL speakers I built were ultimately mounted to some cheap, mass loaded, plastic turntables to allow the owner to adjust as required due to his heavily compromised hearing that was compounded by the very acoustically poor speaker/LP layout choices typical of apartment living. This tweak of course has also allowed him to quickly optimize positioning when moving from place to place.
GM
My Frugels
Hi,
I've made through all the posts. My Alpair 7.3 are breaking in to Jacinth Autumn Leaves down in the TV room. I built my Frugelhorn Mk3 with 3/4 cabinet grade. I'm waiting on some binding posts from Madisound. I have 30 grams in the pointy side stuffed more dense towards the point. The area around the driver is lined with 1/2 inch wool felt. I am very excited about this build. There's are the forth pair of speakers I have made. I will try to post some pictures. I tend to cut the sides a bit over sized then trim them with a router. I have some nice African Ribbon Mahogany veneer. Or I might try to do a black piano paint job. Many thanks to all who have contributed to this great project!
Attachments
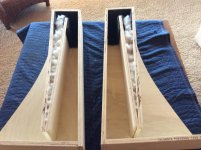
I was doing the final steps today on my cabs, sealing with silicone, sanding out some rough spots, and fitting the bottom when I decided to measure the throat. It came out at 1 1/4" instead of the 1 1/2 in the plans. Will this matter? Since the bottom isn't glued on yet I could lower it by the 1/4 inch so it would not be flush, and then fill in the gap. I could also try to sand the roundover down by 1/4 inch, but it is solid oak and would take forever.
Both of these options are a PITA, but I'd do one if the wisdom is to keep that dimension as spec'ed.
Both of these options are a PITA, but I'd do one if the wisdom is to keep that dimension as spec'ed.
I was doing the final steps today on my cabs, sealing with silicone, sanding out some rough spots, and fitting the bottom when I decided to measure the throat. It came out at 1 1/4" instead of the 1 1/2 in the plans. Will this matter? Since the bottom isn't glued on yet I could lower it by the 1/4 inch so it would not be flush, and then fill in the gap. I could also try to sand the roundover down by 1/4 inch, but it is solid oak and would take forever.
Both of these options are a PITA, but I'd do one if the wisdom is to keep that dimension as spec'ed.
Have you measured the 2 internal boards and the side panels? It would be nice to know where the problem lies. Not that I'm anything but a beginner though.
I think the discrepency is from the quarter round at the bottom. It is 3/4 inch and not the 5/8 that I wanted. I didn't compensate I guess.
Well, I would do whatever makes all the measurements correct. What ever that takes (within reason, of course). I seem to recall that the distance between the bottom and inside baffles was very important .
I've decided I'm going to mount the bottom so that the measurement is correct. I'll decide from there if I want to fill the gap. The top of that same box is also off, by about 3/16ths. So I must have put the rear baffle slightly too low. Overall the dimensions will work out. The other box came out right. I'll decide when I'm doing the remaining cosmetic work whether I want to fill the gap. Because the top cap is lower I can flush cut the sides and front baffle to wherever I put the top, and I was planning on doing that anyway to cover the edges.
Mine are built from pre-finished wood flooring, and the problem with working that is you are scratching it up as you work, you won't be sanding it down, and you won't put veneer over it. Every little mistake shows. Every slightly uneven joint shows. The good part is once I've put it together I'm done. The only finish work is put some floor wax on.") I spent more time doing the veneer on my prior pair than building the cabinets and the crossovers.
I spent more time doing the veneer on my prior pair than building the cabinets and the crossovers.
My next box is going to have all straight pieces, no curves, no angles, no roundovers, and be made of regular ply.
Mine are built from pre-finished wood flooring, and the problem with working that is you are scratching it up as you work, you won't be sanding it down, and you won't put veneer over it. Every little mistake shows. Every slightly uneven joint shows. The good part is once I've put it together I'm done. The only finish work is put some floor wax on.
I spent more time doing the veneer on my prior pair than building the cabinets and the crossovers.My next box is going to have all straight pieces, no curves, no angles, no roundovers, and be made of regular ply.
Last edited:
Haven't reverse engineered this alignment, but the reduced horn vent area/'faster' flare you've created will just lower tuning a bit and/or reduced the amount of stuffing required, which when combined with the room's acoustic impact on performance may be moot or for the better overall, though no way to know for sure of course, but I recommend Scott/whoever sim it before deciding what to do.
GM
GM
I had a very hard time building my FH3, because I did it by hand with no angular capable tools.My next box is going to have all straight pieces, no curves, no angles, no roundovers, and be made of regular ply.
At the end, it's a stunning enclosure, small to the eye, cool, and with that slope really beautiful.
Maybe a pensil would have been the correct choice for me, but after the effort I think it really pays off.
I at least have a compound miter saw for the angles. Plus the flooring is only 8" wide and I could cut the planks at the angles and then Piece it together. That, a router, a circular saw, and a jig saw were what I have so maybe more than a few hand tools. I did use these things to put the floor in after all.
I'll have a check. It shouldn't be a heartbreaking difference, but it will change things slightly.
Probably more important that both speakers are the same.
dave
- Home
- Loudspeakers
- Full Range
- Frugel-Horn Mk3 Builds & Build Questions