chris - the side panels for the FH3 are large enough to require substantial layup of solid, which would take a lot of time, space and raw materials.
I've made a few projects with solid wood - end tables, turntable plinths, amplfier bases, etc, but never a loudspeaker enclosure, so we can leave it to those who have to suggest methodologies, time frame and perhaps even species selection.
Frankly, I'd stick with plywood - lots of folks have painted them. I prefer paper backed veneer, which isn't really all that difficult to apply and trim, but of course the shape of this particular design does present some issues with layout and grain matching. Now, if you want something a bit more exotic looking that could look stunning with minimal finishing, try 3/4" laminated bamboo plywood. That's a material I've used quite a bit as well, but so far not for a pair of FH3
Is it true then that Colin is not producing any more? I have tried messaging him, but no response as yet.
Where did you source your Alpairs from, as of now there is no UK dealer?
How do you intended to finish your speakers? ...
At the time when Colin delivered the FH3 kit to me he was very busy with a new work contract, and said they were the last ones he was making. Apart from work, he sounded busy with other speaker projects...
I sourced the 7.3's from Strassacker in Germany. Unit price rice was slighlty higher than Madisound in America, but cheaper shipping and no import duty brought the overall price down
")
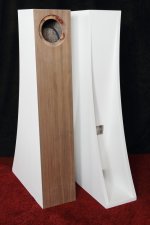
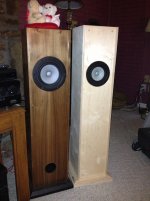
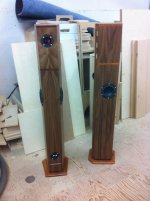
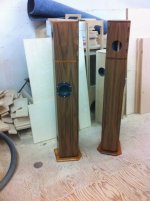
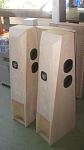
Finish wise, I've used an American Black Walnut paper backed veneer just on the fronts, and painted the rest white. Applying the veneer was straightforward enough with some handy hints from Colin. The painting has been a pain in the butt... paint, leave to dry, sand & re-paint etc. Applied four or five coats now just about ready for the top lacquer coating.
I hunted You Tube for finishing tips, just a shame that nearly every product used isn't available in the UK. I originally wanted to do a series of stains on the BB, but didn't have the guts to proceed... Something like they do with guitar bodies.
There's a chap listed on e-bay [UK] who supplies BB plywood, a 4' x 8' [1220mm x 2440mm x 18mm] sheet is £72.31... not contacted him yet regarding his cutting service, but want to see if he can do the basic panels for some 10-P Pensil's.
If you can find some one to help, or get the time/patience for the build. I think the FH3 are worth it.
Paul
Last edited:
Hi Jim, nice report on your build. I didn't have the confidence to do the cutting myself, curves aren't to much of a problem but I find straight lines near impossible to do
Mine are nearly there, a bit of a touch up on one side where I rubbed the paint a little thin, then on with the acrylic lacquer... The edges between the paint and veneer aren't quite as crisp as they could be, and I'm reluctant to sand down to much. 98% happy with the finish so far though
Mine are nearly there, a bit of a touch up on one side where I rubbed the paint a little thin, then on with the acrylic lacquer... The edges between the paint and veneer aren't quite as crisp as they could be, and I'm reluctant to sand down to much. 98% happy with the finish so far though
Attachments
Build me something, the finish looks nice, is the paint veneer combo a style choice or for practical reasons?
What veneer tips did you get from Colin?
I had a trawl through local timber web sites last night, widths over 150mm are hard to come by in solid hardwood, and get expensive. There is almost nothing wide enough to do the sides of a frugel horn. So whilst a pencil can be done in solid wood, I think an fh must be some engineered wood. Bamboo had occurred to me as I nearly bought some bamboo flooring last year. It is very tough, cheap, and attractive. I will have a look to see if it comes in large sheets. The best stuff is where the fibres are woven, rather than laminated together. A kit in bb is still the most practical for me though at the moment. If I can sort the baffling speaker rebate problem.
chris - side panels in solid wood for something like the FH would need to be glued up as if for a table top - certainly doable, and with the right selection of species, not necessarily killer expensive, but very time consuming and the final result would need to be dead flat.
Re bamboo - or any type of "engineered / laminated" (non solid) flooring - these vary hugely in types and thicknesses of materials used as substrates, and are often thinner than I'd consider suitable for sturdy construction. The bamboo plywood that I've personally used numerous times is 3/4" 3 ply, stave core. Much more expensive than even the highest grade of "baltic birch" style plywoods, and more fiddlier to work with - high glue content, requires very sharp tooling for clean cuts, and wears them faster than ply or many solids. With the woven / strand varieties, you also want to spend some time laying out for grain matching / wrapping.
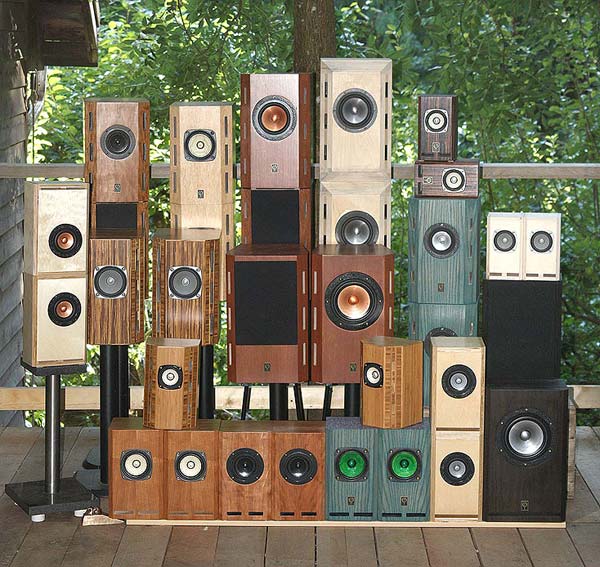
But as you can see from a couple of the enclosures in this family portrait, you can achieve very attractive results.
Re bamboo - or any type of "engineered / laminated" (non solid) flooring - these vary hugely in types and thicknesses of materials used as substrates, and are often thinner than I'd consider suitable for sturdy construction. The bamboo plywood that I've personally used numerous times is 3/4" 3 ply, stave core. Much more expensive than even the highest grade of "baltic birch" style plywoods, and more fiddlier to work with - high glue content, requires very sharp tooling for clean cuts, and wears them faster than ply or many solids. With the woven / strand varieties, you also want to spend some time laying out for grain matching / wrapping.
But as you can see from a couple of the enclosures in this family portrait, you can achieve very attractive results.
Veneer/paint combo was an aesthetical choice more than a practical one. Colin said I might want to try vinyl veneer/wrap, as it'd be easier than painting or wood veneer.
Nantwich Veneers was recommended and not far from me, though I used e-bay in the end...
Err, general tips were; use paper baked wood veneer, contact adhesive [horrible stuff], use pieces of dowel or thin wood strips between panel surface & veneer while working/pressing the two together. For pressing the veneer flat & removing air bubbles, use something with a flat straight edge that will allow you to apply pressure but wont deform or dig into the veneer. Start at one end, move/remove the wood/dowel as you work along the surface, flattening & removing air bubbles as you go... let it dry, trim back, then move onto the next side.
Can't remember it, but iirc there's a specific order you apply veneer to the speaker cabinet for best results!?
Smith & Fong PlybooStrand is a 19mm 3-ply bamboo plywood available in the UK, comes in 1219mm x 1828mm sheets. I like the Neopolitan finish
Re veneering sequence - after letting the particular sheet of veneer "whisper in my ear" to determine layout pattern dependent on figuring and grain, I like to layout full size and mark each piece with matching ticks in pencil.
One of the downsides to the FH3, FH-XL and the taller Woden Monoliths, is that the curved shape of side panels kinda wastes a bit of material - c-est la vie! The photo below is Cal Weldon's pair of FH3 in book flat sliced Oak - not a particularly highly figured sheet as it turned out, but I tend to want to center any figuring in the center of fronts and rectangular side panels.
To maintain a consistent edge reveal around the perimeter, I like to apply the back and fronts first, then the sides, and tops / bottoms last. In more rectilinear enclosures such as the Pensils, small stand mounters, etc, its possible to wrap a single piece around the front and sides in a single piece - particularly if the long egdes have a large radius or chamfers. It depends on how you like to match the grain pattern around the box. I generally like to wrap the sides / tops / bottoms continuously, but there is no "right" way AFAIC.
Re the Neopolitan stranded Bamboo - yes that's quite warm and lustrous with an oil or my preference, matte sheen (15-20%) nitrocellulose lacquer. The second pair from the left in second row with FF125WKs are finished that way.
to determine layout pattern dependent on figuring and grain, I like to layout full size and mark each piece with matching ticks in pencil. One of the downsides to the FH3, FH-XL and the taller Woden Monoliths, is that the curved shape of side panels kinda wastes a bit of material - c-est la vie! The photo below is Cal Weldon's pair of FH3 in book flat sliced Oak - not a particularly highly figured sheet as it turned out, but I tend to want to center any figuring in the center of fronts and rectangular side panels.
To maintain a consistent edge reveal around the perimeter, I like to apply the back and fronts first, then the sides, and tops / bottoms last. In more rectilinear enclosures such as the Pensils, small stand mounters, etc, its possible to wrap a single piece around the front and sides in a single piece - particularly if the long egdes have a large radius or chamfers. It depends on how you like to match the grain pattern around the box. I generally like to wrap the sides / tops / bottoms continuously, but there is no "right" way AFAIC.
Re the Neopolitan stranded Bamboo - yes that's quite warm and lustrous with an oil or my preference, matte sheen (15-20%) nitrocellulose lacquer. The second pair from the left in second row with FF125WKs are finished that way.
Attachments
I couldn't control myself....
Here's an example of centering the book lines as ChrisB suggests. I don't have a picture of both cabinets together, but the other cabinet has the adjacent book on it, so the two cabinets are nearly identical. Looks great, but can waste a lot of rather expensive material. BTW, that's flat cut walnut.
The finished cabinet has an A12P, the naked cabinet has the A10P.
Bob
Attachments
even more fun to wrap the figuring around 2 separate stacked trapezoid shaped boxes - fortunately they were small enough to yield from a single sheet of veneer
starting to quite like the walnut over the cherry
yes, we did replace the screws with black
starting to quite like the walnut over the cherry
yes, we did replace the screws with black
Attachments
even more fun to wrap the figuring around 2 separate stacked trapezoid shaped boxes - fortunately they were small enough to yield from a single sheet of veneer
starting to quite like the walnut over the cherry
yes, we did replace the screws with black
Chris,
The Walnut looks VERY nice with beautiful figuring in the grain!
Looks like you have a Cherry base on these?
I am just starting a FH build, I think Dave should be sending out a pair of Alpair 7.3s in the next day or so, hopefully I will have all my 18mm BB cut by the time the drivers arrive.
A couple questions on finishing...
1) What do you recommend for a first time veneerer, Contact Cement or Gue and Iron?
2) What veneer, is paper backed the way to go?
3) I like the colour on the above Walnut, what did you use... stain, oil, wax, varnish?
Thanks in advance,
Tom
Pssst Chris, You did a great job bookmatching mine. They look really sharp.Re veneering sequence - after letting the particular sheet of veneer "whisper in my ear"
Veneering is something I have very little experience with so I was very glad Chris was able to do mine. He really does have a fine touch and these are for my bedroom, aka SWMBO's palace so they had to be top notch.The photo below is Cal Weldon's pair of FH3 in book flat sliced Oak
bases and caps on the walnut towers and separate microFonkens are Jatoba
the finish is 3 coats of sprayed 15 degree sheen nitro-cellulose lacquer ( M L Campell HP WW to be specific), hand sanded between each coat.
for veneering, I'd recommend the iron-on glue method - contact is instant, and doesn't allow for fine alignment / centering of grain patterns as you wrap around the box - in some of the trapezoid shapes, there are at least 8 - the Facets will be really fun to veneer or clad with cedar
I like the thin paper backed - it's easy to cut rough oversize pieces with sharp regular shop scissors, and trimming out around recessed driver cut-outs, terminal cups , vents, etc is much easier than phenolic or 2-ply wood backed sheets - with some practice you can use the sharpened nose of clothes iron to make the rough cutouts of larger driver openings
Thanks chris,
OK then, I will try the Glue and Iron method.
When I pick up my BB tomorrow morning I will peruse the veneer selection at Exotic Woods in Burlington, Ontario...they had a nice selection the last time I was there.
I am still not sure what species and cut I will go for, I was leaning toward Cherry until I saw the beautiful Walnut on those towers of yours.
For finishing, I don't have the spray equipment to do a nice job so I am thinking a wipe on finish, maybe something like a Watco oil.
I've found that the walnut looks gorgeous without need for any additional color / stain - note that unlike polyurethanes, a true NC lacquer will impart a light amber to the raw wood / veneer.
There are some very nice aerosol spray real lacquers, but it'd probably take several cans worth for the 3 coats required on the FH3 - in fact could end up costing as much as the veneer. The lacquer we use in our shop is approx $35 / gallon, and it takes usually about 1 qt for a pair this size.
Lots of options for non lacquer finishes - Danish Oil, Tung Oil, finishing waxes etc, I'd personally avoid the clear polys - the wipe-ons are easy enough to apply and fairly durable, but every time I've used them they look like exactly what they are - plastic.
The worst looking finish I can ever remember on a commercial speaker was AudioNote E (some special version with silver wired voice coils & outboard copper and oil film caps, blah, blah) - gorgeous exotic veneers ( birds eye maple in this case), ruined with clear urethane finish thick enough that it looked like it was dipped in a vat of varathane. It must have taken a lot of very careful application to achieve those results.
rant off
There are some very nice aerosol spray real lacquers, but it'd probably take several cans worth for the 3 coats required on the FH3 - in fact could end up costing as much as the veneer
. The lacquer we use in our shop is approx $35 / gallon, and it takes usually about 1 qt for a pair this size. Lots of options for non lacquer finishes - Danish Oil, Tung Oil, finishing waxes etc, I'd personally avoid the clear polys - the wipe-ons are easy enough to apply and fairly durable, but every time I've used them they look like exactly what they are - plastic.
The worst looking finish I can ever remember on a commercial speaker was AudioNote E (some special version with silver wired voice coils & outboard copper and oil film caps, blah, blah) - gorgeous exotic veneers ( birds eye maple in this case), ruined with clear urethane finish thick enough that it looked like it was dipped in a vat of varathane. It must have taken a lot of very careful application to achieve those results.
rant off
I'm going to try the iron-on glue method on my next speaker project. Using contact cement/glue worked well but I got it everywhere so wouldn't to confident doing more than one panel for fear of making a real mess.
Chrisb; do you use aerosol cans of NC lacquer or lucky enough to have a spray-gun & booth? I'm currently hand brushing on acrylic lacquer so it wont attack the base paint used & keeps the fumes down.
My FH3's should be ready to rock this time next week
Chrisb; do you use aerosol cans of NC lacquer or lucky enough to have a spray-gun & booth? I'm currently hand brushing on acrylic lacquer so it wont attack the base paint used & keeps the fumes down.
My FH3's should be ready to rock this time next week
Last edited:
- Home
- Loudspeakers
- Full Range
- Frugel-Horn Mk3