Not having to worry about ever seeing a CNC machine, I use the direct approach. I have THIS circle jig attached to a Bosch 1617 router. The jig is infinitely adjustable with a vernier dial as does the plunge adjustment on the router. I mark out the center hole and a radius of the rabbet on either side of the center. I put a 3/4" straight bit in the router, adjust the cutting radius and have at it. Then I turn the work piece over and do the same for the through hole, this time using a 1/4" spiral bit. Yes, I do a test cut before I commit to the actual work piece.
Bob
Bob
Bob, of course there are probably several methods to achieve the same results, but note that as a potential first time project for a "complete woodworking novice" the total investment in tools and jigs that any of us might recommend could well be greater than the cost of ordering a kit from a local CNC shop. Flat packs do keep some of us in business 
Bosch 1617 with plunge base - nice rig, and the vernier depth adjustment would certainly ensure accuracy and ease of operation = $250 - 280?
M-power router jig - actually a pretty cool looking jig, maybe time time for me to update my tool box = $80
While I understand you're not doing ellipses that much any more, when you did, what did you use? Rockler makes a pretty cool jig for circles and ellipses (up to much larger than most of us would use for speakers)
http://www.rockler.com/product.cfm?page=17282&TabSelect=Videos
quality 3/4" dual flute plunge bit $40-60? Unless you're not planning on them lasting, cheap bits are false economy at best, particularly when dealing with high density plywood
1/4" spiral bit $20 - 30?
Bosch 1617 with plunge base - nice rig, and the vernier depth adjustment would certainly ensure accuracy and ease of operation = $250 - 280?
$208 today at Lowe's
While I understand you're not doing ellipses that much any more, when you did, what did you use? Rockler makes a pretty cool jig for circles and ellipses (up to much larger than most of us would use for speakers)
I print out a 1x copy of the ellipse (included in the plans packages) and glue it to a piece of 1/4" of whatever. Jig saw and sand paper (disk) to shape. The print also has the center marked, drilled out 1/8". The pattern is screwed to the back side of the work piece, rough cut with a jig saw (band saw if you have one), and then to the router table. If you choose, you could rough cut the work piece on the router table with a guide ring and a spiral bit. Continuing, finish cut the work piece with a straight pattern bit and then a 3/4" round-over bit. That last item can be a bit expensive if you want a quality bit.
If you are only making one pair of speakers, you might not want to do the pattern, but since I do many speakers, the pattern speeds the process.
Bob
Well what I get from all this is that it is possible to rebate a through hole, with the right equipment and know how. Right now I don't have either of these qualities. What I may do is get the kit from custom cans and then see if I can get someone to rebate the two holes for me. Or alternatively I could simply surface mount the Alpairs, though this is a less preferred option.
Does anyone have any suggestions for a suitable amp to go with these speakers? I have seen suggestions that T-class amps are well suited. I am considering building something from scratch, though I saw recommendations for this amp:-
Class-T-Amp-2020-m-mk2, Autocostruire
also this kit:-
AMP6 T-Amp DIY Class-T Amplifier Kit from 41hz.com
I went a different approach to mounting the driver. I simply mounted it on the face of the front. you can then use a cheap portable sabre saw to cut the hole. I then used a rotary rasp bit in a drill to bevel the back side of the hole (Very Important).
To deal with the lack of a rebate, I used a solid piece of plywood for a grille frame and made the thickness around the hole in it flush with the extended speaker bezel.
Now let's bring on the grille vs. no grille debate!
Another hint which is buried deep in these forums; Make the top removable. It allows you to adjust the stuffing, or in my case, retighten a terminal post which came loose.
Attachments
c g l :
Either of those kits would work fine if you're more comfortable building an electronic project than speaker enclosures - by many accounts the 41Hz are particularly great performers.
Of course I could get all snarky and suggest that nothing less than a tube amp would to the Alpairs justice, but that's just not true.
What I will say is that I've tried a few Class-T amps (commercial) chip amps (AudioSector gain clones, etc) and over the years, and for bang for the buck, something like the little Topping TP30 is quite a sweet little unit. Bob is even more enthusiastic about his higher powered TP60, and that's a good enough recommendation for me to eventually try one of those myself - a guy can't have too many amps - as long as they're not all the size of a Jolida 302 etc.
As for rebating of the Alpairs or for that matter any wide dispersion full range driver with a thick mounting flange being "optional" - I'd differ with that. At the very least, perhaps the custom cans boys could cut a separate piece of 9mm or so material with a hole to fit the driver flange that could be laminated on the the front of the baffle - you could even make it a "feature" . You'd just need to decide whether to use the extra bezel ring on A7s or not. FWIW, I don't on the 7s myself, and would be surprised if I could hear the difference - other folks might.
Will adding a piece behind the baffle mess with the cabinet volume sort of like adding stuffing that you are not able to remove or adjust?Well, you will always find a use for the rest of the 18mm sheet!
I tend to use 12mm material, which makes the problem worse. I just double the baffle or portion of the baffle, giving me 24mm material. Using 15mm material, I would double the area behind the driver. As long as you chamfer the driver hole, all will be well. laminating two 15's is a lot easier than laminating a 15 and a 5.
Bob
I went a different approach to mounting the driver. I simply mounted it on the face of the front. you can then use a cheap portable sabre saw to cut the hole. I then used a rotary rasp bit in a drill to bevel the back side of the hole (Very Important).
To deal with the lack of a rebate, I used a solid piece of plywood for a grille frame and made the thickness around the hole in it flush with the extended speaker bezel.
Now let's bring on the grille vs. no grille debate!
Another hint which is buried deep in these forums; Make the top removable. It allows you to adjust the stuffing, or in my case, retighten a terminal post which came loose.
Nice job on those speakers - what finish have you used on the cabinets is it veneered?
Will adding a piece behind the baffle mess with the cabinet volume sort of like adding stuffing that you are not able to remove or adjust?
if the thickness and length of panel I envision Bob is suggesting and I've used myself (i.e. no more than 1/2" and full width, but extending only a couple of inches below the through hole), not significantly enough to impact - excess stuffing placed directly behind a driver such as the Alpair 7 or CHR70 would likely have a more deleterious effect
edit; yet another addendum - with 18mm - 3/4" baffles, I don't personally use anything thicker than 9mm 3/8" for those extra rear plates - but others might want to
Last edited:
I'm breaking in A7a's while I build the enclosures. (Actually I'm waiting for a track saw to be delivered THEN I'll build). I set the drivers in 9 1/2" tall pieces of 4" PVC pipe that was laying around. I'm listening to NPR and it sounds really good with the string quartet that happens to be playing on an old Tandberg 2075. I figure I'll just let them play continuously until I get the cabinets done and will probably get 100 hrs or so in. What constitutes low volume? Right now I'm at an average 65db. Too much? Not enough? Should I measure voltage and limit the output that way?
Thanks,
Charlie
Thanks,
Charlie
track saw, - would that be a Fien?
and re NPR - I happen to enjoy the Jazz & Blues offered by the local affiliate - KPLU : on a good day the programming and sound quality, even on web stream are pretty fine indeed
I digress
Re our 65-70 dB volume levels, I have to admit that I've probably not been as cautious as others (of course any polka-dotted drivers will have had many hours of break-in before I ever get my grubby paws on them) , but in the approx 3(?) years that I've been ab-using Mark's drivers, I've yet to damage one that way.
IOW, I think you're fine, ( should I retain legal counsel?) but any of the messieurs Alpair - Mark, Evan, etc, would be best to address that concern
and re NPR - I happen to enjoy the Jazz & Blues offered by the local affiliate - KPLU : on a good day the programming and sound quality, even on web stream are pretty fine indeed
I digress
Re our 65-70 dB volume levels, I have to admit that I've probably not been as cautious as others (of course any polka-dotted drivers will have had many hours of break-in before I ever get my grubby paws on them) , but in the approx 3(?) years that I've been ab-using Mark's drivers, I've yet to damage one that way.
IOW, I think you're fine, ( should I retain legal counsel?
) but any of the messieurs Alpair - Mark, Evan, etc, would be best to address that concernAFIK Fein doesn't make a track saw but no, nothing fancy like a Festool. This is a cheapo Sheppach/Grizzly that was offered on Amazon for $139 and I found on a woodworking site for $100. Scheppach M90700 6 1/4-inch Blade Plunge Saw with Two 25" Rails and Connector - Amazon.com
I figure it'll make cutting the 5x5 sheet easier since there are few cuts that go across the whole sheet and there are the 4 5º cuts. I could use my home made circular saw guide but hey, for $100 it'll be a fun and hopefully accurate tool.
I figure it'll make cutting the 5x5 sheet easier since there are few cuts that go across the whole sheet and there are the 4 5º cuts. I could use my home made circular saw guide but hey, for $100 it'll be a fun and hopefully accurate tool.
cbien: yes, it's not Fein, but the other "f-word" - Festool I was thinking of - not inexpensive, and certainly not something to lend to a buddy
chrisgoeslive: it's and easy and frequent exercise for us arm-chair quarterbacks to postulate about gear we haven't heard. It's been at least 10yrs since I've heard any model of KEF, and who knows how many of the larger forum regular will have had the opportunity to make this type of direct comparison.
As Scott says, it depends on what you mean by "quality" - one thing for sure is the final cost of a DIY speaker system can be less than the sales tax on a "high-end" commercial system
edit: the smiles per dollar is a quality not to be overlooked
Last edited:
chrisgoeslive, shame your not a bit closer to me. I've very nearly finished my FH3's with Alpair 7.3 drivers [I got Colin's last kit]. I did briefly listen to them before embarking on my first attempts at applying a surface finish, and was pretty blown away by them.
Should be another two weeks before they are fully finished and playing once more
Paul
Should be another two weeks before they are fully finished and playing once more
Paul
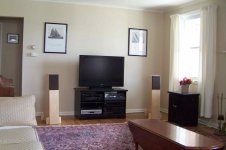
Sorry for the slow response. My speakers are made from Maple veneer plywood (Lowe's) with iron on banding over the edge grain. They were given a couple coats of simple rub-on varnish finish.Nice job on those speakers - what finish have you used on the cabinets is it veneered?
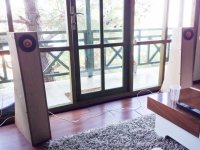
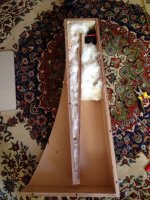
I have cut all the wood in cnc. It is made out of birch plywood. 15mms on the sides and 18mms on the front. I have put Alpair 7.3 drivers and found some good felt. I used cotton wool about 100grs per speaker (more than most as far as I can see). I am now breaking them in. The imaging seems right, strong phantom center image, clean and may considered detailed sounding. It all depends what is your reference. I have played with the stuffing as I have made screws to one side, so I can open it whenever I want. It is completely sealed, I tried it with smoke. Still after break in period if I am satisfied with everything, I will glue that side and do a nice finishing for the cabinet. I used nice binding posts from an earlier project. Thanks for all the plans and information on this site. It was a breeze building them.
Attachments
Last edited:
chrisgoeslive, shame your not a bit closer to me. I've very nearly finished my FH3's with Alpair 7.3 drivers [I got Colin's last kit]. I did briefly listen to them before embarking on my first attempts at applying a surface finish, and was pretty blown away by them.
Should be another two weeks before they are fully finished and playing once more
Paul
Is it true then that Colin is not producing any more? I have tried messaging him, but no response as yet.
Where did you source your Alpairs from, as of now there is no UK dealer?
How do you intended to finish your speakers?
If I get a plywood kit I would prefer a simple wax or stain rather than a veneer, which I am worried I would royally mess up when I came to trim it.
I am still toying with the idea of building from scratch from solid wood, if I can lay my hand on suitable stock. However this would involve many hours of work (any time estimate anybody?), which my better half would not tollerate, plus it is now the wrong time of year.
- Home
- Loudspeakers
- Full Range
- Frugel-Horn Mk3