This is a build thread for a horn loaded enclosure for the Tangband W8-1772 8" full range driver.
Driver Detail: Parts-Express.com:Tang Band W8-1772 8" Neodymium Full Range Driver | Tang Band W8-1772 8" Full Range Driver full range tb speakers neodymium driver line array point source midrange home theater computer speaker center channel set tube amplifier
Driver Spec sheet: http://www.parts-express.com/pdf/264-893s.pdf
When researching designs for this driver, I looked at
1. the Sachiko horn : The Spawn Family of Double Horns
and
2. the RCA-Fan K-Slot Horn : Acoustic Horn - Backload K-Horn
Both have their own approaches to horn loading, and with little to go on as far as real life A-B comparisons , I've decided to build the K-Slot design. Both have been tested succesfully with a variety of drivers, but never (to my knowledge) with this tangband. Bill Woods of Acoustic Horn feels that his design will work with my drivers, .. and Martin King feels likewise about the Sachiko, so go figure.
Basically, I'd like to get
1. honest response into the 40 Hz region, without the driver crapping out,
2. tuneful bass ie. the design must not sound like a one note boom box.
3. minimal to no bass suckout, which some designs have i.e. low bass present but bass impact missing
I'm not new to high efficiency designs or horns, so I know what to expect from a good sounding design.
This thread will chronicle the build and results, for better or worse.
Last edited:
I've had two sheets of Arauco ply (3/4" x 4' x 8') cut up from Lowes. This should get me about enough plywood to make some progress. Baltic birch is too rich for my blood, and I've almost never liked anything I ever built with MDF over the past 9 years. The quality of veneered ply available at home centers has taken a sharp dip over the past few years which is why I use 7 ply Arauco ACX nowadays
My rough cut plan (in order to get everything to fit inside my car)
Sheet 1: Four 2 ' x 4 '
Sheet 2: One 2' x 4' and Four 1' x 6 '
My rough cut plan (in order to get everything to fit inside my car)
Sheet 1: Four 2 ' x 4 '
Sheet 2: One 2' x 4' and Four 1' x 6 '
Last edited:
I believe there been several builds of Woods blh for a few years - how much "strength" in plywood is really needed for typical fullrange blh?
from one article
"Arauco is the name of the company in South America that makes
a plywood from radiata pine trees You’ll see that Arauco plywood
has seven plies. It’s stronger than domestic birch and less expensive
than domestic or Baltic birch. The downside is its face veneers are
less attractive and may contain some defects or patches."
Pinus Radiata? aka plantation grown Monterey Pine. Hilarious since I grew up in Monterey. We always saw it as firewood, but some of the old buildings used it for timber.
I'd guess it's just a bit less dense than fir ply. Strength isn't really an issue, since a speaker box is unlikely to break. MOE and damping and mass play some sort of role.
Any write ups on the Woods horn? Does everyone use the ever-popular FE206e?
PS
Pinus radiata are very resonant when hammered on by woodpeckers...
At least its void free unlike the other abberations the folks at Home Despot market as plywood
Re. driver choice, there's some information at AA. For example see http://www.audioasylum.com/forums/hug/messages/7/72315.html
Re. driver choice, there's some information at AA. For example see http://www.audioasylum.com/forums/hug/messages/7/72315.html
Last edited:
lookin' good and makes nice use of 2'x4' dims - how do the plies, etc. look on edge with your Arauco?
Plies are void free. I'll add a photo soon.
No veneer, though one side looks better than the other (worse side pictured in my last post). Either way, some sort of veneer or paint will be needed, if anything made of arauco is to be domestically acceptable.
Not much to report from this weekend, as other chores beckoned.
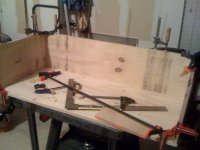
Member kenpeter and I did get together and rip all the interior boards to the same width (11.75") . now, it's mostly a matter of gluing them onto the side.
I plan to use yellow glue to glue the boards onto one side and caulk to ensure airtightness.
When clamping the cabinet shut, I won't have the luxury of being able to caulk so expanding polyurethane glue (PL brand) will be used .
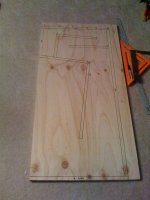
boring build pic. I decided to start outside and build inwards, the opposite of the recommended procedure, as I prefer to get the corners solid first. On a more complex horn build, I might start from the insides, but not for this.
I used a home made cross cut sled for the cuts and cut 2 x pieces per cut so for every piece you see assembled on this cabinet, I've already completed the cuts for the other cab.
I used a home made cross cut sled for the cuts and cut 2 x pieces per cut so for every piece you see assembled on this cabinet, I've already completed the cuts for the other cab.
Attachments
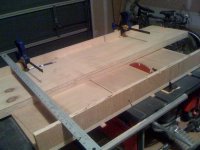

What was not mentioned, was that we lost about 0.75 an inch of width on all those
boards before we finally got them straight. A saw can't cut the other side straight
unless ref side against the fence is straight, got wobblycroOked-er-er every pass!!!
We eventually clamped a very eyeball straight edge to the board, and ran a router
down that template. Then very carefully ripped each to the same width on the saw.
This time using a feather to keep the clean edges pressed firmly against the fence.
That same wax residue (for the sled) in the slot kept making the feather pop loose
and/or slide forward into the blade... and the fence kept moving off its set adjust.
So a lot of extra clamps were abused to hold all that junk that wouldn't stay put.
Was not as Martha Stuart easy as the aftershot pictures would have you believe.
No essential limbs were lost, but not for the lack of tryin.
Last edited:
Plies are void free.
Yeah, we shaved away thin strips of the edge getting everything even.
Those strips did not fall apart. It was almost voidless, like a solid strip
of veneer, except obviously several smaller strips joined together, and
some across the grain. Actually weird that ply shaving held together so
well. Somebody must have busted out the good glue on that day.
Not like my last K15. Layers still peeling apart, except a few soft spots
where Shellac penetrated extra deep.
Last edited:
What was not mentioned, was that we lost about 0.75 an inch of width on all those
boards before we finally got them straight. A saw can't cut the other side straight
unless ref side against the fence is straight, got wobblycroOked-er-er every pass!!!
We eventually clamped a very eyeball straight edge to the board, and ran a router
down that template. Then very carefully ripped each to the same width on the saw.
This time using a feather to keep the clean edges pressed firmly against the fence.
That same wax residue (for the sled) in the slot kept making the feather pop loose
and/or slide forward into the blade... and the fence kept moving off its set adjust.
So a lot of extra clamps were abused to hold all that junk that wouldn't stay put.
Was not as Martha Stuart easy as the aftershot pictures would have you believe.
No essential limbs were lost, but not for the lack of tryin.
Yeah, but that was the ripping part. There's only so much we can accomplish with a portable table saw.
The cross cutting went pretty smoothly.
- Status
- This old topic is closed. If you want to reopen this topic, contact a moderator using the "Report Post" button.
- Home
- Loudspeakers
- Full Range
- Build Thread K-Slot Rear Loaded Horn for Tangband W8-1772