Another DIY Beginner - Mfonken in my crosshairs
Hello diyAudio
I just recently caught the DIY audio bug. I have always like using my hands and tools, good sound, and I am a life long music lover. Now that i've discovered this hobbie, it's like I have finally found a purpose! Quite frankly, it's all I think and read about these days. I am decently equipped with skill, but my knowledge is still lacking.
I am broke as @#@ right now, so I can only afford cheap projects and daydreaming. So far, I have mostly completed a 41hz amp6, which I was able to do for minimum $$.
Next I want to do some speakers to compliment my baby.
I have tentatively settled on the Mfonkens. Depending on my course of action, I can make these pretty cheaply. I wouldn't mind some feeback from the experts.
Material
1. I have found a cheap source for BB, about $30 for enough for the speakers and many mistakes.
2. On the other hand, I've got a ton of plywood lying around in case I make the cabs out of that only.
Drivers:
1. I want to use the FE127es. However, they are currently out of my range.
2. I am considering the pioneer A11EC80-02F. I know I know - they're a big step down. But to my ears, and for my wallet, they may be good for now.
If I do those, I would probably upgrade in the future with a new baffle / 127s.
Construction:
I am new to building cabinets of any type. My experience with tools has mostly centered around general building construction, not fine work. I did learn to use biscuits way back in highschool.
1. Can I just glue and camp these?
2. What part would you temporarily leave loose to effectively change / test linings?
Plans:
In regards to the mFonken-0v999-map plans; I know these are listed as "prelim", but the measurements dont always seem to line up.
It seems like some measurements assume 12.1 mm bb, others 12. Similar inconsistencies with the 15 mm plywood front. I've used plywood for stuff before, but have never had to care about the depth. I've read that plywood dimensions are sometimes a little off the printed size, but these plans go both ways.
What am I missing? Something pitifully obvious?
I can work around it easily enough, but I am sitting here about to make a panel list for cuts, and I want to make sure everything is square / accurate for sound.
Thanks in advance for any responses. And a big thanks to planet10 for giving out these plans to the general public.
I'm super excited to get going on these.
-J
Hi,
I'm in the midst of reworking the mFonken plans for 15mm.
If you are going to use the Pioneer to keep it cheap, i'd suggest using the ply you have on hand -- use the stuff with the most plies.
The holey brace for the magnet is critical and will probably be quite different for the Pioneer. That and remembering Chris saying over & over, "easier to build a new box than try to mid this one", i would suggest just using what you learned and build new boxes for the FE127 (or FE127eN if you can stretch to them) with BB (you can get 3 pair of mFonken out of a sheet of BB)
If we are being finicky, we glue & clamp, if you are veneering, no harm in using a brad nailer.
Chris will need to supply the definitive answer to what side, but when i was in the shop the other day, it was the side left off,
dave
Banned
Joined 2002
mr TD
Among the many tasks he's constantly juggling, Dave will eventually revise the "official" drawings for the whole Fonken family to reflect the use of 15mm BB ply. (with the exception of 18mm for driver baffles for the original "Prime" with FE127E, and some other variants) .
As we build more of these and try different drivers*, the dimensions and some of the minor details have evolved. When Dave copies and pastes drawings for these revisions, some of the dimensions don't add up - which is why I always redraw my own in preparation for the cut lists. For some of the simpler boxes, that can take longer than cutting and initial assembly.
Regarding construction methods, as Dave alluded, I tend to spend more time on the veneering and finishing of the boxes than on fancy schmancy joinery techniques. Provided parts are cut accurately and square, I have no problem using an air driven brad nailer for most of the assembly. In fact, some of the smaller enclosures hardly have enough room to fit all the required clamps that biscuits would require.
Of course, after building many dozens of pairs of the same enclosure designs, the need to prove joinery skills diminishes significantly.
While I don't operate it myself, I'm lucky to have access to a CNC for machining of the driver baffles for flush mounting of drivers. Since variations from nominal thickness of many plywoods is not uncommon, I assemble the boxes with one side panel off to ensure accurate fitting of the driver brace, add the damping felt, and then attach the final side. Don't try to install the damping material to these boxes once they're all assembled.
Other notes:
While on the smaller boxes it's more aesthetic than functional, I like to chamfer at least the front vertical edges on these boxes. For the mF and mmF, it's easier to do that if the side panels and top /bottom are full depth, with the drive baffle inset.
If you plan on doing that, and using a brad nailer for construction, don't nail the driver baffle to the side panels, otherwise you'll damage your saw blade or router bit when cutting the bevel. A single F-clamp and caul will provide more than adequate pressure.
Things will get a bit more complicated if you're thinking of trying drivers with different mounting cutouts and depths. Using cleats and foam weatherstrip tape to attach and seal the front baffles is easy enough, but the driver brace would be a bit trickier - you need to allow for the deeper of the 2 drivers, and use filler blocks for the shallower one. Hardest of all would be the tuning of the port slot. Frankly by the time you dick around with all of those, it could be just as quick to build another pair of boxes - there is very little material involved, and subsequent pairs seem to take far less time .
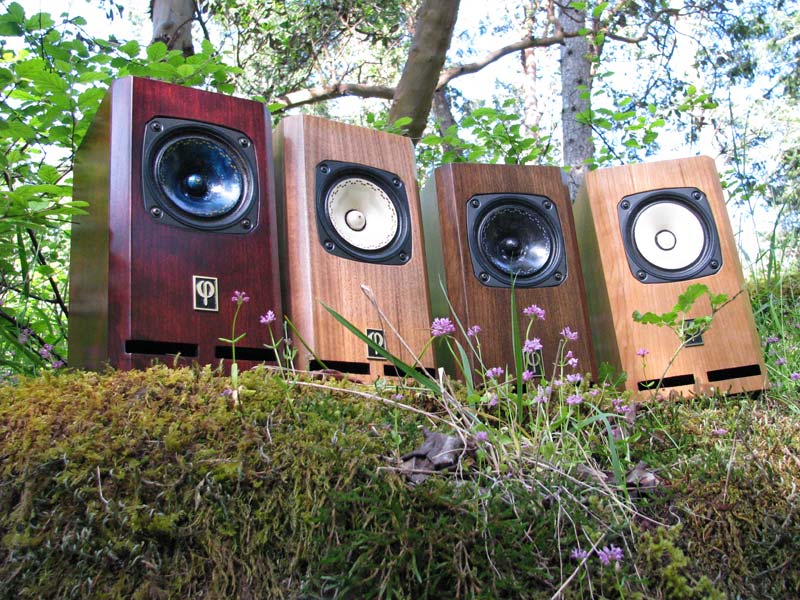
Re Pics: Damn, those look nice.
Chris and Dave, thank you both.
Your responses have already helped me in my planning tremendously.
First, I am glad I can use a nailer rather than messing with glue / biscuits. Hell, if whatever I make turns out well, I can chuck a veneer / cheesy vinyl on them and make my money back for a second run.
Second, your comments about multiple drivers / baffles are well taken. As of Dave's post, I had decided to follow his rec. and for my first run build the cabs out of the already-on-hand regular plywood and use the cheaper pioneers. Then, eventually build another set using the good wood / drivers.
However, I hadn't really considered tuning the lower slot for the Pioneers. I think that kind of expertise is currently way out of my league, not to mention time with a table saw and router that I am using at a friend's house. Is this something that I can approximate mathematically, and / or is it trial and error? That is probably a dumb question with all sorts of complicated answers.
I had just planned on modifying the "holey brace" to account for the ~15mm shorter depth of the pioneer, and crossing my fingers that they would sound good enough (at least better than my Cambridge sound works ensemble or infinity SM115s). I want something I can listen to and enjoy, in addition to a trial run at speaker building.
Unfortunately, because of the finances, I may still do that. I need something to do in between fruitless sessions of looking for work (things are tough all over!) A few bucks spent for the sake of sanity is fair enough.
In either case, I have a couple more (beginner!) specific questions about their construction.
1. Measurements -
Assuming I am making them with 12mm BB and the fostex, which measurements on the v0.999 plans should I focus on? My instinct tells me to keep the 12mm vent slot choate, and round everything else to the nearest values that will keep things square to a 12mm depth ply. Comments?
2. The Brace -
- Can I mount it with brads, or should I glue this?
- DO I want the brace simply flush with the magnet, or should they have a little pressure against each other?
3. Mounting the Driver -
- Is it better to use a foam seal gasket, or some weather seal caulk?
3. BSC
- Is one called for in this?
I want to thank you guys again for your considerate and lengthy responses. This is a great community you have going here.
-J
teflondon said:Re Pics: Damn, those look nice.
Thanks, I'm particularly fond of the dark port mahogany stain
Chris and Dave, thank you both.
Your responses have already helped me in my planning tremendously.
First, I am glad I can use a nailer rather than messing with glue / biscuits. Hell, if whatever I make turns out well, I can chuck a veneer / cheesy vinyl on them and make my money back for a second run.
Second, your comments about multiple drivers / baffles are well taken. As of Dave's post, I had decided to follow his rec. and for my first run build the cabs out of the already-on-hand regular plywood and use the cheaper pioneers. Then, eventually build another set using the good wood / drivers.
However, I hadn't really considered tuning the lower slot for the Pioneers. I think that kind of expertise is currently way out of my league, not to mention time with a table saw and router that I am using at a friend's house. Is this something that I can approximate mathematically, and / or is it trial and error? That is probably a dumb question with all sorts of complicated answers.
I had just planned on modifying the "holey brace" to account for the ~15mm shorter depth of the pioneer, and crossing my fingers that they would sound good enough (at least better than my Cambridge sound works ensemble or infinity SM115s). I want something I can listen to and enjoy, in addition to a trial run at speaker building.
Unfortunately, because of the finances, I may still do that. I need something to do in between fruitless sessions of looking for work (things are tough all over!) A few bucks spent for the sake of sanity is fair enough.
In either case, I have a couple more (beginner!) specific questions about their construction.
1. Measurements -
Assuming I am making them with 12mm BB and the fostex, which measurements on the v0.999 plans should I focus on? My instinct tells me to keep the 12mm vent slot choate, and round everything else to the nearest values that will keep things square to a 12mm depth ply. Comments?
well, as mentioned earlier, we have already switched to using 15mm material for these boxes, for which the external dimensions would be stretched to retain internals. In fact this post arrives in the midst of our conversation re changes to the drawings to reflect actual "as built"
The tuning of slot port is via the aspect ratio (width/height) and length (including the fold) - so if you're thinking of trying different drivers such as the Pioneers, it's likely the length that would be revised. Dave might be able to address that concern
2. The Brace -
- Can I mount it with brads, or should I glue this?
- DO I want the brace simply flush with the magnet, or should they have a little pressure against each other?
This is one of the reasons why I attach the second side panel last - it allows for the driver to be securely mounted (including gasket) before dry fitting of the driver brace. The other reason is to be able to get the damping pads glued in place.
The brace should fit snug (think thin "blonde one"), but not stress the driver basket. It can be clamped in place without the need for any brads - in fact with the holes in a brace of this size, brads coul possibly split the brace, negating much of its utility.
It would be preferable to cut it slightly (1mm or so) short and use a strip of closed cell weatherstrip tape on the leading edge of the brace.
Which brings us to :
3. Mounting the Driver -
- Is it better to use a foam seal gasket, or some weather seal caulk?
I prefer to use 1/8" thick self adhesive closed cell foam weatherstrip tape on the underside of mounting flange - caulking can be messy
3. BSC
- Is one called for in this?
I want to thank you guys again for your considerate and lengthy responses. This is a great community you have going here.
-J
I keep being told that I haven't properly heard a small fullrange driver without it, but I trust my ears - for me the answer would be "try it without"
chrisb said:The tuning of slot port is via the aspect ratio (width/height) and length (including the fold) - so if you're thinking of trying different drivers such as the Pioneers, it's likely the length that would be revised. Dave might be able to address that concern
With adequate T/S data i could come up with an appropriate length.
I should have plans done and up by late this evening. This is the 4th significant revision but mostly encompasses thicker material, and ease of build.
dave
The port-mahogany stain is my favorite as well - it's pretty damn slick. It's the color I have been hoping to eventually approximate for my speakers.
I am liking how this is all coming together. I will stand by for the 15mm plant, whenever they are done.
I believe I may have found access to a CNC machine, which is huge.
And Dave - the T/S data for the Pioneer A11EC80-02F can be found here:
http://www.parts-express.com/pdf/290-010z.txt
It has gotten mainly positive reviews on PE, which I suppose is good. Besides its price, I picked it as a substitute because of it's 4.5" dia., 90 db sensitivity, and of course price. 90+ SPL is crucial for the amp6. I havn't seen any other equally sized+cheap with that sensitivity. I only with they were 4ohm.
Thanks a lot for taking time for this. I imagine this thread will be helpful to many new DIYs wanting to attempt an mfonken build.

- Go Sox
I am liking how this is all coming together. I will stand by for the 15mm plant, whenever they are done.
I believe I may have found access to a CNC machine, which is huge.
And Dave - the T/S data for the Pioneer A11EC80-02F can be found here:
http://www.parts-express.com/pdf/290-010z.txt
It has gotten mainly positive reviews on PE, which I suppose is good. Besides its price, I picked it as a substitute because of it's 4.5" dia., 90 db sensitivity, and of course price. 90+ SPL is crucial for the amp6. I havn't seen any other equally sized+cheap with that sensitivity. I only with they were 4ohm.
Thanks a lot for taking time for this. I imagine this thread will be helpful to many new DIYs wanting to attempt an mfonken build.
- Go Sox
Sorry if this seems like a hijack...
If I want to put a pair of Radio Shack 1354's in an onken enclosure, is there one that would be better than the others? Would the dimensions have to change from what's on Dave's website?
Finally, is it even a good idea to go with an onken enclosure for these drivers?
I know there are some other enclosures on the web for the 1354, i.e. Bob Brines' tower, but I like the convenience and the looks of the onken enclosures.
Thanks.
Sorry for the hi-jack.
Mike
mikje said:Sorry if this seems like a hijack...
If I want to put a pair of Radio Shack 1354's in an onken enclosure, is there one that would be better than the others? Would the dimensions have to change from what's on Dave's website?
Finally, is it even a good idea to go with an onken enclosure for these drivers?
I know there are some other enclosures on the web for the 1354, i.e. Bob Brines' tower, but I like the convenience and the looks of the onken enclosures.
Thanks.
Sorry for the hi-jack.
Mike
IINM, the 1354 is closest to the FE167, in which case the tolerance of the Fonken enclosure design should quite likely allow for more than adequate performance.
Dave is near completion of revised drawings for a floorstanding version of the Fonken enclosure for the FE167, for which he should be able to post photo(s) of a recent production batch, both in the wild, an a more normal domestic environment.
Be advised that unlike the "milli's" displayed above, this is not a simple weekend build project, but well worth the effort.
teflondon said:
However, I hadn't really considered tuning the lower slot for the Pioneers.
-J
would be interested in your review of your build, I have the same speaker in the garage idling....
gychang
Hello again,
Today is finally the day that I have access to the big tools and can make the cuts.
I have one last question that I am crossing my fingers will be answered in the next hour / 2.
I am making the first set today with the pioneers, and Dave told me to shorten the port shelf.
This is probably a dumb question, but I am now wondering whether I compensate for the shorter shelf by by shortening the depth of the entire speaker, so as to keep a 12 mm gap between the back wall and the ledge edge.
Or do I keep everything equal, and just add the approx 42 mm to the gap?
I would go with my instincts if I had any, but I really dont. It seems like the 12mm gap is important, since between the different mfonken plan iterations the port shelf changed a bit while the gap remained constant.
I am getting psyched to finally get going.
teflondon said:This is probably a dumb question, but I am now wondering whether I compensate for the shorter shelf by by shortening the depth of the entire speaker, so as to keep a 12 mm gap between the back wall and the ledge edge.
External box dimensions do not change.
dave
Hey Teflondon, did you ever finish this project? Some years ago I purchased 4 of these to play with. Have tried several designs including Half Chang and BD Pipes, all of which are decent, but I'm still playing. Bass is a bit light but otherwise I like them a lot. Just wondering how they worked out if you finished them. Thanks.
Thanks, I'm particularly fond of the dark port mahogany stain
Yes it does look very nice, how did you achieve that finish? If you don't mind me asking?
-- Andrew
Yes it does look very nice, how did you achieve that finish? If you don't mind me asking?
-- Andrew
Cherry veneer sanded to 220G; stain color is "Port"; 3 sprayed coats of nitrocellulose lacquer, hand sanded with Scotch Brite 7447 (maroon) abrasive pads between coats
- Status
- This old topic is closed. If you want to reopen this topic, contact a moderator using the "Report Post" button.
- Home
- Loudspeakers
- Full Range
- Another DIY Beginner - mFonken in my crosshairs