Clamping and drilling... You only have to clamp after you have determined that the workpiece has spun and knocked the vise, chuck key, micrometer, calculator and cell phone on the floor.
Oh ya, gloves are a great idea in the shop. They will protect your rings, bracelets, and watchbands from the milling cutters and lathe chucks.
Seriously, gloves are just one of those basic safety things. It's obvious that they MAY protect you from some small abrasions. What's not obvious is that they can just catch an edge and suck you and your arm right into a machine.
As for workpiece clamping for drilling, if it's big it's not a problem. If it's small and THIN, watch out. However, when we are talking about >25mm in 10mm material, that's something that should be clamped.
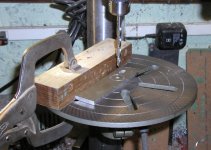
This time I took slightly different bit and it worked really well. No lubrication was used and it took less than a minute to make it through.
With Forstener bit both the piece and the table needs to be locked otherwise the bit will wonder around. Something I didn't do before.
Thanks guys for trying to convince me, I actually learned something new tonight")
With Forstener bit both the piece and the table needs to be locked otherwise the bit will wonder around. Something I didn't do before.
Thanks guys for trying to convince me, I actually learned something new tonight
Attachments

Peter Daniel said:
When drilling 50 holes at one sitting I would simply give up having to clamp it each time.
It can be tedious. A "quick-grip" clamp is fast. Personally, I do all of my drilling by hand, with a cordless drill. I don't own a drill pres (haven't had any reason to buy one).
I drill billions of holes in my line of work, in many different materials, so I've had lots of practice. Accidents still happen though.
Once, a few years back, I was drilling 1/4" holes in some steel bench brackets. I was holding the bracket with my left hand when the drill bit broke and the remaining part sticking out of the chuck plunged into my hand. THIS was a bad day.
Lesson learned: keep my hands out of harms way.
chipco3434 said:Seriously, gloves are just one of those basic safety things. It's obvious that they MAY protect you from some small abrasions. What's not obvious is that they can just catch an edge and suck you and your arm right into a machine.
As for workpiece clamping for drilling, if it's big it's not a problem. If it's small and THIN, watch out. However, when we are talking about >25mm in 10mm material, that's something that should be clamped.
Yes, I agree that 10-25mm piece needs to be secured, and I alwayd do it. I don't clamp it to the table though, but put it in a small vice.
The reason I prefer not to clamp it directly to a table is that the holes never come out precisely where I want them ( when marked with a center punch). And my accuracy is usually better than 0.005".
When I'm afraid that the piece may spun, I clamp a block to a table, and that prevents rotation. But I never clamp the piece directly, it simply does not work for me.
As to the gloves, the ones I pictured are made specifically for sheet metal work and they are safe around drill presses. This is also standard item at aircraft production/maintenence facilities.
Attachments
Thanks chipco3434 .
As we are on the topic of machining aluminum I have a couple of other questions.
1. Is it better to use a lubricant when brush finishing aluminum or is it better to do it dry ? Lubricant would take away particles that could spoil the surface (?).
2. Is it better to use a rotary wire brush ( or rotary pack of emery type sheets ) or a belt sander ?
Thanks.
---when brush finishing aluminum---
I am sure there are a hundred better ways but I have had great luck with a 50 grit belt on a belt sander dry. Keep it flat and keep it moving - in the same direction. By the time your close to done it's much finer than 50 grit and the surface becomes more 'brushed' looking. Watch the heat, if it gets too hot the top surface starts to look blotchy.
A liberal application of wd40 and then a bit more belt sanding gives it a shiny brushed look. Needless to say the belt is toast when it's all over.
I'd love to hear some other methods you guys use.

I tried a drill mounted rotary wire brush but this just polished the aluminum. I used a belt sander but found it didn't give a very consistent finish. I've considered getting a "flap wheel" sander to try.
On a recent project, I used a random orbit sander with a 100 grit disk to produce a kind of frosted look that's not bad.
On a recent project, I used a random orbit sander with a 100 grit disk to produce a kind of frosted look that's not bad.
Attachments
Peter Daniel said:
As to the gloves, the ones I pictured are made specifically for sheet metal work and they are safe around drill presses.
:bs:
Magura
ashok said:Thanks chipco3434 .
As we are on the topic of machining aluminum I have a couple of other questions.
1. Is it better to use a lubricant when brush finishing aluminum or is it better to do it dry ? Lubricant would take away particles that could spoil the surface (?).
2. Is it better to use a rotary wire brush ( or rotary pack of emery type sheets ) or a belt sander ?
Thanks.
A coarse scotchbrite pad will work just by hand, and gives consistency you your work. As far as I remember it, it's the brown version (they're colour coded) that gives some of the best results.
Magura
thanks a lot you guys - awesome load of info here!
I think i will try the gloveless, clamped, (cheap) forstner bit method with some lube - have some tapping oil around somewhere...
the finish is another thing...i am also going to try some home anodizing at some point but am trying to source out a cheaper alternative to the 500$ power supplies at Caswell plating...maybe i will go with that frosted look with the orbital sander first...looks real nice!
Byron
If you use fine paper at high speed it will shine, but leaves a pattern. I used a DA locked with about 320 or 400 grit paper at high speed very lightly. Did an aluminum finned cover on an engine so pattern did not show. I put base color on it then sanded/polished or whatever you call it, then cleared it all and it looked very nice. You can sand it fine and buff it if you want to work it down that far. It will look like chrome, then clear it to keep the finish...just like machined car wheels. I used automotive urethane clear. You can even use the gray scotch pad(2000 grit) and clear will cover it, after you have shined it up. The red pad is for paint, it is 600 I think. They are perfect for doing edges and contours.
The coarse Scotch Brite pad has a tan color and works OK, IF the surface is in reasonable shape, no deep scratches.
It is rather hard to remove scratches with a pad and after a while you will get corner rounding which may affect final look of the panel.
I smooth out all the scratches first with fine sandpaper (150-300 grit), use coarse pad and after that general purpose pad which is maroon color.
However, to get truly professional finish a belt sander is recommended. So far, I was using 6x48 belts with good results. Such short belts need a lubricant and Varsol is my first choice http://www.recochem.com/english/products/faqs.html
I used WD40 few times but it's messy, sticky, dissolves glue in belts and as such is not recommended.
80 grit paper usually worked fine and I didn't dare to go lower.
I recently acquired heavy duty oscillating sander which works with 6x99 belts and here I found that no lubrication, 60 grit belts perform best.
After belt sander I usually smooth out the finish with Scotch Brite pad: http://cc.msnscache.com/cache.aspx?q=72348975319367&mkt=en-US&lang=en-US&w=b4d62957&FORM=CVRE5
- Status
- This old topic is closed. If you want to reopen this topic, contact a moderator using the "Report Post" button.
- Home
- General Interest
- Everything Else
- Drilling aluminum