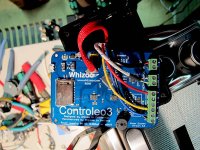
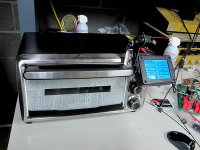
I had been using a toaster oven, or hotplate for SMT stuff. Decided to spring for the Controleo3 MCU controller. Just ran the learning cycle and it works perfectly. You can use the controller for reflow or baking IC's.
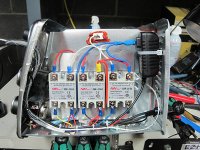
The kit comes with solid-state relays, ceramic blanket, various other insulation and of course the touch-screen and MCU.
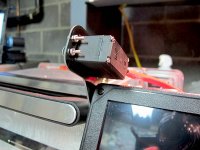
There's a servo which opens the door to cool the oven down -- much better than the "armstrong" method.
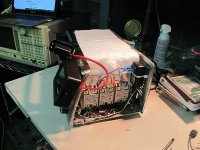
I was fortunate to only cut myself once in taking apart the Black and Decker oven.
The kit comes with solid-state relays, ceramic blanket, various other insulation and of course the touch-screen and MCU.
There's a servo which opens the door to cool the oven down -- much better than the "armstrong" method.
I was fortunate to only cut myself once in taking apart the Black and Decker oven.
Attachments
Last edited:
Whizoo gives you two "profile" examples -- these can be downloaded to Notepad and modified to fit the profile of the SMD paste you are using. In my case Chipquik leaded (keep it refrigerated.) These are then written to an SD card.
I did time and temperature for about 10 runs until I created a profile which matches the graph on the Chipquik datasheet.
The servo allows you to visit the gents while your board cooks.
oh, I rearranged my workspace to have one bench for builds and another for tests.
I did time and temperature for about 10 runs until I created a profile which matches the graph on the Chipquik datasheet.
The servo allows you to visit the gents while your board cooks.
oh, I rearranged my workspace to have one bench for builds and another for tests.
I switched back to leaded paste for the lower temps. Currently using Kester from OSH Stencil and I'm quite happy with it. Used Chipquik brand lead-free previously. Always refrigerated, warmed up >4hrs prior to use.
And don't forget to ventilate the room for the reflows! The ovens/flux put out quite a stench and plume...
BK
And don't forget to ventilate the room for the reflows! The ovens/flux put out quite a stench and plume...
BK
And don't forget to ventilate the room for the reflows!
There's a servo which opens the door to cool the oven down -- much better than the "armstrong" method.
So maybe a sensor that monitors the door, activate a wireless transmitter that triggers a receiver located near a window, that starts a timed circuit to open the window, start a fan, and after a while power down the fan and close the window again.

Or just get a small ventilation kit, put it on a timer.
The oven looks like a really nice piece of equipment though.


I chose to put the control SSRs in a separate enclosure which made the build easier.
Good idea.
I note that the vendor included a band-aid (plaster in your vernacular?) with the kit!
Good idea.
I note that the vendor included a band-aid (plaster in your vernacular?) with the kit!
I cut myself once, but survived without the plaster! 👍
It's been a few months -- there is a software update for the Controleo3
Firmware Update
They'll send you another SD-RAM card for some bucks, or you can get the Arduino Zero and do it yourself.
Firmware Update
They'll send you another SD-RAM card for some bucks, or you can get the Arduino Zero and do it yourself.
- Status
- This old topic is closed. If you want to reopen this topic, contact a moderator using the "Report Post" button.
- Home
- Design & Build
- Equipment & Tools
- Controleo3 DIY reflow oven