I was shocked to find that in just a few days it arrived from Japan, considering the times we live in. Thank you Victor for getting it processed and shipped so quickly.
I am taking my time with this build and just enjoying it bit by bit. For those that have assembled the TU-8600, this is very similar. For those that have never, it is really simple as long as you follow the instructions in the very detailed manual. Please dont ask me for copy of manual or circuit.
I will say that I did struggle a little locating parts. Some resistors are not bagged according to their values. I also find it difficult to distinguish some of the colors, but thats why you have a DMM right? If you cannot find a particular part, look in other bags that might not be so obvious. This is just nitpicking and not an issue really.
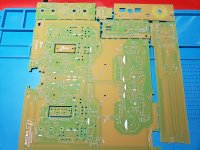
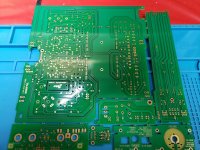
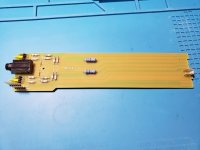
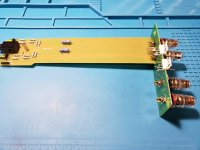
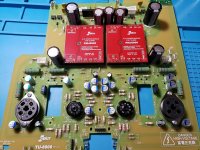
This 1st pic shows 3 layers of packing. Impressive !!!! The outside box was almost pristine. 2nd & 3rd pic shows just how beautiful the PCB's are. I was telling Victor, I really didnt want to touch them because they were so nice") You also have to "break" off about 8 pieces that had me nervous. I lost count but pretty sure I had to sandpaper about 40 perforations There are 2 rectangular sections in the main pcb that need to break off and this I believe is for the caps.
You also have to "break" off about 8 pieces that had me nervous. I lost count but pretty sure I had to sandpaper about 40 perforations There are 2 rectangular sections in the main pcb that need to break off and this I believe is for the caps.
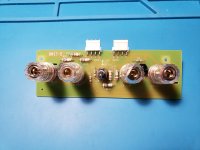
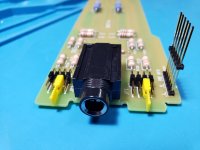
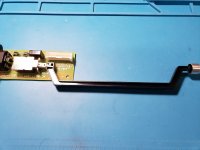
Pic 4 is the speaker connectors, 5 & 6 show the headphone jack.
Even though parts are of good quality I am going to swap out the 9pin tube sockets for ceramics if I have them around.
The end goal here is to compare my mostly stock 8600S with this stock 8900 listening to Cossor 300B at first and then will switch over to 2A3 when they arrive from Victor.
I am going to give it a rest for the night and soak in the fun I had.
I am taking my time with this build and just enjoying it bit by bit. For those that have assembled the TU-8600, this is very similar. For those that have never, it is really simple as long as you follow the instructions in the very detailed manual. Please dont ask me for copy of manual or circuit.
I will say that I did struggle a little locating parts. Some resistors are not bagged according to their values. I also find it difficult to distinguish some of the colors, but thats why you have a DMM right? If you cannot find a particular part, look in other bags that might not be so obvious. This is just nitpicking and not an issue really.
This 1st pic shows 3 layers of packing. Impressive !!!! The outside box was almost pristine. 2nd & 3rd pic shows just how beautiful the PCB's are. I was telling Victor, I really didnt want to touch them because they were so nice
You also have to "break" off about 8 pieces that had me nervous. I lost count but pretty sure I had to sandpaper about 40 perforations There are 2 rectangular sections in the main pcb that need to break off and this I believe is for the caps.Pic 4 is the speaker connectors, 5 & 6 show the headphone jack.
Even though parts are of good quality I am going to swap out the 9pin tube sockets for ceramics if I have them around.
The end goal here is to compare my mostly stock 8600S with this stock 8900 listening to Cossor 300B at first and then will switch over to 2A3 when they arrive from Victor.
I am going to give it a rest for the night and soak in the fun I had.
Attachments

Last edited:
Very cool, Neville! I look forward to following your build and what you think. After lurking for a long time, this post got me to say something. Nice work!
I built my TU-8600 late last year and love it. I'll live vicariously through you since the TU-8900 is not in my near-term budget. Enjoy the build!
I built my TU-8600 late last year and love it. I'll live vicariously through you since the TU-8900 is not in my near-term budget. Enjoy the build!
I use this site for Resistor Codes...How to read resistor color codes
Last edited by a moderator:
That is good to have. Thanks. Whilst I am not color blind there are some colors that just dont stand out and look the same. Dont know if it just this run of resistors but it is the first time where it was hard to tell gray and brown bands. But between a DMM and your link, it should be easy to track values down
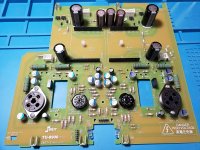
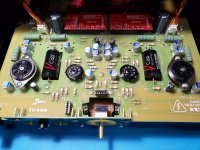
Made good progress this evening. Pic 1 shows AC Inlet pcb. Pic 2 shows the headphone and speaker jack pcb attached. Similar to the 8600 but if I recall the speaker pcb for 8600 spand almost the width of the chassis.
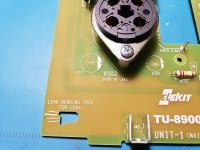
I zoomed in for Pic 3 because I wanted to show the flexibility in this area. To the right of the 4 pin tube socket is the standard signal cap provided in the kit. They provide turrets on the top and bottom for larger caps. I really like this instead of eyelets. Unfortunately I only had 1 9 pin ceramic socket not in use and quick measure with the chassis showed there could be space issues for the socket to protrude, so I just used the stock sockets.
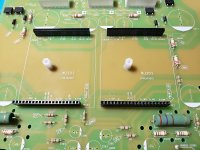
Here in Pic 4 you have the section that will be populated with the "auto power tube selector". Looking around you can see a lot of test points
I thought this was a really good idea, in Pic 5 they actually have a tool to bend your led's. Dont forget orientation.
The final pic is the main pcb almost completed. I still need to attach input rca pcb on the far top right and couple more parts.
I zoomed in for Pic 3 because I wanted to show the flexibility in this area. To the right of the 4 pin tube socket is the standard signal cap provided in the kit. They provide turrets on the top and bottom for larger caps. I really like this instead of eyelets. Unfortunately I only had 1 9 pin ceramic socket not in use and quick measure with the chassis showed there could be space issues for the socket to protrude, so I just used the stock sockets.
Here in Pic 4 you have the section that will be populated with the "auto power tube selector". Looking around you can see a lot of test points
I thought this was a really good idea, in Pic 5 they actually have a tool to bend your led's. Dont forget orientation.
The final pic is the main pcb almost completed. I still need to attach input rca pcb on the far top right and couple more parts.
Attachments


Last edited:
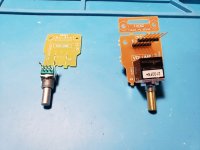
I left the volume for last because I was unsure as to how to mount the TKD kit. There is an spacer pcb where the original pcb does not have Pic 1 shows the ALPS which comes with the kit and the TKD on the right. Note in pic 2 the spacer pcb sits on top of the TKD pcb. Without this added spacer, the volume shaft protruding to the front will be uneven.
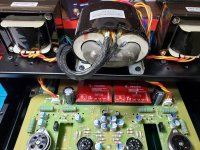
Pic 3 and 4 show the auto power module and it attached to the main pcb. These change colors according to the manual based on the tube.
Pic 5 shows the power switch attached to the AC inlet pcb. It was difficult getting the extension attached to the switch but a little force did the trick. Later on after it was assembled and added to the base chassis, I found that the extension bent when using the power switch. How will this last in the long run, not sure but I would prefer more sturdier metal type.
Its all coming together and looking quite snazzy to me in Pic 6.
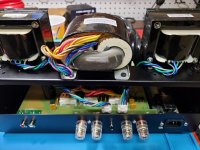
Its been several months since I opened my 8600S and if I recall, there was ample space to disconnect the power connectors and even perform first time voltage checks. Not so much here as you can see in the last 2 Pics. Its pretty tight. I made the mistake of connecting to the AC inlet last and had to undo them all to get there. There is also a lot of play when inserting into the AC inlet pcb since its only held by 1 scree on the side, so be gentle here.
I started screwing down the metal tube socket cover only to remember that I had not even powered it on and perform the needed steps documented.
I will leave that for tomorrow night. One night closer to listening
Pic 3 and 4 show the auto power module and it attached to the main pcb. These change colors according to the manual based on the tube.
Pic 5 shows the power switch attached to the AC inlet pcb. It was difficult getting the extension attached to the switch but a little force did the trick. Later on after it was assembled and added to the base chassis, I found that the extension bent when using the power switch. How will this last in the long run, not sure but I would prefer more sturdier metal type.
Its all coming together and looking quite snazzy to me in Pic 6.
Its been several months since I opened my 8600S and if I recall, there was ample space to disconnect the power connectors and even perform first time voltage checks. Not so much here as you can see in the last 2 Pics. Its pretty tight. I made the mistake of connecting to the AC inlet last and had to undo them all to get there. There is also a lot of play when inserting into the AC inlet pcb since its only held by 1 scree on the side, so be gentle here.
I started screwing down the metal tube socket cover only to remember that I had not even powered it on and perform the needed steps documented.
I will leave that for tomorrow night. One night closer to listening
Attachments

Last edited:
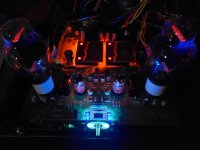
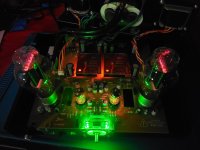
Got started on just the simple tests of removing certain power connectors and checking for tube glow and power led. My Cossor 2A3 and vcaps showed up at this time. So I used the 2A3 with GE 12AU7 tubes and followed all the test points. Swapped out 2A3 for my Cossor 300B (used in my 8600S) and performed same test points. You can see pic 1 is green to reflect 2A3 and Pic 2 is blue for 300B. Test point values will vary from 2A3 to 300B and even 12BH7. Overall with either tubes my values were very close.
3rd Pic shows vcaps installed. I was little hesitant as to which direction they should be installed. I know there was much confusion in the 8600S thread but I think I have it right based on what the manual says. Outer foil to Anode.
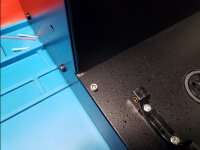
Putting the covers on I did see edges of the chassis that did not have any paint. It should be hidden with the cage but I never use my cages or covers so might have to just use a black marker.
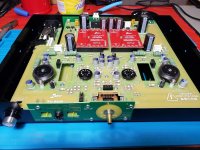
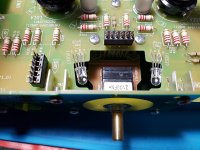
The overview shot of the pot and led's was to show you where the nfb and non-nfb jumper is located - left of the GND test point.
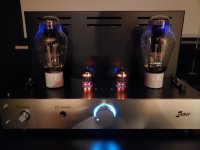
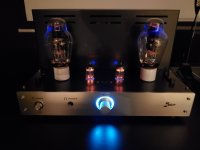
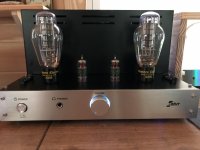
And finally my 8900 is in my main rig and playing. I was using a knob from another project and then found the one that came with the TKD kit, which can be seen in the last picture.
How does it sound ? Well give me a few days to compare this and 300B to the 8600S and 300B (of course) then will try 2A3. I am not sure if its even an apples to apple comparison. Comparing the 2A3 sounds to the 300B sounds in 8900 seems more reasonable - same chassis, parts, caps etc.
Anways let me go back and listen for a few minutes before I call it a night. I will follow up with my thoughts on building this vs the 8600.
Oh and Thanks to Victor for replying to my emails within minutes
3rd Pic shows vcaps installed. I was little hesitant as to which direction they should be installed. I know there was much confusion in the 8600S thread but I think I have it right based on what the manual says. Outer foil to Anode.
Putting the covers on I did see edges of the chassis that did not have any paint. It should be hidden with the cage but I never use my cages or covers so might have to just use a black marker.
The overview shot of the pot and led's was to show you where the nfb and non-nfb jumper is located - left of the GND test point.
And finally my 8900 is in my main rig and playing. I was using a knob from another project and then found the one that came with the TKD kit, which can be seen in the last picture.
How does it sound ? Well give me a few days to compare this and 300B to the 8600S and 300B (of course) then will try 2A3. I am not sure if its even an apples to apple comparison. Comparing the 2A3 sounds to the 300B sounds in 8900 seems more reasonable - same chassis, parts, caps etc.
Anways let me go back and listen for a few minutes before I call it a night. I will follow up with my thoughts on building this vs the 8600.
Oh and Thanks to Victor for replying to my emails within minutes
Attachments
Thanks Neville for the build picture, I have received my TU-8900 a few days ago. I have not yet started the build, however I am thinking of upgrading the resistors and the caps in the signal path. Any suggestion? I am leaning to upgrade the resistors to PRP (series PR9372) which have 1% tolerance. The low ESR 330uf caps with Audio Note Kaisei Electrolytic capacitor (however the size seems to be an issue here) With regards to output caps I have ordered from Victor vcap cutf.
Suggestions and feedback are welcome. Thanking in advance
Suggestions and feedback are welcome. Thanking in advance
Thanks Neville for the build picture, I have received my TU-8900 a few days ago. I have not yet started the build, however I am thinking of upgrading the resistors and the caps in the signal path. Any suggestion? I am leaning to upgrade the resistors to PRP (series PR9372) which have 1% tolerance. The low ESR 330uf caps with Audio Note Kaisei Electrolytic capacitor (however the size seems to be an issue here) With regards to output caps I have ordered from Victor vcap cutf.
Suggestions and feedback are welcome. Thanking in advance
As I was soldering resistors I was thinking if other resistors would fit. There is not much wiggle room when inserting leads. Victor's prices on caps are really reasonable if you shop around.
If there is anything I wish I had on hand would be ceramic 9 pin sockets - these are the tubes I often roll with. The 4 pin 400B/2A3 sockets are pretty good and from the marketing literature are newly made for Elekit?
@Neville
Thanks for sharing
@Victor
Is there an 220V board with external lip also?
Hey Gavin, in my 1st posting, 1st pic shows the pcb's all attached. One of them is for 100V AC inlet pcb. In a separate bag are 2 other pcb - 1 for 115 and the other for 220 or 230. I dont recall seeing any parts to cater for 220. Maybe Victor can confirm this.
I am new to the forum, but not to Elekit. I built an 8200, and 8600, an 8800, and now this 8900.
The kit came on Monday evening. I used parts of Tuesday-Thursday to finish it.
I believe I have the VCap orientation correct.
Since I have given the other amps to friends I cannot do a direct comparison, but my first impressions is that the 8900 has better sound quality than the 8600.
That is, with both the WE300Bs and 2A3s.
I am not sure quite what to make of the Non-NFB setting. Besides the increased gain I do not hear much of a difference. Anyone else try that yet?
This has been a great experience and thanks to Victor for all the help.
Attachments

Comparison
K so how does 8900 compare to 8600S? Let’s breakdown each one first.
8600S is stock but with Takman resistors, Audience Auricap and Cossor black plate 300B, RCA Cleartop 12au7 and Cv4003..about 300 hours
8900 is stock but with Vcap cutf, TKD volume and same Cossor black 300B first with GE 12au7 then RCA Cleartop 12au7 taken from 8600S, about 13 hours
I was immediately drawn to the finer detail in familiar recordings. They were not harsh or drew attention but blended in well. Swapping out GE for RCA presented a slightly livelier image. Overall, can only think the better vcap’s are a major contributing factor to the improvement I am hearing.
Now how does 2A3 sound? Never heard them before. Will keep RCA for better comparison. More to follow…..
Within a few minutes I could tell there was something really special about 2A3, but I decided to listen for a lot longer and my impression has not changed.
300B is a special tube that does everything right, not too much bass and top end but just right midrange. This is comparing it to my el34 and kt66. What I am hearing with 2A3 is taking the 300B to the next level, rendering the 300B to be too bloomy. 2A3 feels like we have stepped inside the bloomy sound and can hear much finer details. Guitar strings have that vibration when plucked. Piano keys have never sounded so real. Better separation of instruments and I could swear I thought I could hear where some instruments like saxophone was changing direction to the mic. There is a slight drop in bass and treble roll off but that could be the key to its success. I can go on and on, but everything I have read on web is true, 2A3 is where you want to be !
300B is a special tube that does everything right, not too much bass and top end but just right midrange. This is comparing it to my el34 and kt66. What I am hearing with 2A3 is taking the 300B to the next level, rendering the 300B to be too bloomy. 2A3 feels like we have stepped inside the bloomy sound and can hear much finer details. Guitar strings have that vibration when plucked. Piano keys have never sounded so real. Better separation of instruments and I could swear I thought I could hear where some instruments like saxophone was changing direction to the mic. There is a slight drop in bass and treble roll off but that could be the key to its success. I can go on and on, but everything I have read on web is true, 2A3 is where you want to be !
With 300B, I really could not tell any difference between the two in bass.If I had to replace caps with stock kit caps, I have a feeling they would still sound the same through the frequencies which is not a bad thing. They are both very good amps. I still have another kit el34/kt66 which has killer bass but no match for 300B if you listen to vocal, jazz, blues. Tube selection between the 2 amps would be the deciding factor I think.
Using 300B tubes my volume is at around 10 o clock (both amps), 2A3 it is around 12. My Zu omen are 97db. Your current or future speaker purchase will dictate which Elekit to build.
If you already have or just bought 8600s then you are already in the gold status of audio nirvana. Getting the 8900 pushes you up to elite status.
But it all depends on your budget and other personal factors. There is also Lundahl upgrade which is not pocket change but from the threads here they sound like a good upgrade.Personally, I like knowing that there are not that many upgrades because when does it stop and my wallet is not infinite. etc. ….shameless plug here, I might be letting my 8600 go to recover some costs…pm me
Last edited: