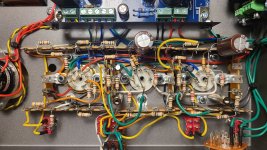
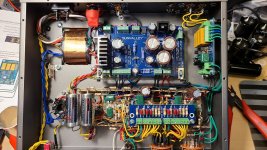
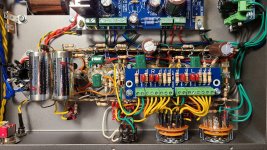
I started building many months ago but got sidetracked when work went covid-insane and I had no free time left ... but things have calmed down before the New Year so I took advantage of the peace and quiet to get back to this. I've installed all the resistors based on the diagrams and want to confirm that I'm supposed to have a pair of 220K resistors left over because they were replaced with 100K now. I remember a sheet included with the extra resistors but I measured and organized all the resistors when I started and discarded that paper.
I'm ready to install the green film caps now as soon as I hear back on the leftover 220K (small) resistors. I did install the blue ones (220K) on the power supply board. The extra ones I have are the brown resistors.
If you referring to the v2.5 modification sheet with extra resistors and caps, I am also at that stage of my build and Victor told me last night that we do not need to do that-those were extra parts.
Last edited:
The assembly instructions I have are for Version 2.2 and I did get extra 100K resistors but don't remember getting extra caps. I just want to make sure I didn't miss anything as I've gone over the schematic a couple of times and gone over the resistor installation image many many times but don't see any spot for 220K (218K measured) resistors so wanted to ask for confirmation that I don't need these.
In the meantime, I've finished assembly now and ready to test voltages with the diode rectifier as I see it says that you can expect lower B+ if you use a tube rectifier.
I have another question - for test voltage measurements, what am I using for GND reference? Do I use chassis? Do I use the GND pads on the lower right side of the PSU board?
I know it's common in Japan to have floating ground but should I add a power plug ground and replace the IEC? Any harm in doing so if I connect it with a ground isolator of some sort?
That looks good twitchie. I installed 3 prong IEC and yet to wire it - perhaps to the tooth washer under the one leg supporting power supply board or the gnd terminal as they both are connected to each other.
I am curious to see what the answers are to your questions. They will help guide me.
I am curious to see what the answers are to your questions. They will help guide me.
@Neville, I clipped my negative probe to the shiny tab that holds the shield in place on the PSU board, which happens to be screwed into the post with the toothed washer connected to the chassis. I tested resistance to the GND pads on the board and it showed continuity so I went with that. All my measurements were within spec - make sure your probe is shielded with heatshrink to avoid shorting anything as you will be probing around spaces with many bare leads very close by.
I am going to leave it for now and might revisit it to add a 3-prong IEC and ground strap if I ever open it up again but for now it's built as directed.
I've buttoned it up and swapped in the psvane 274 rectifier. Right now I've got Gold Lion ECC83/ECC82 tubes installed but picked up a pair of (Fisher branded) Telefunken ECC83 smooth plates from ebay that I want to try (maybe later).
Thank you for another amazing project Victor!!!
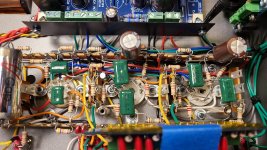
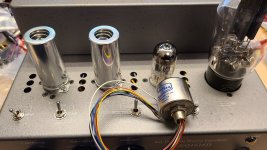
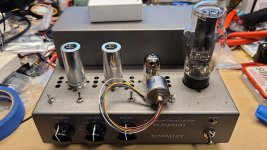


Some things I wish I knew before I started:
- it actually tells you in the manual that if you see an orange dot on the connection, do NOT solder it yet because more connections are coming. Blue dot means go ahead and solder
- when connecting to the switches, you are better off keeping the wires close to the chassis and approach from below as you will be connecting in with capacitors later on from above and you may run into the jumble of turnover wires that come near the end. I connected from above because I wanted to heatshrink these and it turns out that was probably not the best idea and unneccessary
- be patient and do not expect this to be a quick build
- as much as you think the wiring is difficult to install (neatly) because they don't retain any shape, the resistors are not much easier and there are so many of them. Just keep at it and eventually you'll have it all done. I installed anywhere from 4-10 resistors a night over the course of a week and did the same for wire connections over a longer period but now it's done and next up is an external step up transformer build
... but a break for now and time to spin some records

Here are my thoughts about this kit:
- quick shipping from Victor
- outer box comes with the build guide, upgrades you asked for and revision sheet with resistors and caps, which are not needed according to Victor
- inner box has the kit which is well packed
- English build guide is on good printed paper but I felt at times there was a “lost in translation”. There are bag contents and detailed parts breakdown in Japanese. I translated these to English and also did it for parts of the build guide.
- I read the build guide several times and it’s indicated when to solder and when to join the resistors,caps and wires. Think of it as 3 levels of building. Wiring hugs the chassis and terminal lugs. Next up is the resistors. And final level is caps. This where I worked a few parts each night and walked away, slowly checking off each level. I kept on going back and forth between pages to make sure when the iron was in place I had all the necessary build parts in each terminal lug. I found myself twisting my body and arms to get into tight spots...yes 2 more hands would have come in “handy”
- make sure you use painters tape on the chassis to prevent scratches
- right now she is playing music with Sovtek 12ax7 LPS in v1 and v2 and cv4003 in v3 with Sovtek 5ar4 and here in lies a major issue. The metal base for v1 and v2 are so tight, removing and installing tubes is impossible. None of my Genalax tubes fit. Sovtek tubes are almost impossible to remove. I will have to get better tube sockets or just cut away the ones in place which is such a pity. I can hear some distortion in right channel which is not present in my Akitika preamp with built in phono preamp. Is it because tubes are not properly seated ? Not sure... but this needs to go back to the bench.
Akitika phono preamp is on par with Lounge Audio LCR preamp and just sounds right for less than $200. I hope this SunValley preamp will outperform it after it gets reworked.
Neville
Last edited:
Hi Neville - yes i also have a similar question with the v1 and v2 sockets, they are not a type i've used before. When I push 12ax7 gold lions in as far in as I can (without excessive force) there is probably a few millimeters of pin above the socket which you can see poking through. I've just assumed this is correct way valves are to be seated in this type of socket. The phono is extremely quiet and distortion free for me (i'm using 2x genelex gold lion 12ax7 and 1x nos brimar 12au7), so hopefully you should be able to resolve the right channel distortion.
Is there a way to change the input load impedance from 50ohm to something between 100-400 ohms. Is it as simple as changing the resistor in the path?
You can change R1 (51Ω) on the MC board to the desired impedance (100 to 400Ω).
Hi Neville - yes i also have a similar question with the v1 and v2 sockets, they are not a type i've used before. When I push 12ax7 gold lions in as far in as I can (without excessive force) there is probably a few millimeters of pin above the socket which you can see poking through. I've just assumed this is correct way valves are to be seated in this type of socket. The phono is extremely quiet and distortion free for me (i'm using 2x genelex gold lion 12ax7 and 1x nos brimar 12au7), so hopefully you should be able to resolve the right channel distortion.
I have encountered other brands with this tube mounting,one of them is Jolida phono preamp but they were not as restrictive as this. I had no problems tube rolling.
Also on a separate note I am reminded that tube phono preamps need low noise matched tubes....or face the shhhhhhh noise when no music is playing.
I finished my build last weekend and have been trying to track down the reason for some errant voltage reading ever since. P1 and P2 values are low at 138-140v, MC is high at 16.1v. All others are pretty much on the money. I've triple-checked wiring, resistors, and caps. Everything appears to be where it is supposed to be. I'm using the diode rectifier for measurements. Can anyone suggest how to track down the issue?
Thanks,
Smash
Thanks,
Smash
Reviewer Herb Reichert's system, take the complete tour! - YouTube
Reviewer Herb Reichert's system, take the complete tour! SUNVALLEY EQ1616D
Reviewer Herb Reichert's system, take the complete tour! SUNVALLEY EQ1616D
Last edited:
Thinking about building one. Question, will low or medium output moving coil carts require a step-up transformer?
I have a Soundsmith Carmen with about 2mv and it plays nicely but I have to engage high gain for some meaningful volume. I highly suggest a sut or headamp. Waiting on Hagerman Piccolo 2 to arrive.
If you do order and start building the kit I highly suggest you fit your tubes into v1 &v2 sockets first and if they are tight you should buy better tube sockets that mount on top without the shield. I first tried to cut the bottom shield which is easy but when you insert tubes your fingers hit sharp edges. So I ended up cutting the entire bottom shield off and bent whatever metal was there over the socket for reinforcement but at that stage your integrity is shot and now I can finally insert all my tubes I have too much play so I ordered new sockets to replace them.
The preamp is quiet provided you have good tubes and for the most part, gets out of the way. Still waiting to compare it to my Akitika, LCR and Sutherland- after I have put more hours on it.
As for all the knobs, they can be a distraction and you can certainly hear differences but I just stick with Riaa and don’t mess with anything else.
Last edited:
I finished my build last weekend and have been trying to track down the reason for some errant voltage reading ever since. P1 and P2 values are low at 138-140v, MC is high at 16.1v. All others are pretty much on the money. I've triple-checked wiring, resistors, and caps. Everything appears to be where it is supposed to be. I'm using the diode rectifier for measurements. Can anyone suggest how to track down the issue?
Thanks,
Smash
Did you come right? Most of my measurements were close to what was on paper. The differences I assumed to be influenced by valves. Have you played it? Pm me and we try to get on a call tomorrow.
