ahhh, thanks, that explains why I'm confused ")
So it seems I have an early CD 63.
My decoder circuit looks like this
rather than the newer version with the C521
Does that mean I can feed a new clock signal pretty much straight to the pin13 without adding any extra components? If so, I can do this nice and easy at U193 which is a wire jumper right next to the decoder on my board.
So it seems I have an early CD 63.
My decoder circuit looks like this
An externally hosted image should be here but it was not working when we last tested it.
rather than the newer version with the C521
An externally hosted image should be here but it was not working when we last tested it.
Does that mean I can feed a new clock signal pretty much straight to the pin13 without adding any extra components? If so, I can do this nice and easy at U193 which is a wire jumper right next to the decoder on my board.
Last edited:
ahhh, thanks, that explains why I'm confused
So it seems I have an early CD 63.
Does that mean I can feed a new clock signal pretty much straight to the pin13 without adding any extra components? If so, I can do this nice and easy at U193 which is a wire jumper right next to the decoder on my board.
You are right feed the signal before the 100R (I wrongly mentioned 100pf in my previous thread
)You may wish to know that out of my 7 modding projects only two of the CD63s were with the old PCB and I fed the signal as you have mentioned and they all worked like a charm.
Last edited:
Excellent, thanks
the RD14 100R is right next to the DAC, but the U193 jumper is right next to the decoder, so I think maybe I'll remove U193 and insert the new decoder clock feed here with a 100R resistor in series. That way I'm avoiding something like 50mm of the original tracks which may help to avoid interference.
I've just got a little USB oscilloscope, so I'll hopefully get some examples of the current clock signals and the new improved versions too.
It's this one. UsbScope.eu
Hopefully 100khz is sufficient to get an idea of what's going on with the clocks.
I also want to use it to see how the different 5v regulators I've got differ in terms of noise and stability. Ears are good, but nothing beats a bit of measuring
the RD14 100R is right next to the DAC, but the U193 jumper is right next to the decoder, so I think maybe I'll remove U193 and insert the new decoder clock feed here with a 100R resistor in series. That way I'm avoiding something like 50mm of the original tracks which may help to avoid interference.
I've just got a little USB oscilloscope, so I'll hopefully get some examples of the current clock signals and the new improved versions too.
It's this one. UsbScope.eu
An externally hosted image should be here but it was not working when we last tested it.
Hopefully 100khz is sufficient to get an idea of what's going on with the clocks.
I also want to use it to see how the different 5v regulators I've got differ in terms of noise and stability. Ears are good, but nothing beats a bit of measuring
I doubt your USB oscilloscope is sensitive enough to trace if there is any noise exists on the +5V regulatorsExcellent, thanks
the RD14 100R is right next to the DAC, but the U193 jumper is right next to the decoder, so I think maybe I'll remove U193 and insert the new decoder clock feed here with a 100R resistor in series. That way I'm avoiding something like 50mm of the original tracks which may help to avoid interference.
I've just got a little USB oscilloscope, so I'll hopefully get some examples of the current clock signals and the new improved versions too.
It's this one. UsbScope.eu
An externally hosted image should be here but it was not working when we last tested it.
Hopefully 100khz is sufficient to get an idea of what's going on with the clocks.
I also want to use it to see how the different 5v regulators I've got differ in terms of noise and stability. Ears are good, but nothing beats a bit of measuring
BTW the bandwidth might not be sufficient to review what is happening to your external clock signal.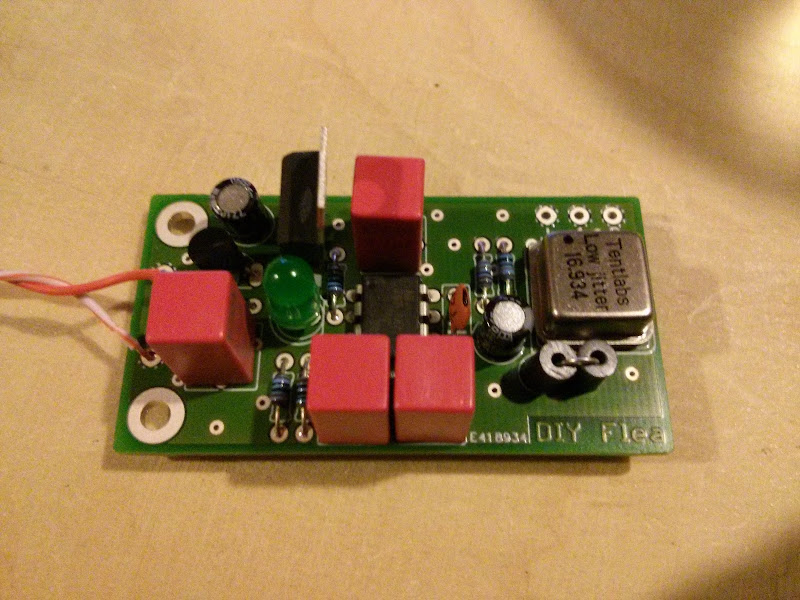
James, I notice that your tentlabs clock is placed differently on your flea board to mine. If you were to rotate yours anti-clockwise through 90 degrees then that is how mine is mounted. I don't know whether this makes a difference or not. (Mine works okay.) I believe I copied mine from someone else's pic on here – just done a trawl but can't find it.
Could someone please clarify which way is correct or whether it makes a difference? Thanks
ahhh, thanks. I haven't had the chance to test it yet, but that's one of the things I wasn't 100% certain on.... I copied the orientation from another picture I found, but it's possible that it was a different version of the PFM flea board and Ray's one isn't the same.James, I notice that your tentlabs clock is placed differently on your flea board to mine. If you were to rotate yours anti-clockwise through 90 degrees then that is how mine is mounted. I don't know whether this makes a difference or not. (Mine works okay.) I believe I copied mine from someone else's pic on here – just done a trawl but can't find it.
Could someone please clarify which way is correct or whether it makes a difference? Thanks
If someone could confirm, that'd be great
Brill, thanks, hotiron.
I have a question for Ray, when he next visits, as I have just been on his site.
I was wondering why the mod of connecting signal wires from the one chip to the other under the board doesn't get mentioned, I have just read the article by Mauro Penasa.
I assume therefore that his mod is implemented instead.
I know from experience how difficult Thorstens mod is to implement, but which is more effective?
I fancy the challenge of doing it again.
Hi, and welcome to this thread
I assume you must mean the replacement of digital signal traces with coax? This is indeed quite an advanced tweak and requires some steady hands and soldering skills.
Mauro's article and this tweak have nothing to do with each other, they can be implemented independently (is that correct english??).
Does that mean I can feed a new clock signal pretty much straight to the pin13 without adding any extra components? If so, I can do this nice and easy at U193 which is a wire jumper right next to the decoder on my board.
You may have to insert a 1...10nF coupling capacitor in series with the clock input, I recall there's around 2.5V DC offset present at the decoder's input and this conflicts with the Flea's output. It's one of the reasons Marantz included one in the mkII version of the player.
Nice work on the boards
Regards,
Ray
Last edited:

Sorted
Thanks Ray.
Is this coupling capacitor in addition to a resistor in series? Is there a specific type of cap that would be best suited to this application?
Would it be best to re-create the V2 Marantz circuit with it's 10p coupling, 390R series, then 39p decoupling to ground before pin 13?
Is this coupling capacitor in addition to a resistor in series? Is there a specific type of cap that would be best suited to this application?
Would it be best to re-create the V2 Marantz circuit with it's 10p coupling, 390R series, then 39p decoupling to ground before pin 13?[/QUOTE]
Actually I have tried to re-create the V2 circuitry from V1 but it did not work for me even though everything had correctly connected. No idea why it was so :confused: May be the wires had picked up some noise. I reverted back to V1 and it worked beautifully then :)
I did not have the coupling cap added but if you do I would suggest 10p mica.
Last edited:
Did you come to a working solution in the end for supplying a new clock signal to the decoder with the V1 circuit?Actually I have tried to re-create the V2 circuitry from V1 but it did not work for me even though everything had correctly connected. No idea why it was so
Do you think it's better for me to just concentrate on giving the DAC a good clock and relying on the standard DAC clock-out to supply the decoder? I would hope that because of the low jitter clock supply to the dac, this will give the decoder a better clock signal anyway, but wasn't sure...
I found the Tentlabs divide by 2 circuit diagram today, so I have ordered a 74HC74 and will try and supply 8mhz to the servo from this new clock as well.
http://www.tentlabs.com/Components/XO/assets/Divide by 2 V2.pdf
Last edited:
Did you come to a working solution in the end for supplying a new clock signal to the decoder with the V1 circuit?
Do you think it's better for me to just concentrate on giving the DAC a good clock and relying on the standard DAC clock-out to supply the decoder? I would hope that because of the low jitter clock supply to the dac, this will give the decoder a better clock signal anyway, but wasn't sure...
I found the Tentlabs divide by 2 circuit diagram today, so I have ordered a 74HC74 and will try and supply 8mhz to the servo from this new clock as well.
http://www.tentlabs.com/Components/XO/assets/Divide by 2 V2.pdf
Yes, at the end of the day for the old boards I used the V1 circuit. But for the new boards I lifted one leg of the cap and connected a signal to it. Both worked fine.
If you can I recommend you clock the decoder separately as there is slight improvement in SQ though by not much. What you need to do is just to feed signal from your 16.xx Mhz clock to the decoder (connected in parallel with the cable to your DAC), therefore no cost at all apart from the small length of coaxial cabled being used
In my case out of the 7 modded projects I did, 2 of the CD63s used 2 separate independent clocks for the servo and the DAC (and the decoder) while 5 of them used only one clock which has a build in frequency divider on it supplying 8 and 16 Mhz clock freq. to the servo and DAC (as well as decoder).
I think the V2 circuit has to do with the revision of the decoder that is used. I would stick with a 33R series resistor that's on the Flea board, and then a small cap to the decoder input. Anything from 10p to 10n will do indeed (I usually use a small 1nF NP0 ceramic or FKP). MKP, mica, NP0 ceramic or polystyrene will all work fine. It may even work without the cap in your V1 player, but I have no experience with this.
Ray
Ray
Last edited:
Thanks guys, that's great. I'll wire it up so I can try a few variations. Is it a case of 'if it works, it works' ? Or will there be 1 method which gives better results?
Ray,
I know it's not ideal, but if I wanted to run 3 outputs from the flea with XO so I can also use a divider for the Servo, how would you do this? Maybe run the DAC and decoder joined from 1 output, then the divider from the other? Or maybe use outputs 1 and 2 for the DAC and Decoder, then join #3 for the divider onto the output pin of the XO using another 33R resistor?
thanks,
James
Is it a case of 'if it works, it works' ? Or will there be 1 method which gives better results?
Yes you are right 'if it works, it works'. If not just try to do with or without a cap and if still you have no luck then just forget about it as the improvement in SQ is not that big. It is only something nice to have IMHO
.- Home
- Source & Line
- Digital Source
- Marantz CD63 & CD67 mods list