Last year during first lockdown, I build a TAS3251 Class D amplifier by joining a project of DIYA member JMF11. This amp is named NetAMP, build threat is: [design log] Neat 2x170W I2S in, I2C controlled, integrated DSP amp (TAS3251).
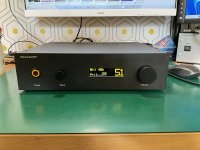
I was very happy with the result and decided to use it as my main amplifier in the living room. I then decided to build a preamp, then an enclosure. One design goal was to have something user friendly (easy to use) intended to all family and friends usage.
As the project as reach a point where I can confirm it is viable, I can publish information and progress in this thread
NeatAmp Pre handle:
NeatAmp Pre allow user to manage:
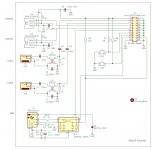
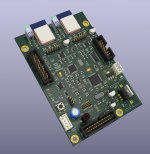
The block diagram shows Pre is made of four different boards: one for the rear panel with the inputs connectors; one for the front panel with display, IR receiver and encoders; one for the main board and the last for the power supply controller. This design mostly address large enclosure, this choice was dictated by NeatAmp board size and also the SMPS size. Boards are connected via flat cables and JST connectors.
NeatAmp Pre is built around a STM32F303, an AK4118 and two CSR Bluetooth modules. CSR, now Qualcomm, provide AptxLL (Low Latency) codec which is required for TV sound.
Power distribution is a bit weird, during development I encounter overheat issues on main board +5V reg and I installed a pre reg on the front panel board. This could be simplified.
NeatAmp Pre manage NeatAmp through a serial link. For this purpose, NeatAMP receive a specific software which manage low level TAS3251 duties including error management and communication with NeatAmp Pre. NeatAmp Pre also run its own software. Both software are made with ST suite: STM32Cube, they’ll be available on GitHub once acceptable quality level reached.
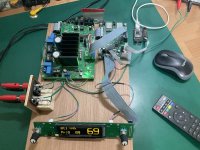
Current project status is ongoing, but everything now is stabilized and is viable.
What remains to do?:
Block diagram is attached.
I was very happy with the result and decided to use it as my main amplifier in the living room. I then decided to build a preamp, then an enclosure. One design goal was to have something user friendly (easy to use) intended to all family and friends usage.
As the project as reach a point where I can confirm it is viable, I can publish information and progress in this thread
NeatAmp Pre handle:
- Remote management of NeatAmp board, including fault and error handling.
- 7 sources: 2 spdif, 2 toslink, 2 Bluetooth (1 open and 1 dedicated as a bridge with the TV), and 1 USB.
- Bt sources are 44.1 or 48k, spdif and toslink 44.1, 48, 88.2 and 96k and SUB will be 44.1 or 48k.
- IR receiver (NEC & Sony protocols).
- UI made of an OLED display and two rotary encoders.
- Soft start / power control for the SMPS.
- User presets memories.
- Auto power-off.
NeatAmp Pre allow user to manage:
- Volume, Mute, L&R balance, mono/stereo, DSP presets, balance of the input level of each source, IR remote code learn.
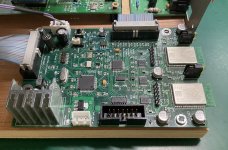
The block diagram shows Pre is made of four different boards: one for the rear panel with the inputs connectors; one for the front panel with display, IR receiver and encoders; one for the main board and the last for the power supply controller. This design mostly address large enclosure, this choice was dictated by NeatAmp board size and also the SMPS size. Boards are connected via flat cables and JST connectors.
NeatAmp Pre is built around a STM32F303, an AK4118 and two CSR Bluetooth modules. CSR, now Qualcomm, provide AptxLL (Low Latency) codec which is required for TV sound.
Power distribution is a bit weird, during development I encounter overheat issues on main board +5V reg and I installed a pre reg on the front panel board. This could be simplified.
NeatAmp Pre manage NeatAmp through a serial link. For this purpose, NeatAMP receive a specific software which manage low level TAS3251 duties including error management and communication with NeatAmp Pre. NeatAmp Pre also run its own software. Both software are made with ST suite: STM32Cube, they’ll be available on GitHub once acceptable quality level reached.
Current project status is ongoing, but everything now is stabilized and is viable.
What remains to do?:
- Power controller board. I am not satisfied with the current one, I’m currently switching to something closer to the one of Mark Johnson with an ‘always on’ supply made of a AC/DC converter module. I’ll update later when tested ok.
- Software modules:
- Storage and management of the DSP presets
- IR Learn
- Shut off screen
- Some minors enhancement
- USB Audio (will be made last after the enclosure)
- Make an enclosure.
Block diagram is attached.
Attachments

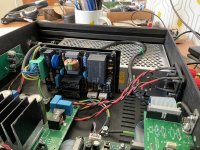
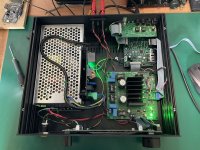
Hardware
Some comments on the hardware side:
Uc
DIR
Bluetooth
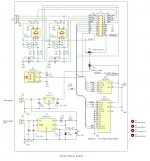
Schematics and board pictures are attached.
Some comments on the hardware side:
Uc
- I choosed a STM32F303RB because I was having one…and it has I2S, USB enough GPIO ports and also enough RAM to run USB.
- Uc can be programmed and debugged via a STLink V3 interface with 1.27pitch IDC connector; with the help of jumper JP1 it can always easily be flashed through USB.
- For USB audio, and some future development, Uc produce an I2S signal based on the clock fed in I2S-CK (PC9). Clock is provided by a mux and on/off control of two Renesas PLL based XO multiple of 44.1k and 48k frequencies.
DIR
- Not much to say, I already knew AK4118, good chip and I had some. Its GPIOs are very handy.
Bluetooth
- I decided to add Bt to the project after finding a Bt module supplier offering cheap, well-made, documented modules and a cheap evaluation breakout module: https://www.ebyte.com/en/product-class.html?cid=3&pid=157, I then bought an EVM on their Ali shop Bluetooth Module Adapter Test Kit Test Board USB SPI VBT E104 BT30 TB|Fixed Wireless Terminals| - AliExpress a CSR programmer and the with the help of the software and ref data available on this thread : CSR8675 programming guide w. software and tons of CSR info, I confirmed feasibility.
- Bt Module are built around SOC CSR64215. This is a real gem, It embeds a Bluetooth receiver, a Arm core, a DSP, a DAC and an ADC, a mixer, an headphone amp, mic and line input, USB audio receiver, SPDIF, X0 and PLL, serial comm, I2S, SPI, QSPI, I2C, Serial, PSU, IR Receiver, pre-loaded plug and play software. I decided to use it as a simple piece of hardware intended to play audio through I2S, without the DSP, or even the DAC; a simple I2S source but with some control capabilities by the STM32F303.
- On the main board are some headers for each Bt module in order to be able to configure it on site with the CSR programmer. There are also level shifter 3.3V/1.8V for the links with the rest of the board.
- Without writing custom software for the SOC, there are a lot of parameters to adjust on it in order to suit your needs, that’s what the headers and programmer are for. I then apply the following dedicated configuration.
- Bt1 SOC is configured to accept BT connection with audio from any device, any codec.
- Bt2 SOC, is intended to set a permanent bridge with my TV, it is configured to accept connection from a single device, preferably with AptxLL codec, and also to always try to reconnect automatically upon disconnection or at power up.
- Both SOC are configured to enter Bluetooth pairing mode or clear pairing list or restart based on custom pulse trains on their ‘Play/Pause’ input: this is the way my software manage the SOC : via the pulse train used.
- Both Soc embed their on PCB antenna: main board will be installed at the back of enclosure, with the antenna pcb slightly outside the box (if metal box). This is not optimal, but tested ok, for now.
- Both Soc are very close on pcb, I didn’t notice any kind of interference, for now.
Schematics and board pictures are attached.
Attachments
-
 NeatAMP_Pre_Input.jpg129.4 KB · Views: 198
 -
 NeatAMP_Pre_Front.jpg162.2 KB · Views: 202
 -
NeatAMP_Pre_Main.pdf401.6 KB · Views: 97
-
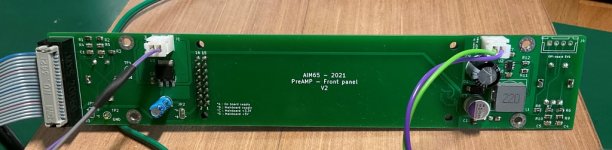 Front_board.jpg104.5 KB · Views: 188
 -
 Input_board.jpg222.5 KB · Views: 327
 -
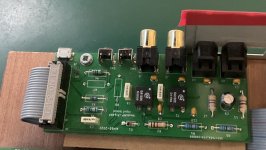
 Main_board.jpg342.5 KB · Views: 330
 -
 Pre_Main_PCB.jpg250.9 KB · Views: 327
 -
 NeatAMP-Pre.jpg349.4 KB · Views: 342
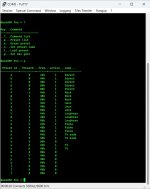
Software
Some comments on the software side:
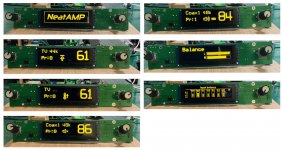
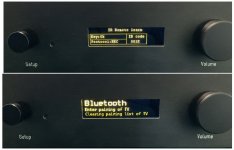
Screen gallery is attached.
Some comments on the software side:
- NeatAmp Software is totally slaved to NetAmp Pre software. A basic protocol is established between them and allows Pre to tell NeatAmp to change volume, mute, balance, preset, ... Each command has to be acknowledged by NetAMP within 1s, there’s one retry then if not acked a fault is issued.
- On the other direction, NeatAmp could notify Pre on dedicated events such as clipping, overheat, i2c error, TAS fault or PSU fault. NeatAmp Pre process those incoming notify as events and actions.
- Both software of NeatAmp and Pre are event based superloops and thus behave like real time. User Interface of NeatAMp Pre is made of screen, each screen behaviour is defined by tables where events and actions are associated, this is not hard coded thus easily repurposable.
- The OLED display used has a SSD1322 controller. When used in SPI, its internal frame buffer could only be written by the Uc and enforce that a single write has to be 16bits so 4 pixels. Without using an external frame buffer in Uc memory it become very difficult to manage the whole screen. As I didn’t want to spend 8kB of Uc RAM for the display I spent much more time than planned on displays issues, preparing fonts and bitmap. Next time, I’ll avoid SSD1322 (event if cheap and good looking) or use it with a framebuffer in Uc memory.
- Two Infrared protocols are implemented: NEC and SIRC (Sony).
- Environment used is 100% ST: IDE is CubeIDE, Uc configurator and hardware API (HAL) are CubeMX, USB middleware is part of CubeMX, all free.
Screen gallery is attached.
Attachments

Project is mostly finished, the amplifier is ready to be installed in the living room.
This was a long run, software development took most time, certainly too much !, next project shall be analog, without any uP 😊
Since previous posts :
This was a long run, software development took most time, certainly too much !, next project shall be analog, without any uP 😊
Since previous posts :
- Boxing
- PSU control board has been finalized and installed
- A thermometer with supervision has been installed with a LM335 and some software. As box cooling is pretty weak, I have no idea of the temperature that could be internally reached. Better to place this under software control.
- Infrared now support Apple IR protocol, which is a NEC variant. A ‘learn’ feature has been added with allows the amp to learn the keys to use on any NEC/SONY/Apple remote.
- Some internal controls are now available on a PC through serial USB. This mainly allows uploading in the amp new filter configuration without having to recompile (same for IR learn feature) and also to set up amplifier gain.
- A feature has been added to let bluetooth receivers entering in pairing mode and to clear their pairing lists.
- First set of filter has been tuned, but to be improved…
Attachments
- Home
- Source & Line
- Digital Line Level
- NeatAMP Pre : a digital preamp for NeatAMP