There is often a price to be paid on the road to that magical holy grail of musical bliss. For some, it's usually a mirage' that keeps moving. For others, it's a rabbit hole we've descended into, and yet we keep digging.hey @gerihifi , yes that role is for grounding, I also use a second modded one with silver fork for grounding my network via the bottom switch (Aqvox SE).
As you said, switches unfortunately make a difference and not exactly a subtle one.. The more experiments I make, the more I find the importance of multiple reclocking of the music data along the way to the target. But there are some principles to follow in this delicate subject..
Disclaimer for others: I was a non-believer or sceptic at first, so don't attack me for my observation, if you find it impossible (as I did before).
") But for many others, it's the journey that we try to enjoy along the way. As I get older, I think I'm falling into the latter camp.
But for many others, it's the journey that we try to enjoy along the way. As I get older, I think I'm falling into the latter camp.You should try and keep the wiring as short as possible from the output of the LinearPis to the OPA861 output board. If you can't, use the 'sense' lines also.IAN DAC Stack Success 😅🙏😍
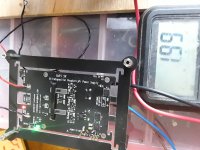
View attachment 1211429
For sure. I plan to do that when I figure out how to put this genius piece of engineering in a box. I just needed to give myself literally some ‘wiggle room’ for this very first test.
I’m super impressed. Next week I rebuild my streamer stack and i2S out into this baby and really rock.
Listening to Pink Floyd vinyl right now through a crappy turn table and a crappy A2d converter to SPIDIF and it sounds amazing.
I’m super impressed. Next week I rebuild my streamer stack and i2S out into this baby and really rock.
Listening to Pink Floyd vinyl right now through a crappy turn table and a crappy A2d converter to SPIDIF and it sounds amazing.
Hmm when exactly do you need 3 amps for Rpi4?
Me during normal operation, I need just 0.3 amps for Rpi3 and around 0.5-0.6A for Rpi4.
During the highest load when also recharging batteries of PurePi, I haven't seen going it upwards 1.5A, more like 1.3A (and this is with one network switch connected to this measured 5V rail).
Hello,
I had to recharge batteries of my digital meters.
With the switch on the pure pi board in on position ( so connected to a 2A load created by a resistor string in my test set up) and ultracaps drained the top load was around 2,8 A in on position going down to only 2A in a few minutes..
So if you have a remote switch it would be nice and let the charged caps function as a kind of powerbank?during start up . I dont have a Christmas tree nor an ssd
INDEED if you use a serious output board and a serious supply the wire in between those two should be 5 inches. Probably they wont dissipate any heat so can be mounted on top of each other.
Greetings, Eduard
But I used 14 AWG. Big wire. Barely fit in the screw downs.You should try and keep the wiring as short as possible from the output of the LinearPis to the OPA861 output board. If you can't, use the 'sense' lines also.
I had issues running a DSI screen and an SSD for FLAC on my streamer stack. Maybe it was another issue. But it would freeze up, not see the SSD or respond to Volumio web server etc. While running on the iFi ipower 2.5A supply.Hmm when exactly do you need 3 amps for Rpi4?
Me during normal operation, I need just 0.3 amps for Rpi3 and around 0.5-0.6A for Rpi4.
During the highest load when also recharging batteries of PurePi, I haven't seen going it upwards 1.5A, more like 1.3A (and this is with one network switch connected to this measured 5V rail).
Hello,
I had to recharge batteries of my digital meters.
With the switch on the pure pi board in on position ( so connected to a 2A load created by a resistor string in my test set up) and ultracaps drained the top load was around 2,8 A in on position going down to only 2A in a few minutes..
So if you have a remote switch it would be nice and let the charged caps function as a kind of powerbank?during start up . I dont have a Christmas tree nor an ssd
INDEED if you use a serious output board and a serious supply the wire in between those two should be 5 inches. Probably they wont dissipate any heat so can be mounted on top of each other.
Greetings, Eduard
When I switched to cheap 3A supply no issues. The guide for RPi4 says 3A is max draw.
I realize most of you don’t run screens and drives or you do on a separate system. My prep of concept was SSD and screen attached to the Volumio streamer.
OPA861 Fully Balanced Zero Feedback I/V Stage
First Impressions
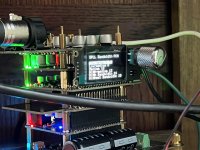
I have just got this working finally on a PiLess DAC Stack recently posted above. My comparison is the the output stage of a Cambridge Audio DACMagic 200M with same amp and speakers and sources. The input source is a Denon 200USB turntable going through an ADC audio converter from turntable Lineout to a RCA S/PIDIF output running into IAN DAC Stack:
Then into two Focal Audio 50 professional monitors (powered monitor with XLR inputs).
What stands out
1) Neither too warm and mushy, nor ice-picky harsh, but very in between showing all the details of the source with neither of those drawbacks.
2) Soundstage. Instead of just hearing where the instruments are...you can pick out where the high hats, crash rides etc are - they reveal themselves in different spots. Like the drum kit has its own soundstage within the soundstage.
3) Bass. The bass runs in the music really pop and the clarity of the low frequencies to me stand out as the biggest difference I hear.
This is really incredible as my source turntable is not really a hifi piece of gear, and the ADC is really just because it's the only way I have to get something into this DAC stack until I rebuild my streamer stack as I have had shared components. Eventually I'l have a hifi turnable im building and a Phono Pre-Amp with optical out for convenience (as I'm using my DAC as the pre-amp and my main source is FLAC via the streamer).
But now I put the order in for enough FiFoPiQ7 and ShieldPiProMkII to have both stacks with the best quality boards on offer.
I am also going with the just released ReceiverPiProII as there is more functionality for source control with the MonitorPiPro I have which is also a recent release.
@iancanada Thanks for all the support I have received from him with my un-ending questions on how this all goes together.
It really is to my ears the best I've had in my lifetime of audio.
First Impressions
I have just got this working finally on a PiLess DAC Stack recently posted above. My comparison is the the output stage of a Cambridge Audio DACMagic 200M with same amp and speakers and sources. The input source is a Denon 200USB turntable going through an ADC audio converter from turntable Lineout to a RCA S/PIDIF output running into IAN DAC Stack:
- PurePiII
- ReceiverPiPro
- ShieldPiProMkII
- FiFoPiQ7
- MonitorPiPro
- ESS 9038Q2MPi Dual Mono Plus DAC HAT
Then into two Focal Audio 50 professional monitors (powered monitor with XLR inputs).
What stands out
1) Neither too warm and mushy, nor ice-picky harsh, but very in between showing all the details of the source with neither of those drawbacks.
2) Soundstage. Instead of just hearing where the instruments are...you can pick out where the high hats, crash rides etc are - they reveal themselves in different spots. Like the drum kit has its own soundstage within the soundstage.
3) Bass. The bass runs in the music really pop and the clarity of the low frequencies to me stand out as the biggest difference I hear.
This is really incredible as my source turntable is not really a hifi piece of gear, and the ADC is really just because it's the only way I have to get something into this DAC stack until I rebuild my streamer stack as I have had shared components. Eventually I'l have a hifi turnable im building and a Phono Pre-Amp with optical out for convenience (as I'm using my DAC as the pre-amp and my main source is FLAC via the streamer).
But now I put the order in for enough FiFoPiQ7 and ShieldPiProMkII to have both stacks with the best quality boards on offer.
I am also going with the just released ReceiverPiProII as there is more functionality for source control with the MonitorPiPro I have which is also a recent release.
@iancanada Thanks for all the support I have received from him with my un-ending questions on how this all goes together.
It really is to my ears the best I've had in my lifetime of audio.
Hello,
If you search on you tube for testing wire connectors they will show real life connections with a big current running from A to B. They will show where the culprit by monitoring where the hotspots are by showing the temperature rise caused by current being restricted by resistance. Only the connecting area will show temperature rise so i guess there is where we should focus.
I use Kimber tcss which is 19awg for up to 2A so far. There is also a thicker Kimber but it is sturdy as hell and it would nullify all vibrations killing tricks.
For the purepi i decided to solder the 19 awg directly to the circuitboard. There are two spots for that. I expect this to be better than using a thicker cable into the connector. 19 awg fits perfectly for that solder connecting thicker wire would require much more heat during soldering.
I think we should consider longer wire as an aerial. A state of the art supply reduced in quality by using long wires is not good i guess. Thinking by using garden hose cables you can make the cables longer is not good either i think.
Of course Ian should make something like a big motherboard with a number of pci slots where you can plug in the things you need.
Making a stack is a good start.
Greetings,Eduard
Hello,
You see a piece of cake to get a better connection.
Of course you should consider it being comfortable doing it on both sides of the Kimber wire.
The average usb power cable/ connection not being that high grade i decided to do it my way after all there is a considerable current flow.
With 2A current running a conventional supply with caps is drained really quickly. So i guess a typical smps is empty in less than a split second.
So a good idea to use a proper power supply
Attachments
@eduard, I believe his reasoning by adopting a small form-factor SBC, like the RPi is its popularity. Sure, his audience now may be small - relatively speaking - it's ubiquitous enough of a platform, for people to adopt very inexpensively. This is particularly important for new, and future, prospective enthusiasts of the hobby. The RPi, imperfect as it may be for an audio device, Ian has uniquely. and geniously(I don't think that's a proper word) addressed many of those issues with his suite of kit boards. One could argue, the RPi, is merely a smart and programmable digital transport device at its core. And more importantly, until Covid hit, they were within reach $$ for just about anyone.
Ideally, it would be nice to have more of a motherboard platform, but that would require a complete redesign and engineering effort. A costly undertaking that will never happen and would be the end to many hobbyists coming onboard for the journey. The StationPi board provides (for me at least), a perfect solution, for a space-saving, integrated platform. It simply makes his kits a plug-n-play proposition. For the most part. This is an unsolicited comment, but IMO, Ian has singlehandedly brought his craft in an amazing way to this side of the hobby. It has allowed many of us to enjoy building DAC and streamers in a variety of ways, with a variety of his boards and technology he offers. Some pathways are not always inexpensive, but he has challenged himself to create and offer a line of products to match lower budgets.
Just my 2 cents.
Ideally, it would be nice to have more of a motherboard platform, but that would require a complete redesign and engineering effort. A costly undertaking that will never happen and would be the end to many hobbyists coming onboard for the journey. The StationPi board provides (for me at least), a perfect solution, for a space-saving, integrated platform. It simply makes his kits a plug-n-play proposition. For the most part.
This is an unsolicited comment, but IMO, Ian has singlehandedly brought his craft in an amazing way to this side of the hobby. It has allowed many of us to enjoy building DAC and streamers in a variety of ways, with a variety of his boards and technology he offers. Some pathways are not always inexpensive, but he has challenged himself to create and offer a line of products to match lower budgets.Just my 2 cents.
Hi all,
The new MonitorPi Pro can do a lot. Here are some screenshots. I have this running on the PiLess DAC Stack that I recently posted.
Main Screen

Press Up or Down on remote and get Volume control instantly there


First Config Screen

Press Center Botton to mute screen (and I think connect a jumper to also mute music)


Press left or right to select source

Once into a source (volume mode) press centre button twice to get ESS config screens @iancanada - is this saved per source?


There are more screens. This is just scratching the surface.
You can also use the knob on the MPiPro.
The new MonitorPi Pro can do a lot. Here are some screenshots. I have this running on the PiLess DAC Stack that I recently posted.
Main Screen
Press Up or Down on remote and get Volume control instantly there
First Config Screen
Press Center Botton to mute screen (and I think connect a jumper to also mute music)
Press left or right to select source
Once into a source (volume mode) press centre button twice to get ESS config screens @iancanada - is this saved per source?
There are more screens. This is just scratching the surface.
You can also use the knob on the MPiPro.
Attachments
I was able to do this. I definitely heard a discernible difference - I think for the better.Hmmm... you should try True Sync Mode...
I think this means I can't play DSD but I haven't yet got into that format.

Yep. There is another layer of "veil" lifted off the music. I hear it mostly in the vocals I think but it is overall more clarity yet again.
Thanks. I had read about this, but it's all so mind-boggling to me how much flexibility there is in this gear.
I also tried the filters. I'll have to wait and really listen. Not much difference to me, but the true sync mode was definitely change for better.
Thanks. I had read about this, but it's all so mind-boggling to me how much flexibility there is in this gear.
I also tried the filters. I'll have to wait and really listen. Not much difference to me, but the true sync mode was definitely change for better.
Hello,I was able to do this. I definitely heard a discernible difference - I think for the better.
I think this means I can't play DSD but I haven't yet got into that format.
So you should prepare yourself for some more improvement once you reduced the cables running around.
I guess if Purepi circuit is being fed by a low grade supply you could make some improvements there too as stated in the manual.
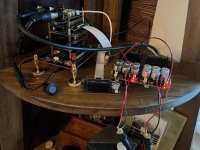
Of course positioning your power supply boards output connectors facing the dac power supply inpunt connectors and keeping them at 2 inches will improve things. It wont cost you a dime which does not happen a lot in this hobby!!
Greetings, eduard
Thanks Eduard. That is planned. I just made them longer so it's easier to move around while testing, although I used 14 AWG instead of 18 AWG thinking that would be better since the cables are long as you say. And yes, right now I'm just feeding it with 2x 12V DC power bricks until I figure out the toroidal system.
Last edited:
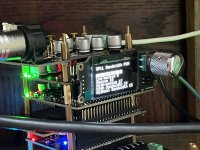
I have wired a switch to the PurePiII and made everything else slave to that switch.
I have put the GPIO extender on to get the screen and switch to test for enclosure.
The only thing i can't figure out is the MUTE function on MonitorPiPro. When I used it on the streamer stack I could mute the player, but here it's just a DAC - how do I setup to just mute the sound - does anyone know. I don't see it in the manual for MPiPro, but I will re-read it again.
Attachments
- Home
- Source & Line
- Digital Line Level
- Asynchronous I2S FIFO project, an ultimate weapon to fight the jitter