I am starting this new thread with the hope fellow forum members will benefit from the work already done, and possibly can help me with the work still ahead.
I too am working on the Ikea Symfonisk hack, mostly because we are already heavily invested into the Sonos system for casual listening.
In my office,I used to have a Sonos Connect:AMP to drive two homebrew bookshelf speakers, but I got curious after reading about the Symfonisk hack. So I bought one, opened it up and hooked it up to the drivers directly and this sounded way more detailed to me. So I bought a second one and from thereon, the project got stuck.
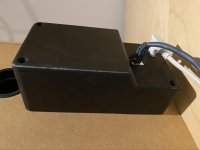
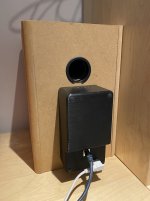
But not before I got a friend to design a 3D printable enclosures to mount the Symfonisk board on the back of the speaker:
(It's a real pity the forum engine ignores the orientation property)
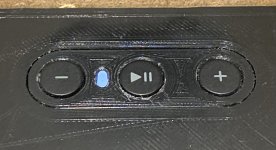
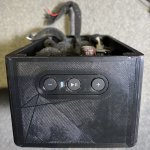
We even added the Sonos signature button panel:
It's got that 3D chique finish, but it's on the back, so nobody sees is. I have to lookup the .STL files and I will post them here later.
As is well known, the Symfonisk is a bi-amp system, driving the tweeter and woofer with separate Class-D amplifiers. The cross-over filter is probably digital, since Sonos offers a feature they call Trueplay, allowing to tune a speaker for the room it is place in. It's sold as a feature, but it's probably a work-around for the bug of using sh*tty drivers in a tiny box.
Now I wonder if this feature can also be used to compensate for a different set of drivers. To do that right, the digital cross-over filter must not only be able to adjust the levels on both sides, but also the cross-over frequency.
And this is where the project is stuck now: I want to measure the cross-over properties, but I lack the experience. I own a Rohde & Schwarz UPL audio analyzer and I have a Sonos Connect I can use to inject the UPL's signal into the Sonos system. There will be delay, so sweeping will not be possible, but it can also use white noise, so that will be the next-best thing.
Is there anybody here who can help me set up this measurement?
I too am working on the Ikea Symfonisk hack, mostly because we are already heavily invested into the Sonos system for casual listening.
In my office,I used to have a Sonos Connect:AMP to drive two homebrew bookshelf speakers, but I got curious after reading about the Symfonisk hack. So I bought one, opened it up and hooked it up to the drivers directly and this sounded way more detailed to me. So I bought a second one and from thereon, the project got stuck.
But not before I got a friend to design a 3D printable enclosures to mount the Symfonisk board on the back of the speaker:
(It's a real pity the forum engine ignores the orientation property)
We even added the Sonos signature button panel:
It's got that 3D chique finish, but it's on the back, so nobody sees is. I have to lookup the .STL files and I will post them here later.
As is well known, the Symfonisk is a bi-amp system, driving the tweeter and woofer with separate Class-D amplifiers. The cross-over filter is probably digital, since Sonos offers a feature they call Trueplay, allowing to tune a speaker for the room it is place in. It's sold as a feature, but it's probably a work-around for the bug of using sh*tty drivers in a tiny box.
Now I wonder if this feature can also be used to compensate for a different set of drivers. To do that right, the digital cross-over filter must not only be able to adjust the levels on both sides, but also the cross-over frequency.
And this is where the project is stuck now: I want to measure the cross-over properties, but I lack the experience. I own a Rohde & Schwarz UPL audio analyzer and I have a Sonos Connect I can use to inject the UPL's signal into the Sonos system. There will be delay, so sweeping will not be possible, but it can also use white noise, so that will be the next-best thing.
Is there anybody here who can help me set up this measurement?
Attachments
Back on topic, the enclosure is now available on Thingiverse:
Symfonisk by MindBender - Thingiverse
Symfonisk by MindBender - Thingiverse
Thank you Allen.
I'm having trouble setting up the UPL. I can work a regular HF spectrum analyzer, but the UPL is a whole different beast, purposely made for audio analysis.
I need it to drive a single-ended (non-balanced) line input, and I need it to listen to two loudspeaker level signals, to draw two boden-plots.
This allows me to compare the cross-over properties of a virgin Symfonisk over a Trueplay-tuned Symfonisk, to see what Trueplay actaully does. If it only does equalisation, replacing the drivers requires me to find drivers matching the cross-over filter. However, if Trueplay also adjusts the cross-over filter, nearly any driver set could be used.
I think this should be an easy test, but I have a hard time setting up the UPL.
No; The influence of the drivers, their enclosure and the room would be too big, and their properties is not what I'm after.Are you planning to use a microphone in this process?
I'm really only after the properties of the equalizer and the cross-over. It was my intention to electronically measure the analog signals driving the drivers. This will also include the influence of the Class-D power amplifier, but I'm good with that.
I can inject the UPL's test signal into the Sonos System using the analog input on my Sonos Connect. That would introduce a small time delay; I don't know if the UPL can configured for that, but if not, I will have to have it generate white noise instead of a sweep. But that's good enough, since I'm not interested in measuring the harmonics and harmonic distortion it generates.
I know the UPL can do this, but unfortunately I'm not familiar enough with this instrument to know how to set it up for this measurement. It's not an instrument I use every day, unfortunately.
Two updated photos to illustrate the project
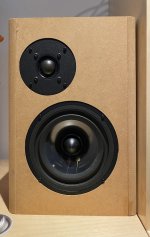
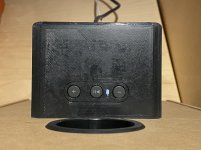
Below two photos illustrating this project. The first photo is of one of the speakers itself. I build it a long time ago, originally intended as rear-speakers for my cinema setup, but they didn't match my DIY Dynaudio Double-17's on the front very well. After being set aside because of that, I hooked them up as office speakers and they were surprisingly impressive on their own. Now they are high-quality Sonos (compatible) speakers.
Yeah, painting is not my strong suit. And I had to clip off a bit of the reflex port for the wall mounts I used in the cinema setup. It's a battle scar.
Attachments
Step-by-step assembly instructions
Step-by-step assembly instructions. Each step matches one of the photos attached.
Step-by-step assembly instructions. Each step matches one of the photos attached.
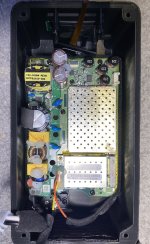
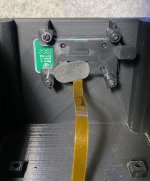
- Mount the Sonos-shaped control panel into the top op the box. It goes in only one way; with the flat flex cable inwards. Leave the flat flex cable attached to the control panel circuit board, as there is no reasonable way of connecting it after the control panel has been mounted.
- Use the same screws and mounting bracket that held it in place in the original Symfonisk enclosure and be sure not to over-tighten them.
- Mount the smaller of the two antennae below the control panel. If you pry it loose from the original Symfonisk enclosure carefully enough, you don't even need to apple new double sided tape. Orientation of the antenna is important!
- Mount the mains socket. Again, use the same screws that held it in place in the original Symfonisk housing. Position the wire lugs downwards and don't remove the acoustic gasket. Again, use the same screws that held it in place in the original Symfonisk housing. It fits in only one way.
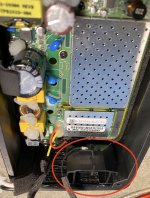
- Mount the heat sink. Again, Again, use the same screws that held it in place in the original Symfonisk housing.
- Mount the circuit board onto the heat sink. You can tuck the cable of the top antenna under it, but make sure it stays on the side of the heat sink, not interfering with the board contact. Four of the six screws fasten the board to the heat sink. Use the same screws that held it in place in the original Symfonisk housing. Tighten the two center screws first. For the two bottom screws, it is better to use two of the similarly sized, yet slightly thicker, blunter screws that came out of the Symfonisk. If you don't know what I mean, use the same pointy screws as the other four.
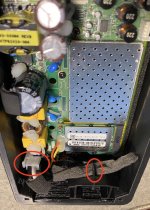
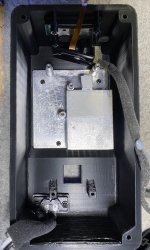
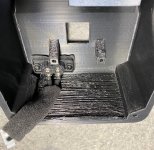
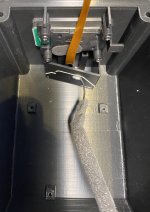
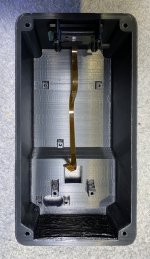
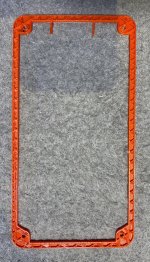
- Mount the larger antenna on the bottom of the enclosure as shown in the red circle. Again, you can reuse the tape still on it. Orientation of the antenna is important!
- Connect the mains connector to the board and tuck the antenna cable of the larger antenna under the hook of the antenna, as shown in the two red circles.
- Fold the flat flex cable for the control panel onto its own tape. Leave a loop at the end and fix it to the RF shield with a little piece of foam tape.
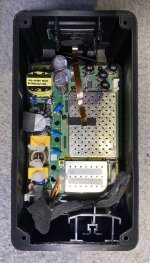
- Ready to be connected to a woofer and tweeter, and to be mounted on the rear of a loudspeaker.
Attachments
-
 11 Ready to mount.JPG273.5 KB · Views: 198
 -
 10 Connect the control panel FFC.JPG358.5 KB · Views: 192
 -
 09 Connect the mains and tuck the antenna cable.JPG337.4 KB · Views: 183
 -
 08 Mount the large antenna.JPG314.1 KB · Views: 218
 -
 07 Mount the circuit board.JPG321.4 KB · Views: 170
 -
 06 Mount the heat sink.JPG341.7 KB · Views: 166
 -
 05 Mount the mains socket.JPG356.1 KB · Views: 193
 -
 04 Mount the small antenna.JPG302.6 KB · Views: 164
 -
 03 Mounted control panel detail.JPG206.8 KB · Views: 252
 -
 02 Mount the control panel.JPG360.8 KB · Views: 315
Mounting tips
Mounting tips:
Mounting tips:
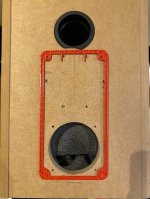
- Print a few layers of the housing with the mount-side on the build plate, as a drilling/fitting template.
- Use this template to fit the best possible location to mount the box and mark the mounting holes.
- Pry off four of the eight rubber-domed feet from the Symofnisk and use them as hole covers for the mounting holes on the back. The mounting holes have purposely made recessions for that.
- Yes, when looking over the speaker, the control panel appears upside-down. That's an after thought, but I'm not going to change is anymore.
Attachments
Nobody?
Hi Zak,
Thanks for posting this. I have been looking into the Symfonisk hack for a while now, and while some of the early documentation of the hack claims that TruePlay will adapt the crossover frequency, a lot of comments indicated that seemed unlikely. I'll try to track it down, but one site ran mics to each of the drivers individually and estimated that the crossover was around 1600hz. I will try to dig up the link.
1600hz is pretty low, and it seems you would need a pretty decent tweeter to cross that low without a lot of distortion - the Dayton RST28f seems like the least expensive one to try. Though maybe a lesser tweeter in a waveguide would work.
Here's the video: IKEA Symfonisk: Crossover frequency and driver impedance measurements for bi-amping Sonos speakers - YouTube
The crossover frequency he estimates is 1600hz, and it looks like its a pretty steep slope, so maybe even a DCF28 would work.

The crossover frequency he estimates is 1600hz, and it looks like its a pretty steep slope, so maybe even a DCF28 would work.
Thanks for looking into this, guys.
When I read it, TruePlay adapting the cross-over sounded unlikely to me too, but I figured I could easily measure this with the R&S UPL that has been unemployed on my desk for years now. But the UPL seems to be a bit of a different beast from what I'm used to work with, so I had to let that idea go.
What I think TruePlay does, is not much more than automatically setting an equalizer. It may be a very advanced DSP-based equalizer, and the cross-over may even reside in the same DSP, but its cross-over frequency is most likely fixed. It makes no sense to change that at run-time, as it achieved nothing that cannot be achieved with the equalizer, if the speakers do not change.
The loudspeakers they're connected to now were once built for DynAudio 17W75LQ midtone woofers and D28 tweeters, but those because increasingly rare, so I settled for Seas T18REX/P-IT (H1013) woofers and Scanspeak D2905 tweeters. I was unable to find Boden-plots for those, so I have no idea how well/poorly they match the 1600Hz cross-over frequency.
But fully assembled they sound fine. It broke my heart having to rip out the Audin-cap based cross-over filters, but I was surprised how much better this Symfonisk setup sounds than when I was driver the same speakers with a Sonos:Amp.
It may be 'wrong' now, but I was over-thinking it. Its a bit of a pity to have all the equipment sitting around to do the job properly, but lacking the experience to use it, but I'm still happy with the end result.
I think he estimates wrongly; The graph uses a logarithmic horizontal scale, not linear. When adding a log scale between the 1kHz and 2kHz line, the yellow line appears to be around 1300Hz.The crossover frequency he estimates is 1600hz, and it looks like its a pretty steep slope, so maybe even a DCF28 would work.
And that's good news for me, because my tweeters are good well down to 1kHz, taking over more high from my woofers (which are T17REX/P-IT, a typo i was unable to correct), of which I do not know their frequency response.
Bringing this thread back from the dead since I also did a bit of digging about this and hoping it helps someone else. A while back i modded some Klipsch rp-600m and added the gen1 ikea symfonisk guts.
You can read about it here.
What I recall is that there is no fixed crossover in the software kernel code (at least none that i could find). The ikea symfonisk uses the same board called "tupelo" as the One/OneSL and other variants (like about 5 or 6 I think).
We know that the symfonisk uses different drivers than the One/OneSL, so its fair to say that during startup, there must be some sort of preset settings for each variant. When sound comes out of the cpu, it uses i2s interface that goes the pcm5102 DAC. This is a stereo dac but instead of LR, it receives a split high/low stream. From there on it goes to the 3116 amp.
The tupelo code from what I recall does not control the dac/amp as other models. This is why you can do the mono hack and not affect the functionality, because the software is just not aware. Unfortunately research stopped since sonos password protected their boot loader and we (I say we because there are others) could not longer snoop around.
One test I was never able to do was compare measurements before/after trueplay. To see if the cross over point moved at all. That would be interesting to find out.
I was curious about that too. Ideally, you would inject a synthetic signal in to the Sonos system, using a Sonos Connect, and measure the sound back electronically, directly on the driver connectors. I know it is important to leave the drivers attached. But I think it is less important to leave the drivers fully installed in the enclosure.One test I was never able to do was compare measurements before/after trueplay. To see if the cross over point moved at all. That would be interesting to find out.
An extra caveat with this measurement is the delay the Sonos system introduces. So when using frequency sweep for the synthetic signal, this needs to be compensated. Most spectrum analyzes with tracking generator have a setting for this. Hopefully the delay in constant. Alternatively, white noise can be used for the synthetic signal. The receiving end will then use FFT to figure out the spectral response. Naturally, this is less accurate, but it will probably do.
One of the measurement instruments capable of this measurement, is theRohde & Schwarz UPL Audio Analyzer. I happen to own one, purchased many years ago for no other reason than that I wanted one. So I’m not really proficient with it. I asked for help configuring the UPL here and in the UPL thread on this forum, but nobody was able to help. So I tore down the test setup I prepared, and put the Symfonisk in the last speaker I had prepared.
If you’re interested in the results, and you know how to configure a UPL for this measurement, I’d be happy to carry it out. Even if I have to purchase a new Symfonisk I no longer need.
I think its worth it to find out if possible. I'm doing more of a software research to see if we can bring the older bricked units backed to life.
I had a few chats with the author of this code. He mas made headway into a custom kernel
https://github.com/trulyspinach/sonos-fenway
I had a few chats with the author of this code. He mas made headway into a custom kernel
https://github.com/trulyspinach/sonos-fenway
I did the same thing and I also installed it into a wall so it would be hidden, but I had to cut some of the wall with a diamond blade. If you need to use a diamond blade then you can go to https://americandiamondblades.com
- Home
- Design & Build
- Construction Tips
- The Ikea Symfonisk speaker conversion project