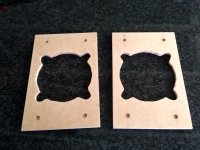
What glue can I use to glue the grille cloth to the grille wood?
The current cloth is peeling away from the wood grille - it's 30+ years old.
I tried some gorilla glue, but didn't seem to stick.
Is this glue ok?
Do I need to sand the existing wood grille to make it stick better?
Do I need clamps to keep the grille cloth pressed against the glue to help it bond?
Thanks
If you can get spray adhesive to the right spot, I'd probably try that first.
Gorilla glue expands, or gets "foamy." It may not be optimal. Python Glue is better in that respect.
Super glue, et al, can soak into the cloth and leave a visible spot.
Maybe rubber cement, letting it dry a little bit first to be tacky but less viscuous?
You shouldn't need to sand, but of course you don't want it dusty or the glue won't hold well.
Any recommendations for a specific brand?
I can search for carpenters glue and python glue.
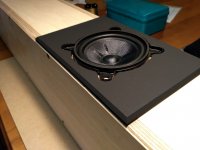
I think I also used some superglue, but did make a visible spot on the cloth (the part that wraps around the wood grille, so not too visible, but i might re-do the whole cloth eventually, as the mounting pins are broken and I may need to drill into the wood grille to put new ones).
I can search for carpenters glue and python glue.
I think I also used some superglue, but did make a visible spot on the cloth (the part that wraps around the wood grille, so not too visible, but i might re-do the whole cloth eventually, as the mounting pins are broken and I may need to drill into the wood grille to put new ones).
Yes and use a small piece of wood to compress the blobs and distribute them. Use a piece of parchment paper between the wood and fabric to prevent them from sticking when the glue bleeds through.Or use hot melt with a glue gun, you will have to be fast with it, sets in less than a minute.
Staples work also but look kind of 'tacky'
")
Nip down to wilco, get some " stick together " contact adhesive ( in a brown toothpaste type tube ) and use that. You can either apply it, stretch the cloth over it and hold it with tape until it dries, or apply it to both surfaces, leave it of 10 minutes to dry and then stretch it over, but once it touches ( when dry ) it grabs.
I tried some gorilla glue, but didn't seem to stick.
Whilst Gorrilla Glue is not suitable you do realise you have to add a certain amount of water to it on the surface(s)
It turns into concrete given the right environment (as above)
Cracked case means rubber solution, Pliobond is one of its brand names?
Honey colored stuff?
It dries out after a few years...[/QUOTE]

No, it's like EVO-STIK 528 ( contact adhesive), but instead of coming in a can that costs about £17, that dries out before you've used half, it comes in a £2 tube so you don't waste any.
Honey colored stuff?
It dries out after a few years...[/QUOTE]
No, it's like EVO-STIK 528 ( contact adhesive), but instead of coming in a can that costs about £17, that dries out before you've used half, it comes in a £2 tube so you don't waste any.
Please post a picture.
Hate to suggest something without first seeing the damage you want to repair, the type and condition of both cloth and surface, and whether the glued area is visible or hidden.
This should have been shown in the first post, otherwise you will receive discording opinions, all in good faith of course.
Even the stapling solution remains viable unless proven otherwise.
I think the Evo Stik Impact adhesive sounds like something that could work well for someone in the UK. It seems different glue brands are not always available everywhere in the world, or the same stuff is named differently in different countries.
I had success with a spray adhesive (used for arts and crafts) on mdf frames. As Galu said – the challenge is to tension the cloth uniformly over the frame before the glue sticks. From my experience and previous attempts - apply as little glue as needed. You don’t want blobs of glue to soak into the cloth and be visible on the other side. When using contact adhesive, it must be touch dry and you can get away by applying the glue only to the frame and not to the cloth. Also spray the frames the same colour as the cloth. I just used a can of matt black spray paint for the mdf frames before glueing the black grill cloth.
My grilles are small. Larger grills might be a bigger challenge.
Attachments
Somebody mentioned getting the cloth tension just so....
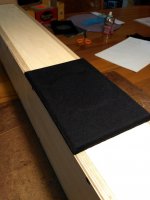
If I was doing it I'd start with just gluing one long edge (with a tiny bit of tension along that long edge as the material will have slight stretchability) and weigh down with a strip of timber and weights to evenly put pressure on that glued edge whilst whatever adhesive you choose goes off.
Then if you've cut oversize on all edges then will have some excess with which to grab with heavy duty binder/bulldog clips (and elastic bands) to set the tension across the 2nd opposite long edge as you glue that. (you cut the excess off after both long edges have gone off)
Then do the two short edges (both together) whilst pulling the appropriate tension. (weigh down those short edges whilst they go off.
Cut the excess again and job done...
It's a lot easier with wooden frames and staples , but you don't have the staple option with plastic frames.
Yes.
You basically described the proper way to stretch silk applied to silkscreening frames, which is a somewhat difficult high precision process, complicated because silk must be stretched very tight, and on finger tapping "must sound like a drum skin" go figure.
I still staple them to wooden frames because I typically run less than 1000 unit batches of PCBs and front panels but in the garment cloth Industry, where they make HUGE frames (cloth width, around 140cm wide by 2 or 3 meter long sections) to stamp floral designs or whatever pattern on cloth, typical runs 50000 to 100000 "printings", they use welded structural tube frames , not exactly staple friendly , and silk is glued on by necessity.
And adhesive must stand solvents used to clean frames between printing jobs, so they tipically use some kind of Epoxy, which has relatively long curing time.
Here they are using a dedicated tension machine which clamps cloth on 4 sides and stretches it tight, then any adhesive works, I guess you might stretch and clamp one cloth edge between 2 pieces of wood, and glue it first (this was suggested above) ;then do the same with the opposite one, then on 2 remaining edges.

First edge is "easy", others get more complicated.
Clamping wood stripes make it possible to bend cloth under tension to sides and back, not just front as shown in the picture.
You basically described the proper way to stretch silk applied to silkscreening frames, which is a somewhat difficult high precision process, complicated because silk must be stretched very tight, and on finger tapping "must sound like a drum skin" go figure.
I still staple them to wooden frames because I typically run less than 1000 unit batches of PCBs and front panels but in the garment cloth Industry, where they make HUGE frames (cloth width, around 140cm wide by 2 or 3 meter long sections) to stamp floral designs or whatever pattern on cloth, typical runs 50000 to 100000 "printings", they use welded structural tube frames , not exactly staple friendly
, and silk is glued on by necessity. And adhesive must stand solvents used to clean frames between printing jobs, so they tipically use some kind of Epoxy, which has relatively long curing time.
Here they are using a dedicated tension machine which clamps cloth on 4 sides and stretches it tight, then any adhesive works, I guess you might stretch and clamp one cloth edge between 2 pieces of wood, and glue it first (this was suggested above) ;then do the same with the opposite one, then on 2 remaining edges.
First edge is "easy", others get more complicated.
Clamping wood stripes make it possible to bend cloth under tension to sides and back, not just front as shown in the picture.
- Home
- Design & Build
- Construction Tips
- What glue for grille cloth to wood grille?