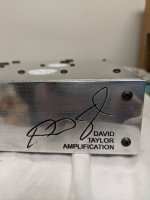
I have been using laser engraving on black anodized aluminum panels with great success for many years. This looks fairly white with good contrast and is much better than inked milled lettering like Front Panel Express panels.
Silkscreening is not a great solution in my view.
I am now trying to find a good solution for anodized panels where the color is not black. In my case, I don't get a good enough contrast with the "bare metal aluminum" laser engraving. I have tried Birchwood Casey Aluminum Black which turns exposed laser engraving black and leaves the anodizing unchanged. This does turn the lettering black but it still could have much better contrast.
I have seen that Front Panel Express offers UV printing. Their panels are only really prototype quality since the have exposed edges.
So I have thought about whether UV printing on a flat bed printer might make sense. These vary considerably in price. I am not inclined to buy an expensive printer but a cheap version or maybe using a service bureau might be an option.
Does anyone have experience down this path?
Al
If the engraving is deep enough, you should be able to fill it with the color of paint of your choice.
Paint, and wipe off the surface. I've seen that looking very good.
PAINT FILL PRODUCTS : Quality One Engraving, Your #1 Source for Engravers and Engraving!
Paint, and wipe off the surface. I've seen that looking very good.
PAINT FILL PRODUCTS : Quality One Engraving, Your #1 Source for Engravers and Engraving!
I've been researching to find a method/machine to produce clean looking lettering at home. I haven't settled on any method or machine but was hoping something around 500 might work. Appears that quality lettering/images one needs to spend a few Thousand or more dollars.
The appearance of ink is very appealing. I like what this guy has done with an Epson printer.
UV Inkjet Prints On Metal: Machine Tag Reproduction - YouTube
The appearance of ink is very appealing. I like what this guy has done with an Epson printer.
UV Inkjet Prints On Metal: Machine Tag Reproduction - YouTube
....clean looking lettering at home. I haven't settled on any method or machine but was hoping something around 500 might work.....
Why own a cow when you can rent one?
"Sign Shops" today have several printers and cutters and a variety of media to work on. I see you are way out in the woods, and so am I; here there's at least 3 sign shops within a few miles (catering to tourist traps) and you may have more?
Attachments
I have explored a little bit further. The inking method that works with milled engraving is likely a bad idea with laser engraved letters. This is because the laser does not typically remove very much material. Milled engraving makes a relatively deep hole for the paint to settle in. You then wipe the excess from the surface.
UV printing may have some challenges if the surface is not very flat. for example after bead blasting.
There is a common method call "pad" printing. This may have promise. I am going to talk to some service providers in this space.
There is also Cerakote. This is often used by gun enthusiasts, but may be useful here.
Al
UV Film Resist with Anodizing
I just tried a “proof of concept” experiment to put fine images and lettering onto aluminum by ‘selectively anodizing’ a small sheet of aluminum. It was a quick and dirty test with plenty of flaws, but the results were VERY promising.
The technique is to use UV-30 film, the same type and method used to make printed circuit boards, except apply it to the aluminum panel. It is readily available on Amazon and Ebay in 12” x 16’ rolls.
Next, prepare a mask using a laser printer – what is black will be anodized, what is clear will be “clear anodized” aluminum. Place this mask over the UV sensitive aluminum panel you want to anodize and expose it to UV light.
After exposure, develop the panel in washing soda, removing the exposed resist. Further expose the panel to UV to fix the resist image to the aluminum panel. Thoroughly clean the panel with a nylon brush and dishwashing soap (Dawn works very well). If properly exposed, developed and fixed the remaining image is surprisingly durable.
Next you use a standard anodizing process on the panel. The hard part is how to maintain a reliable electrical connection to aluminum if you also want the edges anodized. Also, once the panel is thoroughly cleaned, DO NOT touch the panel with bare fingers – wear rubber gloves until the panel is anodized.
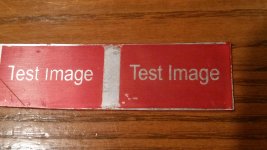
The first image is my proof of concept. The left-hand side was a bit under-exposed, so make your evaluation based on the right-hand side. The aluminum was a piece of scrap, as was the piece of UV film I used (hence the holes). Due to a failed electrical connection, the anodizing time was only about half of what it should have been, which is why the depth of color is not that great. Like I said – quick and dirty with plenty of flaws.
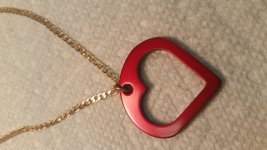
The second image illustrates what the color will look like when properly anodized. I found using a current density of 22A/sq. ft. for 30 minutes (about a 1 mil anodizing depth) gave a good deep red. Many DIY anodizers use Ritt fabric dye, I opted to use an actual anodizing dye.
Check the Resolution
I have briefly looked into a CriCut or Silhouette, and someday I may actually get one to play with. But to address your question - I would look hard at the effective resolution of what you can cut into vinyl. The resolution will be determined by both the software you use with it and the mechanical limitations of the machine itself.
One quick source (Better image sizing in Cricut Design Space 3) I found suggested that the resolution would be equivalent to 72 DPI. If that is the case, then the best resolution would be +/- 0.014" That would mean the finest feature that should be planned on would be about 0.028", +/- 0.014". Certainly not useful for precision work such as a PC Board and I would think borderline for something like a front panel. There is also the labor involved with removing the bits of vinyl you don't want while ensuring you do not disturb the vinyl areas you DO want. One mistake here and you start over with cutting a new piece of vinyl.
That is why some sort of photo lithography method is universally used for precision work. A modern laser printer can achieve resolutions of 600 DPI fairly inexpensively, especially if you go with a B&W monochrome printer. If you print your image onto a sheet of acetate (reversed so that the toner is against the panel you are printing on), you should be able to expect a feature resolution of approximately 0.004" with everything right.
I have certainly seen vinyl cut to much higher precision than 72 dpi.
Here a Roland:
That is a mechanical resolution of 0.000197” -> over 5,000 dpi.
GR Series Large Format Cutter | Roland DGA
dave
Here a Roland:
Mechanical resolution 0.005 mm/step
Software resolution 0.025 mm/step
That is a mechanical resolution of 0.000197” -> over 5,000 dpi.
GR Series Large Format Cutter | Roland DGA
dave
We are talking about a $300 CriCut, not a $6,000 Roland. But even they are playing resolution games.
Mechanical Resolution: 0.005 mm/step
Software Resolution: 0.025 mm/step - add this to the mechanical resolution
Distance Accuracy: 0.1 mm - we will assume this is the greater amount. Longer than 2
mm would yield an even larger error.
Repetition accuracy* 0.1 mm or less
* "Only applicable under certain internal test conditions with the usage of specific
vinyl sheet and cut settings." "Excluding stretching/contraction of the material."
Adding the Mechanical Resolution, Software Resolution and Distance Accuracy errors up and you have a 0.13 mm (0.005") total positioning error. Roland brought up an excellent point that the vinyl sheet itself changes dimensions too.
I'm not saying cutting vinyl sheet doesn't have it's place; it clearly does. For example I have a professional sign maker friend who uses a Roland almost exclusively in his sign business. All I'm saying is that the accuracy you can expect out of a $300 CriCut may not be enough to produce a good DIY front panel and that a laser printer has a better chance of giving you the resolution you need for as little as $99 for a monocrome laser printer.
The youtube videos for Cricut are convincing, But, True Sound, you are making me think a little more.. A friend is thinking of buying Cricut for labelling product containers - should work well for that.
Heavily leaning toward Silkscreen Printing, but will continue looking at other ways before going all out.
Heavily leaning toward Silkscreen Printing, but will continue looking at other ways before going all out.
I know you want to use a laser to engrave but if you have a z axis and can fit a spindle, you can use 60degree v-bits to v-carve deep enough letters to be filled. With passes that are about 2 hundredth of an inch deep, the loads on the spindle are fairly low.
I use a product by Crayola called "Black Crayon" to fill the letters by heating the panel, melting it in, and then wiping off the excess. I've used other colors too. Results look professional.
Here's one example that took less than 30 minutes to generate g-code and produce.

I use a product by Crayola called "Black Crayon" to fill the letters by heating the panel, melting it in, and then wiping off the excess. I've used other colors too. Results look professional.
Here's one example that took less than 30 minutes to generate g-code and produce.

Last edited:
- Home
- Design & Build
- Construction Tips
- UV lettering on Anodized Panels


