I can't see if it's been mentioned, but add a chamfer a bit larger than the thread major diameter to the top of the hole. This helps with starting of tapping and also prevents a mound building up around the thread which can stop the device sitting flat against the heatsink.
A bench drill and good suitable size tap wrench allows for better results. I use methylated spirits as a cutting lubricant as it leaves no residue as it evaporates. Tapped hundreds of M3 and M4 threads in heatsinks and similar, through as well as blind and never had an issue. Just take your time and care.
A bench drill and good suitable size tap wrench allows for better results. I use methylated spirits as a cutting lubricant as it leaves no residue as it evaporates. Tapped hundreds of M3 and M4 threads in heatsinks and similar, through as well as blind and never had an issue. Just take your time and care.

Great tip. It also helps to align/start the screw afterward and minimize the risk of cross-threading. Much better than trying to chamfer the hole after it's been tapped since even a slightly dull countersink bit can mush up the starting thread.I can't see if it's been mentioned, but add a chamfer a bit larger than the thread major diameter to the top of the hole. This helps with starting of tapping and also prevents a mound building up around the thread which can stop the device sitting flat against the heatsink.
Second Nature
+1 For me it is second nature to deburr any hole drilled in metal. I use a small multi-bladed countersink that is clamped in a chuck from a very olde (broken) hand drill. Works like a charm.I can't see if it's been mentioned, but add a chamfer a bit larger than the thread major diameter to the top of the hole. This helps with starting of tapping and also prevents a mound building up around the thread which can stop the device sitting flat against the heatsink.
A bench drill and good suitable size tap wrench allows for better results. I use methylated spirits as a cutting lubricant as it leaves no residue as it evaporates. Tapped hundreds of M3 and M4 threads in heatsinks and similar, through as well as blind and never had an issue. Just take your time and care.
This! Surprisingly, I find using a cordless drill with variable speed, the easiest and fastest. I actually use the motor. Of course, a drill press hand-turned works best, but is not always convenient. Oh, and WD40 works great as lubricant on aluminum.Taps require a very steady and accurate hand control which is difficult to achieve with taps in the range of a few millimeters in diameter. My advice is to use a drill stand and work very slowly by manually rotating the chuck with your hand.
Since WD40 is mostly kerosine it should work as a drill lubricant, even though excessively expensive and smelly. Mineral spirits is about the same price as diesel. Bought at Home Depot in one gallon containers is very close to kerosine and makes an excellent drill lubricant on aluminum.
Approximate correct starting size = 0.8 x final tap size. For low density material you can reduce size further by 10-15%. I end up using 2.12mm for most aluminum in India, except the really poor quality ones where I need to go down to 2.01mm.
I use spare engine oil as lubricant, as my car takes 3.8l so there is 200ml left over every year. I use a 8-10mm drill turned by hand on top of the hole after drilling to countersink. Also I use common sense and feel, if the tap is not turning with finger pressure it has to be slowly turned back out and the hole cleaned.
Finally, for softer materials I use either the #1 or #2 tap, and not the #3. The #3 is mandatory in low thickness material to ensure the screw has a few millimeters of thread. For through taps it is generally not required. You can also get a bottoming tap for such use cases.
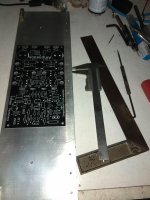
The most critical thing is actually the hole, not the tap. If it is too big your screw will slip and not straight or too small you will find it difficult to tap. Even 2 degrees tilted will be an issue. I don't have a drill press, so I use a 10x10 bar with a pre-drilled straight hole as a drill bit guide.
I use spare engine oil as lubricant, as my car takes 3.8l so there is 200ml left over every year. I use a 8-10mm drill turned by hand on top of the hole after drilling to countersink. Also I use common sense and feel, if the tap is not turning with finger pressure it has to be slowly turned back out and the hole cleaned.
Finally, for softer materials I use either the #1 or #2 tap, and not the #3. The #3 is mandatory in low thickness material to ensure the screw has a few millimeters of thread. For through taps it is generally not required. You can also get a bottoming tap for such use cases.
The most critical thing is actually the hole, not the tap. If it is too big your screw will slip and not straight or too small you will find it difficult to tap. Even 2 degrees tilted will be an issue. I don't have a drill press, so I use a 10x10 bar with a pre-drilled straight hole as a drill bit guide.
That is exactly what I was telling people from the beginning but it seams this concept, using ethyl/methyl alcohol for Al, is very difficult to grasp for general publicBefore entering university I worked at a factory that made electronic lab equipment. Drilling and tapping aluminium meant daily job there. All they used for lubrication was plain (spoiled) ethylic spirit. So I - sucessfully - adopted it.
Best regards!

I am new to the forum, but have tapped a lot of holes in many materials and here are my comments.
There is an exact, correct, tap drill size for each thread size. For the M3.5 thread discussed, the correct drill is 2.90 MM. They are not normally available at Home Depot, but they are available online. Do whatever it takes to get the correct size, especially if tapping aluminum. This is a soft material and being off a very small amount can marginalize the strength of the threads. This drill size is from the Machinery’s Hand Book (a worthwhile purchase if you will be doing a fair amount of metal work). Getting the correct size drill will make a large difference.
A full Tap Drill Chart is available at this link:
https://www.natool.com/wp-content/uploads/2019/06/tapdrillsizes-inmet_web_catp113-116.pdf
This is all easier if you have a drill press. Even a simple cheap one is a big help. With a steady hand and patience a hand drill can be successfully used.
Through holes are easier to tap than blind holes (holes with a bottom).
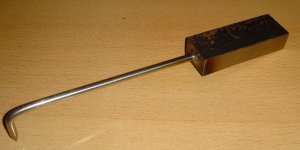
Be sure to have a handle for your tap.
Step one is to drill the hole with the correct drill. Use a drill press if you have it.
Step two is to chamfer the edge of the hole with a chamfer tool. This makes the tap start easier, creates a “lead in” for the final screw thread, and makes for a more professional appearance.
Step three is to lubricate the hole. For hand tapping, I like 3-in-1 oil or 30 weight motor oil (like for your car engine). I find WD-40 doesn’t have enough lubrication properties (it is a solvent, not a lubricant).
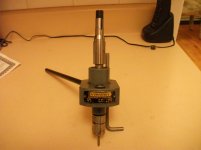
Step four is to tap the hole. If you have a drill press, put a dead center in it (or a nail with the head cut off) so that there is a point centered in the chuck. Place the tap tip in the hole and press the point in the drill press into the back of the tap gently so the the drill press is holding the tap vertically in the hole. Press down gently but firmly on the tap with the drill press and wind the tap in using a tap holder (just buy a tap holder if you don’t have one, they are cheap and so worth it). Once the tap is in a few turns, lubricate the hole again and raised the drill press spout of the way. Continue to wind the tap into the hole as far as needed. You should not have to force it at any point.
Step five is to remove the tap. This is where it is very easy to bugger up your hole. Before removal, clean any curs or metal shaving out of the way. Needle nose piers can be used. Then wind the tap back out.
If you are tapping by hand (without a drill press) do the same process using a very steady hand.
There is an exact, correct, tap drill size for each thread size. For the M3.5 thread discussed, the correct drill is 2.90 MM. They are not normally available at Home Depot, but they are available online. Do whatever it takes to get the correct size, especially if tapping aluminum. This is a soft material and being off a very small amount can marginalize the strength of the threads. This drill size is from the Machinery’s Hand Book (a worthwhile purchase if you will be doing a fair amount of metal work). Getting the correct size drill will make a large difference.
A full Tap Drill Chart is available at this link:
https://www.natool.com/wp-content/uploads/2019/06/tapdrillsizes-inmet_web_catp113-116.pdf
This is all easier if you have a drill press. Even a simple cheap one is a big help. With a steady hand and patience a hand drill can be successfully used.
Through holes are easier to tap than blind holes (holes with a bottom).
Be sure to have a handle for your tap.
Step one is to drill the hole with the correct drill. Use a drill press if you have it.
Step two is to chamfer the edge of the hole with a chamfer tool. This makes the tap start easier, creates a “lead in” for the final screw thread, and makes for a more professional appearance.
Step three is to lubricate the hole. For hand tapping, I like 3-in-1 oil or 30 weight motor oil (like for your car engine). I find WD-40 doesn’t have enough lubrication properties (it is a solvent, not a lubricant).
Step four is to tap the hole. If you have a drill press, put a dead center in it (or a nail with the head cut off) so that there is a point centered in the chuck. Place the tap tip in the hole and press the point in the drill press into the back of the tap gently so the the drill press is holding the tap vertically in the hole. Press down gently but firmly on the tap with the drill press and wind the tap in using a tap holder (just buy a tap holder if you don’t have one, they are cheap and so worth it). Once the tap is in a few turns, lubricate the hole again and raised the drill press spout of the way. Continue to wind the tap into the hole as far as needed. You should not have to force it at any point.
Step five is to remove the tap. This is where it is very easy to bugger up your hole. Before removal, clean any curs or metal shaving out of the way. Needle nose piers can be used. Then wind the tap back out.
If you are tapping by hand (without a drill press) do the same process using a very steady hand.
This is not rocket science! Why don't you try a bit of self help/experimentation and do some trial tapping in some scrap aluminium.
Or just watch a couple of youtube vids.
jeff
Hello,
I retried, and even with all advices, even with the fact that it is not rocket science, even with a drill press and lubrification, I screwed several attempts and broke my final tap in the last one.
Finally what worked for me was:
- drill 2.5mm (the one I had, did not bought the "official" size,
- chanfrain the top on the hole with a larger drill,
- lubricate with WD40
- one pass with the intermediate tap, by hand.
2 holes => 2 OK => Done
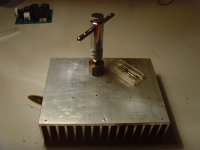
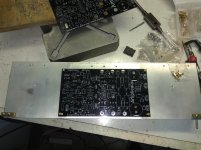
For sure this is not the best way to proceed, but now the heatsink is on the amplifier
Thanks for all explanations and advices.
JMF
I retried, and even with all advices, even with the fact that it is not rocket science, even with a drill press and lubrification, I screwed several attempts and broke my final tap in the last one.
Finally what worked for me was:
- drill 2.5mm (the one I had, did not bought the "official" size,
- chanfrain the top on the hole with a larger drill,
- lubricate with WD40
- one pass with the intermediate tap, by hand.
2 holes => 2 OK => Done
For sure this is not the best way to proceed, but now the heatsink is on the amplifier
Thanks for all explanations and advices.
JMF
- Status
- This old topic is closed. If you want to reopen this topic, contact a moderator using the "Report Post" button.
- Home
- Design & Build
- Construction Tips
- Tap aluminum heatsink